While they might seem similar, mold is typically fuzzy or slimy and can be green or black, while mildew is often powdery and appears gray or white. Regardless of what you call it, this unwelcome guest not only hurts your home’s curb appeal but can also lead to long-term damage to your siding and even pose potential health risks if it finds its way inside.
The good news? In many cases, cleaning mold and mildew from your siding is a very manageable DIY project. You just need the right approach. Think of me as your friendly expert on the other end of the line, ready to walk you through it. Let's get your home looking clean and pristine again.
Step 1: Assess the Situation Safely
Before you mix up any cleaning solutions or grab a brush, the first and most important step is to assess the scope of the problem. This will tell you whether it's a job you can handle or one that's best left to the pros.
Safety First!
Mold can release spores that may cause respiratory irritation, so personal protection is non-negotiable. Before you get close, put on:
- An N95 mask to prevent inhaling spores.
- Waterproof rubber gloves to protect your hands.
- Safety glasses or goggles to shield your eyes.
The 10-Square-Foot Rule
Now, let's figure out how big the issue is. Take a walk around your entire house and look for any discolored areas, dark streaks, or fuzzy patches. The U.S. Environmental Protection Agency (EPA) recommends that if the affected area is larger than 10 square feet (roughly the size of a 3-foot by 3-foot patch), you should call a licensed mold remediation professional.
Why? A large area of mold on your exterior could signal a significant, hidden moisture problem behind the siding. Professionals have the specialized equipment and training to contain the spores and address the root cause without risking further contamination or structural damage.
While you're inspecting, peek at the nearest interior walls and attic spaces. Do you see any matching stains, smell a musty odor, or notice any water damage? If you see any signs of mold inside your home, stop immediately and call a professional. This is no longer just a cosmetic issue.
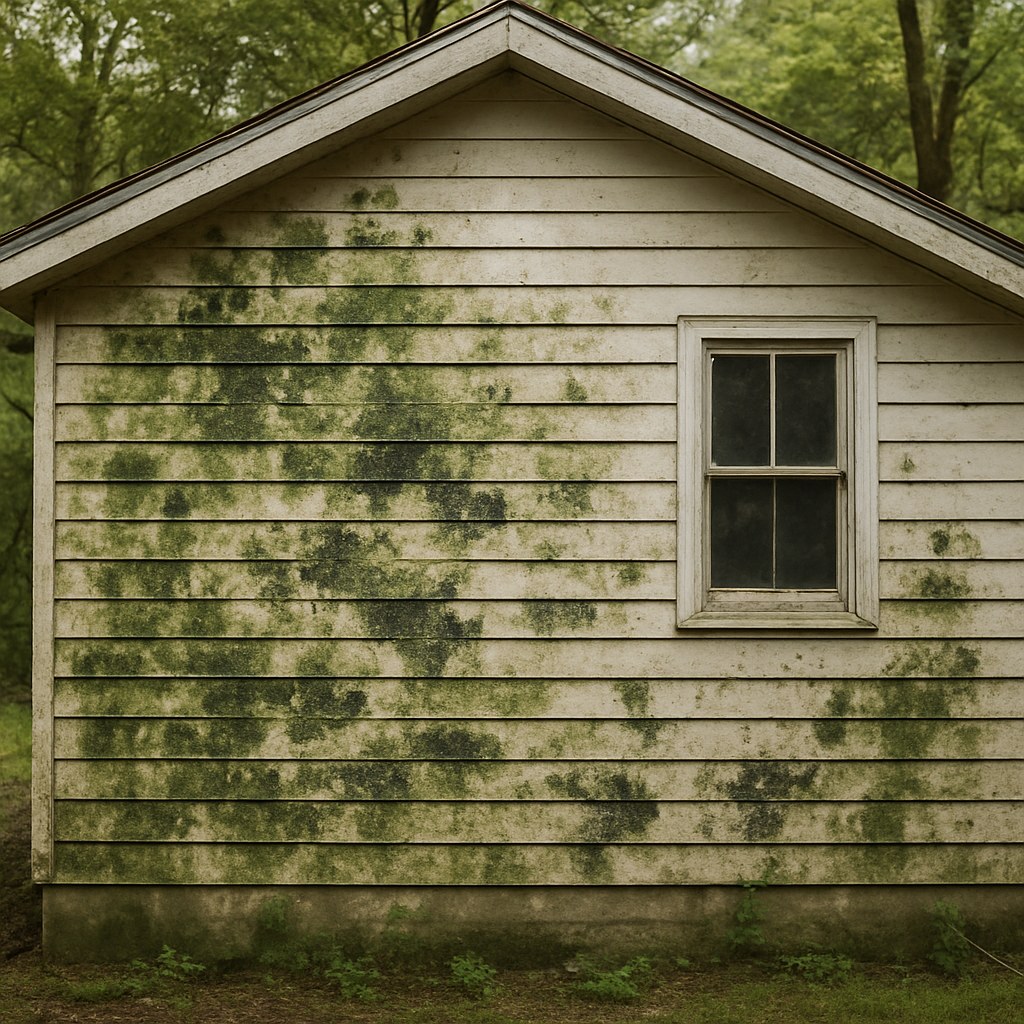
Step 2: Know Your Siding – Porous vs. Non-Porous
If your mold problem is small and contained to the exterior, it's time for the next step: identifying your siding type. This is crucial because the material determines the best cleaning method.
- Non-Porous Siding: This includes materials like vinyl, aluminum, and fiber cement. These surfaces are smooth and don't absorb moisture, making mold a surface-level problem that's easier to clean.
- Porous Siding: This includes materials like wood, brick, and stucco. These materials have tiny holes and can absorb moisture, allowing mold to embed itself deeper. They require a slightly more intensive cleaning process to be effective.
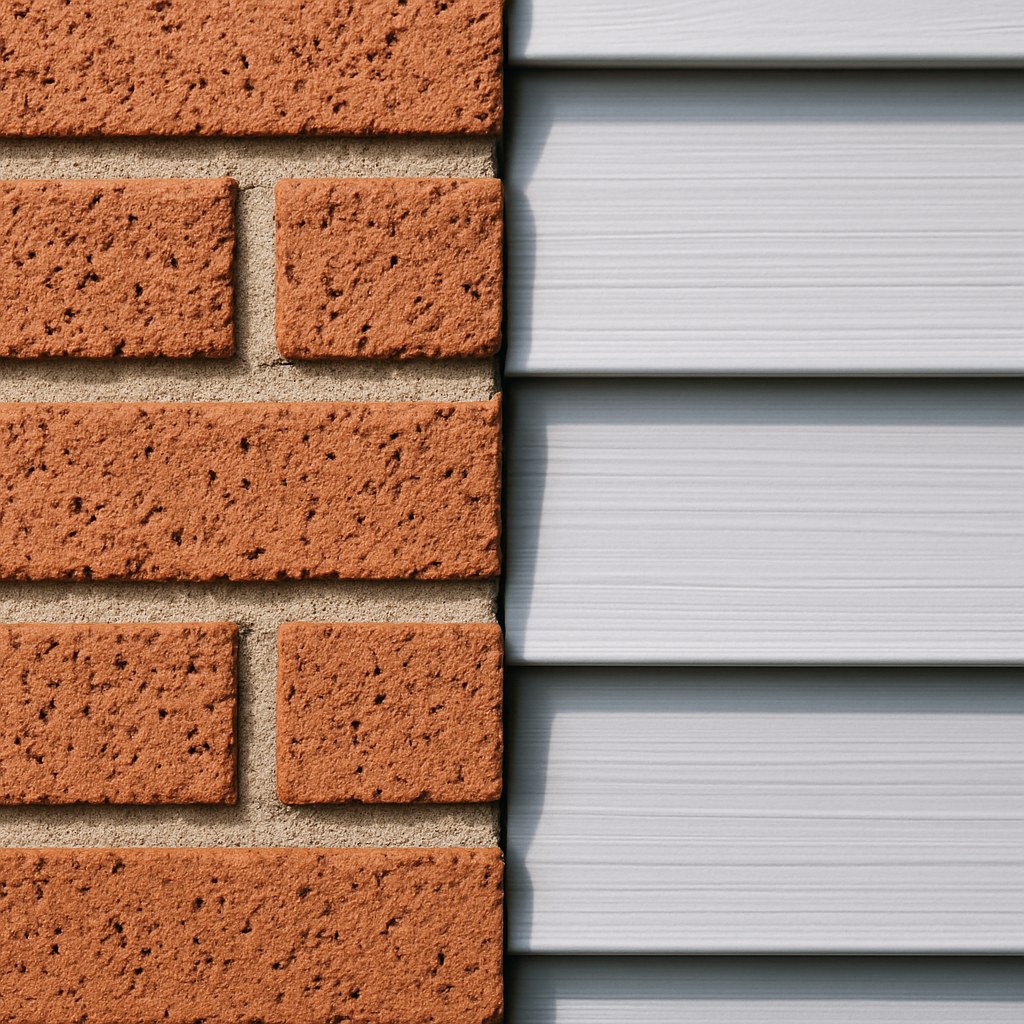
Not sure what you have? Vinyl siding is a very common plastic material with interlocking panels. Wood siding has a natural grain, while brick and stucco have distinctly rough, textured surfaces. Once you’ve identified your siding, you can choose the right cleaning path.
Step 3: How to Clean Mold and Mildew from Siding
Alright, you've done your assessment, you're geared up, and you know your siding type. Let's get to cleaning. We’re going to use an oxygen bleach-based cleaner, as it's effective and less harsh on plants and siding than chlorine bleach.
For Non-Porous Siding (Vinyl, Aluminum)
This is the more straightforward of the two processes. The mold is just sitting on the surface, so our goal is to kill it and wash it away.
What You'll Need:
- Protective gear (N95 mask, gloves, glasses)
- A pump sprayer
- Oxygen bleach powder
- A soft-bristle brush with a long handle
- A garden hose with a spray nozzle
- Plastic sheeting to protect plants
Instructions:
- Prep the Area: Close any nearby windows and doors. Cover delicate plants and shrubs below the work area with plastic sheeting to protect them from the cleaning solution.
- Mix Your Solution: Fill your pump sprayer with one gallon of warm water, then add one cup of oxygen bleach powder. Close the sprayer and shake it gently until the powder is fully dissolved.
- Apply the Cleaner: Lightly spray the solution onto the moldy section of siding. To avoid streaks, start at the bottom and work your way up.
- Let it Dwell: Allow the solution to sit on the surface for about 5-10 minutes. Don't let it dry out—if it starts to, apply a light mist of the solution to keep it wet.
- Scrub Gently: Use your long-handled, soft-bristle brush to gently scrub the area. The mold and stains should lift away easily.
- Rinse Thoroughly: Set your garden hose to a low-pressure setting. Rinse the siding completely, this time working from the top down to wash all the residue away.
- Air-Dry: Let the siding air-dry completely for at least an hour.
For Porous Siding (Wood, Brick, Stucco)
With porous siding, we need to give the cleaner a little more time to penetrate and kill the mold that's taken root within the material.
What You'll Need:
- Protective gear (N95 mask, gloves, glasses)
- A bucket
- Oxygen bleach powder
- A medium-bristle brush
- A garden hose with a spray nozzle
- Plastic sheeting
Instructions:
- Prep the Area: Just like before, lay down plastic sheeting to protect the ground and any nearby plants.
- Mix Your Solution: Fill a bucket with a gallon of warm water and add the amount of oxygen bleach powder recommended on the product's label. Stir with your brush until dissolved.
- Apply and Scrub: Dip your brush into the solution and begin scrubbing the moldy siding. Again, work from the bottom to the top to prevent streaking.
- Let it Penetrate: This step is key. Let the solution sit on the siding for at least 10-15 minutes. This gives the oxygen bleach time to work its way into the pores and kill the mold roots.
- Rinse Carefully: Using a garden hose on a low-pressure setting, rinse the siding thoroughly. It's very important to direct the water downward. Never spray upward, as this can force water behind the siding and create the very moisture problems we’re trying to solve.
- Air-Dry: Allow the wall to dry completely for a few hours.
Step 4: The Final Inspection and Preventing Future Growth
Cleaning the mold off is great, but making sure it doesn't come back is even better. Mold only grows where there's moisture, so the final step is to eliminate its water source.
Inspect for Damage:
Once the siding is completely dry, take a close look at the area you just cleaned.
- Do you see any cracks, warped panels, or loose seams?
- On wood, are there any soft spots or bubbling paint?
These are signs that water may be getting trapped behind your siding. If you find any of these issues, it’s best to call a siding contractor to investigate and make repairs.
Eliminate Moisture Sources:
If the siding looks good, it's time to play detective and find out why the mold grew there in the first place.
- Trim Landscaping: Are shrubs, vines, or tree branches touching the house? Trim them back at least 12 inches to allow for proper airflow.
- Remove Debris: Piles of firewood, mulch, or leaves against the foundation can trap moisture. Move them away from the base of your siding.
- Check Your Gutters: Climb a ladder and check the gutters directly above the moldy spot. Clogged gutters can overflow and send a steady stream of water down your walls.
- Adjust Downspouts: Make sure your downspouts extend at least 3-5 feet away from your foundation.
- Check Sprinklers: Ensure your irrigation system isn't spraying water directly onto your siding.
DIY vs. Hiring a Pro: What Does It Cost?
One of the best parts about this project is how affordable it is to do yourself.
- DIY Cost: You can likely buy all the necessary supplies—oxygen bleach, a brush, and a sprayer—for under $50.
If the job is too big or you'd rather not handle it, you can hire a professional.
- Professional House Washing: A pro power washing company will typically charge between $300 and $700 to wash an entire house, depending on its size and location. Be sure to hire a company that uses a "soft wash" technique, which relies on cleaners rather than dangerously high pressure.
- Professional Mold Remediation: If you have a serious mold problem (>10 sq ft), costs for a certified remediation specialist will be higher, as they are treating a potential health hazard and addressing the underlying cause.

Keep Your Home in Top Shape
You did it! By following these steps, you’ve not only restored your home's appearance but also protected it from potential damage. A little bit of proactive maintenance goes a long way in keeping your home healthy and beautiful.
For more easy-to-follow DIY guides, personalized maintenance reminders, and instant access to vetted home service professionals when you need them, download the Casa app today! We’re here to help you tackle any project, big or small, and make homeownership easier.
Related Reading


