Mold on your patio isn't just an eyesore. It can make surfaces dangerously slippery, degrade materials over time, and even pose potential health risks to you and your family. The good news is that with the right approach and a little bit of elbow grease, you can reclaim your patio and make it a clean, safe, and inviting space once again.
Here at Casa, we believe in empowering you to tackle home maintenance projects with confidence. Consider this your friendly, expert guide to banishing patio mold for good. We’ll walk you through diagnosing the problem, choosing the right cleaning method, and preventing it from coming back.
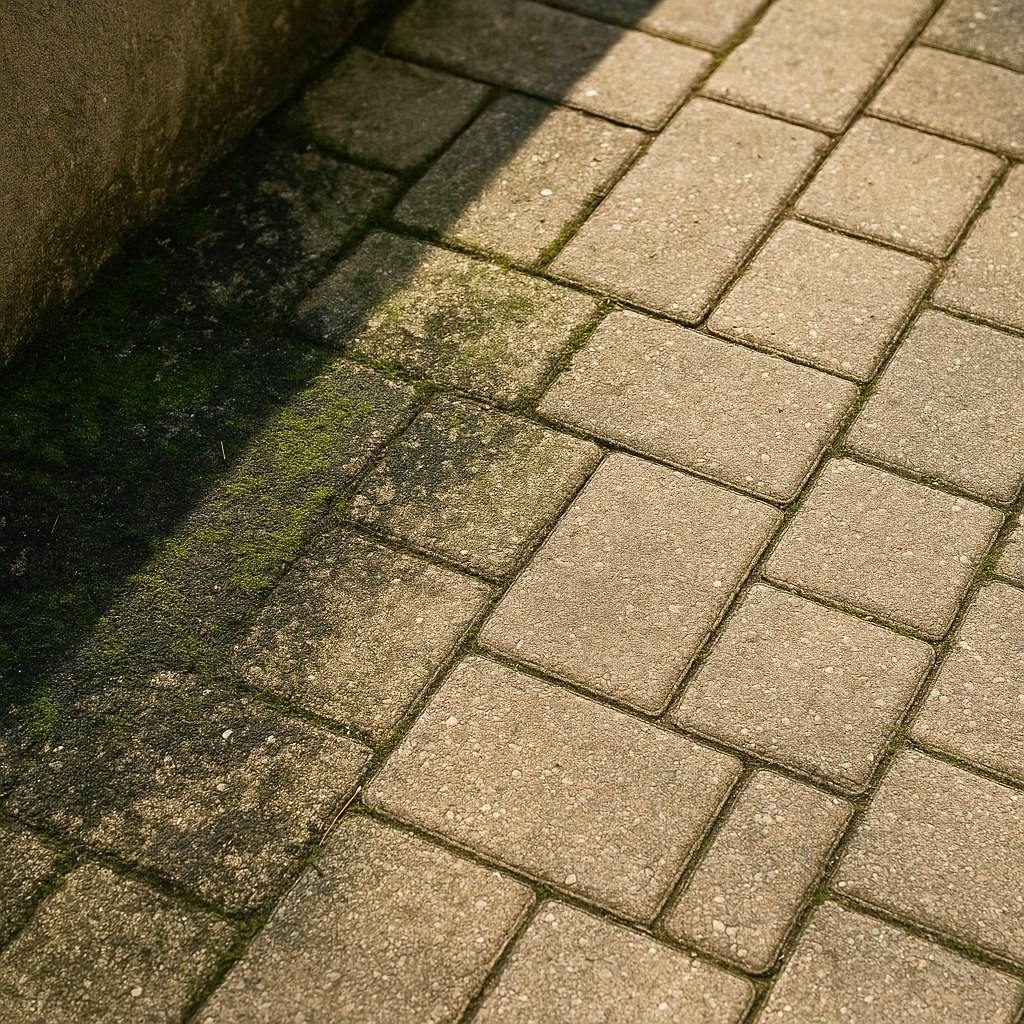
Why Is There Mold on My Patio Anyway?
Before we dive into cleaning, it helps to understand why mold chose your patio as its new home. Mold spores are everywhere in the environment, just waiting for the right conditions to grow. Your patio becomes a perfect breeding ground when a few key ingredients are present:
- Moisture: This is the number one requirement for mold growth. Patios with poor drainage, areas that are frequently damp from rain or sprinklers, or spots under leaky gutters are prime real estate for mold.
- Shade: Areas that don't get much direct sunlight stay damp longer, giving mold the time it needs to flourish.
- Organic Matter: Mold feeds on organic material. This includes fallen leaves, dirt, pollen, grass clippings, and even the residue from food and drink spills.
- Porous Surfaces: Materials like concrete, brick, and natural stone are porous, meaning they have tiny holes that trap moisture and organic debris, creating an ideal environment for mold to take root.
Understanding these causes is the first step, not just in cleaning, but in preventing a future invasion.
Getting Started: Safety and Preparation
Before you mix a single drop of cleaning solution, it's crucial to prepare your workspace and yourself. Mold releases microscopic spores into the air that can irritate your respiratory system, so safety should always be your top priority.
This prep work should only take about 5-10 minutes, but it's the most important part of the job.
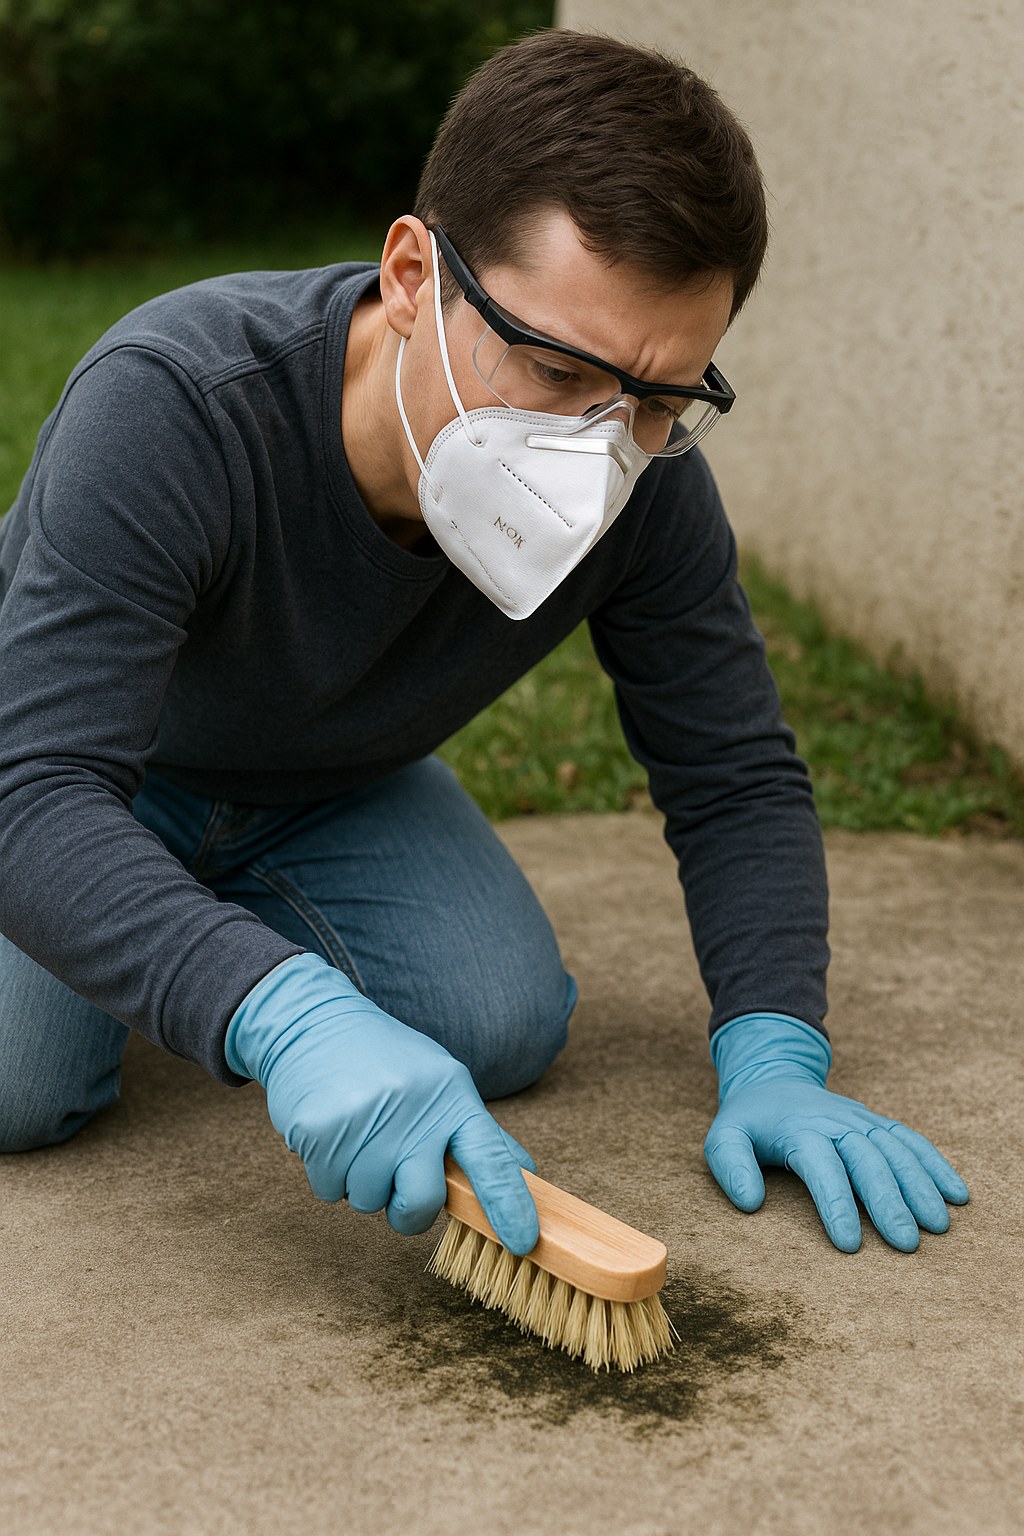
- Gear Up for Safety: Protect yourself from both mold spores and cleaning chemicals. Put on a pair of disposable gloves, safety glasses to shield your eyes from splashes, and a N95 mask or respirator to avoid inhaling airborne spores.
- Clear the Deck: Move all potted plants, furniture, grills, and other items at least ten feet away from the area you plan to clean. This gives you a clear, unobstructed workspace and protects your belongings from the cleaning solution.
- Sweep the Surface: Use a stiff broom to sweep all loose debris—leaves, twigs, dirt—off the patio. You want to clean the mold, not the dirt sitting on top of it.
Choose Your Method: Spot Cleaning vs. Large-Area Treatment
Now it’s time to assess the situation. The best cleaning method depends on the extent of your mold problem. Take a look at the affected area.
Is the mold growth covering less than about ten square feet?
- If YES, you can likely handle this with a targeted spot cleaning approach using a scrub brush and a simple cleaning solution.
- If NO, and the mold covers a significant portion of your patio, a more heavy-duty approach using a pump sprayer and pressure washer will be more effective and efficient.
Let’s break down both methods.
How to Spot Clean Small Patches of Mold
This method is perfect for isolated spots of mold and mildew. It requires a bit of scrubbing but is highly effective for smaller infestations.
What You'll Need:
- Oxygen bleach powder
- A plastic bucket
- A stiff scrub brush (with a long handle to save your back!)
- A garden hose with a spray nozzle
Step-by-Step Instructions:
- Mix Your Solution: In your plastic bucket, mix one cup of oxygen bleach powder with one gallon of warm water. Stir it until the powder is completely dissolved. We recommend oxygen bleach over chlorine bleach because it's less harsh on your patio surface and safer for nearby plants.
- Apply and Scrub: Dip your stiff scrub brush into the solution and apply it liberally onto the moldy area.
- Let It Dwell: Let the solution sit and work its magic on the mold for at least 10 minutes. The key here is to keep the surface wet. If you see it starting to dry, just apply a bit more solution.
- Scrub Away: After letting it sit, start scrubbing the moldy surface in small, firm circles. You should see the dark staining begin to lighten and lift away.
- Rinse Thoroughly: Use your hose to rinse the entire area completely. Be sure to direct the runoff away from sensitive flower beds and keep any pets away from the area until it's dry.
- Inspect Your Work: Wait about 30 minutes for the surface to dry a bit, then inspect it for any remaining mold.
If all the visible mold is gone, congratulations! You’ve successfully cleaned the area. Now, the key is prevention. Keep an eye on the spot after it rains. If you notice water pooling for more than 24 hours, you may have a drainage issue that a contractor can help with.
If stubborn stains remain after scrubbing, it may be best to call a professional landscaper or exterior cleaning service. Repeated, aggressive scrubbing can damage some patio surfaces.
How to Treat Large Areas of Mold
When mold has taken over a large section of your patio, scrubbing by hand is impractical. This method uses a pressure washer for a faster, more powerful clean.
A Word of Caution: Pressure washers are powerful tools that can etch or damage concrete, brick, and stone if used improperly. Always start with the lowest pressure setting and a wider-angle nozzle.
What You'll Need:
- All your safety gear (disposable gloves, N95 respirator, safety glasses)
- Plastic sheeting
- A pump sprayer
- Oxygen bleach powder
- A pressure washer (with a 25-degree tip)
Step-by-Step Instructions:
- Protect Your Plants: The cleaning solution can harm your landscaping. Cover any nearby plants, shrubs, and grass with plastic sheeting.
- Prepare the Cleaning Solution: Fill your pump sprayer with a solution of two cups of oxygen bleach powder per one gallon of water. Seal it and shake well to dissolve the powder.
- Saturate the Patio: Using the pump sprayer, evenly spray the entire mold-covered patio. You want the surface to be fully saturated but not to the point where there are large puddles.
- Let It Dwell: Wait at least 15 minutes to let the solution penetrate and kill the mold. Just like with spot cleaning, keep the surface wet by misting on more solution if it starts to dry out.
- Pressure Wash: Attach a 25-degree (green) tip to your pressure washer. Set the pressure to around 1,500 PSI—this is generally safe for most patio materials but check your washer's manual. Start washing from one edge of the patio and work your way across in smooth, overlapping sweeps. Keep the nozzle about 12 inches away from the surface at all times to prevent damage.
- Rinse and Finish: Once you've washed the entire area, switch to a lower pressure or use a hose to rinse everything thoroughly with clean water.
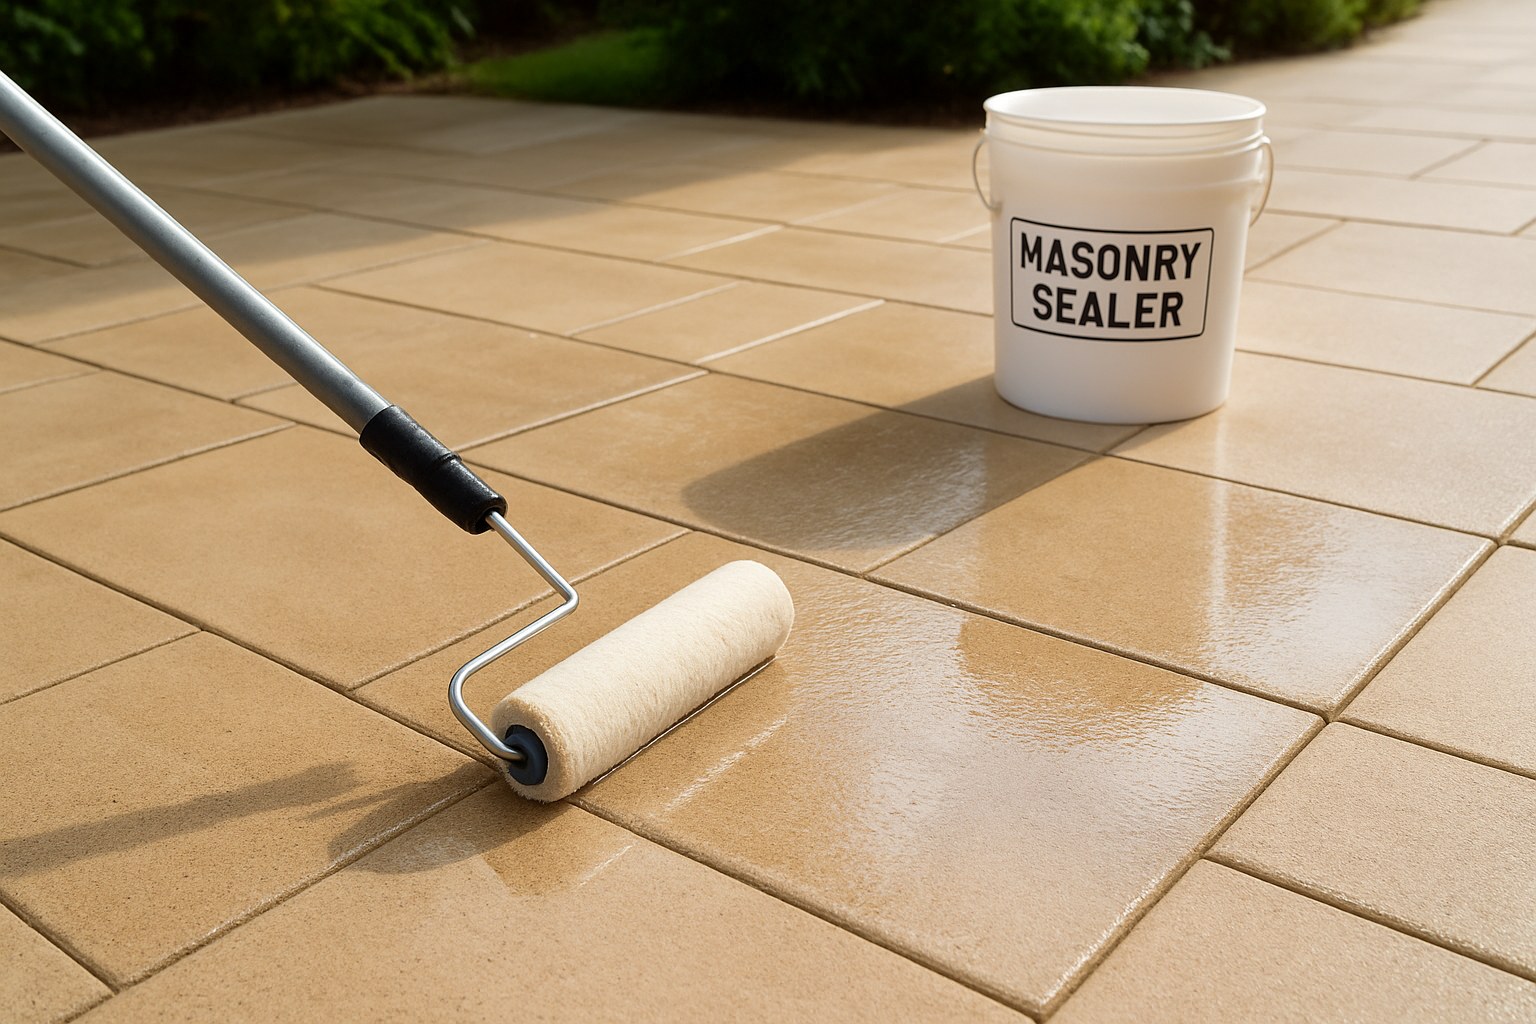
After the patio is completely dry, inspect your work. If the surface is clean and undamaged, you’re done! To go the extra mile, consider applying a quality masonry sealer. This will help prevent water from penetrating the surface and make it harder for mold to grow back.
If you’re not satisfied with the results or are worried you might have damaged the surface, it's wise to call a professional landscaper. They have the experience and equipment to finish the job safely.
How to Keep Patio Mold from Coming Back
You’ve worked hard to get your patio clean—let's keep it that way. Prevention is all about eliminating the conditions that mold loves.
- Promote Drainage: Ensure water flows away from your patio, not onto it. Adjust sprinkler heads and make sure downspouts extend several feet away from the patio foundation.
- Increase Sunlight: Trim back overhanging tree branches and overgrown shrubs to allow more sunlight and airflow to reach the patio surface, helping it dry faster.
- Keep It Clean: Regularly sweep your patio with a stiff broom to remove leaves, dirt, and other organic debris that mold feeds on.
- Apply a Sealer: For porous surfaces like concrete, brick, or unsealed stone, applying a water-repellent sealer every few years can dramatically reduce moisture absorption.
Your Partner in Home Maintenance
Cleaning mold from a patio is a satisfying DIY project that can completely transform your outdoor space. By following these steps and prioritizing safety, you can confidently tackle the job and enjoy a beautiful, mold-free patio.
But we know that home maintenance doesn't stop here. From leaky faucets to clogged gutters, there’s always something new to manage. That's where Casa comes in.
Download the Casa app today for more expert guides, personalized maintenance reminders, and a simple way to connect with vetted, local professionals for the jobs you'd rather not handle yourself. Let Casa be your trusted partner in keeping your home in perfect shape.


