Take a deep breath. While a damp wall is certainly something you need to address promptly, the fix is often more manageable than you think. The key is a methodical approach: find the source of the moisture, assess the extent of the damage, and then make the repair.
In this guide, we'll walk you through the entire process, just like we would over the phone. We'll help you play detective to find the culprit, determine if it's a small DIY patch job or something bigger, and give you the steps to get your wall looking pristine again.
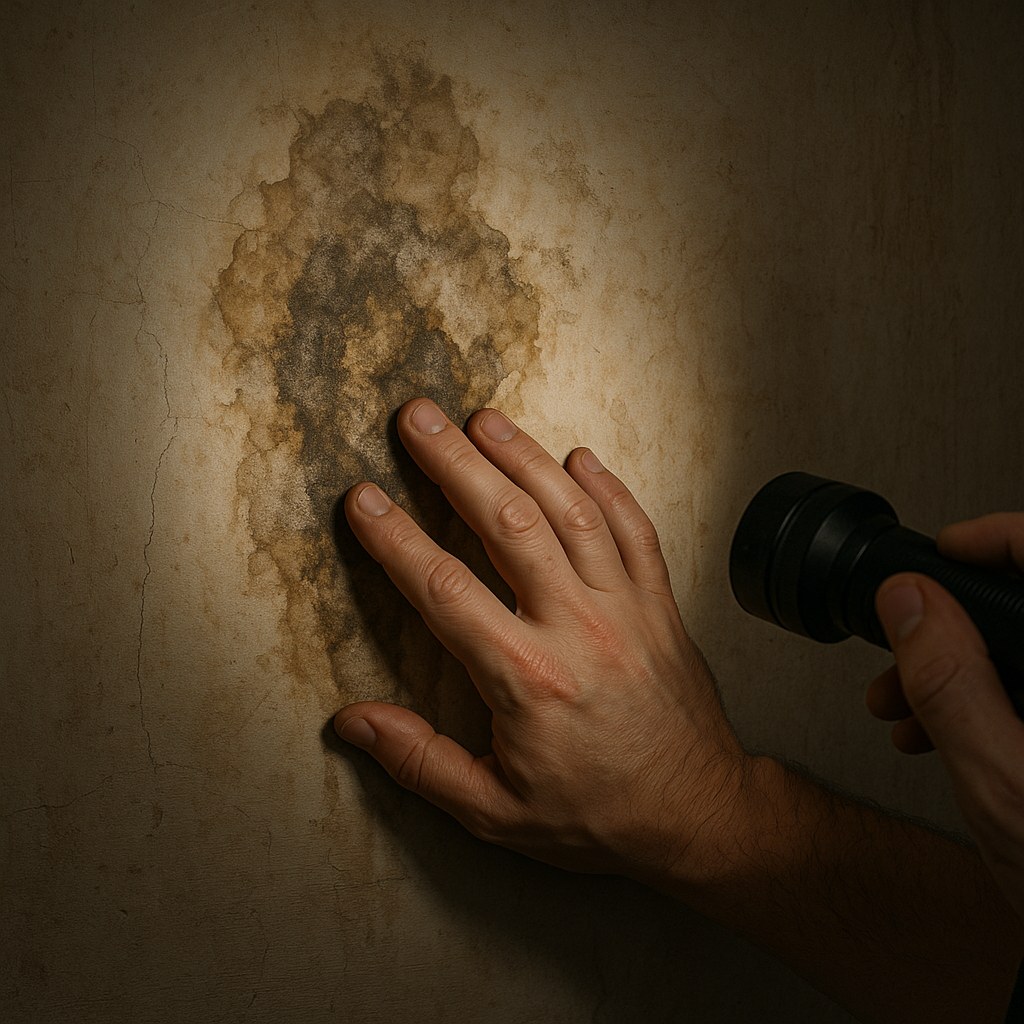
Step 1: Inspect the Area and Assess the Damage
Before you can fix the problem, you need to understand its scope. Put on your investigator hat and let’s gather some clues.
- Confirm Dampness: Gently touch the discolored area with the back of your hand. Is it actively damp, cool to the touch, or does it feel soft and spongy?
- Examine the Stain: Use a flashlight to get a good look. Is it a yellowish or brownish ring? Dark spots that could indicate mold? Note the edges of the stain—crisp, well-defined edges often suggest a recent or active leak, while blurry, faded edges can point to an older, slower leak that has dried and reoccurred over time.
- Use Your Nose: Get close to the wall and take a sniff. A distinct musty or earthy odor is a strong indicator of mold and mildew, even if you can’t see it clearly.
- Determine the Size: This is a crucial step. Is the affected area a small, localized spot—say, smaller than a standard sheet of printer paper? Or is the dampness widespread, affecting a large section of the wall or even multiple walls? The size will dictate your entire approach.
Step 2: Find the Source of the Moisture
Patching the drywall is useless if you don't stop the water that caused the damage in the first place. The damp spot is a symptom; the leak is the disease. Here are the most common culprits.
Plumbing Leaks
This is often the first suspect, especially if the damp spot is in a bathroom, kitchen, or laundry room.
- Look Up: Is the stain directly below an upstairs bathroom or plumbing fixture? Check the pipes for sinks, toilets, and tubs above.
- Check Connections: Examine the water supply lines and drain pipes for any visible drips, corrosion, or condensation. A simple way to check for a slow leak is to dry a pipe connection thoroughly and wrap a single layer of toilet paper around it. If the paper gets wet, you’ve found your source.
Roof and Gutter Leaks
If the damp spot is on a ceiling or the top of an upper-floor wall, the problem is likely coming from above.
- Inspect the Attic: Carefully head into your attic with a flashlight. Look at the underside of the roof sheathing directly above where the stain is. Do you see dark, wet spots, or active drips?
- Check the Roof: From the ground or safely on a ladder, look for missing shingles, damaged flashing around chimneys or vents, or cracked sealant. These are all common entry points for water.
Window and Door Leaks
Damp spots under or around windows and doors are often caused by failed sealing.
- Inspect the Caulk: Check the exterior caulk around the window or door frame. Is it cracked, peeling, or missing in sections? Over time, caulk degrades, allowing wind-driven rain to seep into the wall cavity.
- The Hose Test: Have a helper stand inside while you run a gentle stream of water from a hose around the outside of the window frame. If they see water seeping in, you’ve confirmed the source.
High Indoor Humidity
Sometimes, the water doesn't come from outside—it comes from the air inside your home.
- Look for Condensation: Widespread dampness, especially on exterior walls or in poorly ventilated areas like basements and bathrooms, can be caused by condensation. If the indoor air is too humid, moisture will condense on cooler wall surfaces. Using a dehumidifier can often solve this.
Step 3: How to Fix a Small, Localized Damp Spot
If your problem area is smaller than a sheet of paper, you're likely in DIY territory. The process depends on whether mold is present and if the drywall itself is still structurally sound.
Safety First: Dealing with Potential Mold
Even for a small spot, if you suspect mold, take precautions.
- Protect Yourself: Wear disposable gloves, safety glasses, and an N-95 respirator.
- Ventilate: Open a window and place a box fan pointing out the window to pull airborne spores out of the room.
- Contain the Area: Close the door to the room to prevent spores from traveling through your home.
Case A: No Mold, Drywall is Firm
If the wall is just stained but firm, the repair is straightforward.
- Dry the Wall: Use a hair dryer on a low heat setting or a fan aimed at the spot to ensure the drywall is completely dry.
- Sand and Clean: Lightly sand the stained area to scuff up the surface, then wipe away the dust with a cloth.
- Prime with Stain-Blocker: This is the most important step. Apply a coat of high-quality, stain-blocking primer (shellac-based or oil-based primers are best for water stains). Regular paint will not cover the stain; it will just bleed right through. Let it dry completely.
- Paint: Once the primer is dry, paint the area to match the rest of your wall. It may take two coats.
Case B: Surface Mold is Present, Drywall is Firm
If you see mold but the wall feels solid, you need to clean it before you repair it.
- Clean the Mold: Mix a solution of one part household bleach to ten parts water. Using a sponge, gently scrub the moldy surface. Don't oversaturate the wall.
- Dry Completely: Allow the area to air-dry thoroughly.
- Prime and Paint: Follow the same steps as above, using a stain-blocking primer to seal any lingering discoloration before painting.
Case C: Mold is Present and Drywall is Soft
If the drywall is soft, spongy, or crumbles when you press it, the structural integrity is compromised and the damaged section must be removed.
- Cut It Out: Use a utility knife or drywall saw to cut a clean square or rectangle around the damaged area. Extend your cut about an inch into the clean, dry, firm drywall on all sides.
- Inspect the Cavity: Remove the damaged piece. Look inside the wall cavity for any wet insulation (which should also be removed) or signs of a larger mold problem.
- Dry the Interior: Use a fan or hair dryer to completely dry the inside of the wall cavity.
- Install a Patch: Cut a new piece of drywall to fit the opening. Secure it to the surrounding studs or use a drywall patch kit.
- Finish the Seams: Apply drywall joint compound (mud) over the seams using a putty knife. Embed paper or mesh drywall tape into the first layer, then apply a thin second coat over the tape.
- Sand, Prime, and Paint: Once the compound is dry, sand it smooth. Then, prime the entire patch with stain-blocking primer and paint to match.

When to Call a Professional
While many damp wall issues are fixable, some situations are best left to the pros. According to Forbes Home, professional water damage restoration can cost anywhere from $1,300 to $6,000, so a DIY fix can save you a lot. However, you should call for help if:
- The Damage is Widespread: If the damp area is larger than a few square feet or on multiple walls, it could indicate a significant, ongoing leak.
- You Suspect Extensive Mold: The EPA recommends professional remediation for mold problems larger than 10 square feet. A professional will have the proper equipment for safe removal and containment.
- You Can't Find the Leak: If you've tried everything and still can't pinpoint the source of the water, a plumber or roofing contractor can use specialized tools to find it.
- The Repair Involves Major Plumbing or Roofing Work: Don’t risk causing more damage. If the fix requires replacing pipes or significant roof repairs, it’s time to call in an expert.
Take Control of Your Home Maintenance
Discovering a damp, discolored wall can be stressful, but by following these steps, you can confidently diagnose the issue and, in many cases, fix it yourself. The key is to act quickly, find and stop the source of the water, and choose the right repair method for the damage you find.
For more expert-led home maintenance tips and step-by-step repair guides, download the Casa app today. Casa makes DIY projects simple and provides a direct line to vetted, trusted professionals for those jobs that need an expert touch. Take the guesswork out of homeownership and tackle any project with confidence.


