The great news is that you don't have to live with it. In most cases, fixing a drawer that falls off its tracks is a straightforward DIY project that you can tackle in under an hour. You don't need to be a master carpenter—just a little bit of patience and the right guidance.
Here at Casa, we believe in empowering you to handle these common home repairs yourself. Think of us as your friendly expert on the line, ready to walk you through the process. In this guide, we'll help you diagnose why your drawer is malfunctioning, identify the type of drawer slides you have, and provide step-by-step instructions to adjust, tighten, or replace them. Let's get that drawer gliding smoothly again!
Why Do Drawers Fall Off Their Tracks?
Before we grab our tools, it helps to understand what’s causing the problem. A drawer slide mechanism is a simple but effective piece of engineering, but a few things can go wrong over time.
- Loose Hardware: This is the most common culprit. The screws holding the slides to the drawer box and the cabinet can loosen with repeated opening and closing, causing misalignment and wobbling.
- Bent or Damaged Slides: A heavy load, a forceful slam, or simple wear and tear can bend the metal rails. Once bent, they can no longer guide the drawer properly.
- Worn-Out Rollers: Many slides use small plastic or nylon wheels to glide. These rollers can crack, break, or get gummed up with debris, preventing smooth operation.
- Dirt and Debris: Dust, grime, and small particles can build up in the slide mechanism over the years, creating friction and causing the drawer to stick or jump off the track.
Identifying the root cause is the first step to a lasting fix.
Before You Begin: Gather Your Tools
Getting everything you need in one place before you start will make the job much quicker and easier. You won't need a massive toolbox for this one.
- Phillips Screwdriver: The most essential tool for this job.
- Work Gloves: Good for protecting your hands from sharp metal edges or pinch points.
- Clean Rags or a Paintbrush: For cleaning out debris from the slide tracks.
- Silicone Lubricant Spray: This helps ensure the slides move smoothly without attracting dust. Avoid oil-based lubricants like WD-40, which can gum up over time.
- A Small Level: Crucial for ensuring your slides are perfectly aligned.
- Replacement Drawer Slides (if needed): If you determine your slides are damaged beyond repair.
Step-by-Step Guide to Fixing Your Drawer
Let’s dive into the fix. We'll start by figuring out what kind of hardware you're working with.
Step 1: Identify Your Drawer Slide Type
Not all drawer slides are created equal. The two most common types are side-mounted and bottom-mounted (often called undermount). Your repair approach will depend on which type you have.
- Pull the drawer all the way open, keeping it as level as you can.
- Look at the outer sides of the drawer box. If you see metal tracks attached to both the drawer and the inside of the cabinet, you have side-mounted slides. These are very common in kitchens, bathrooms, and office furniture.
- If you don't see any hardware on the sides, look underneath the drawer box. If the slides are hidden beneath it, you have bottom-mounted or undermount slides. These are often found in higher-end cabinetry for a cleaner look.
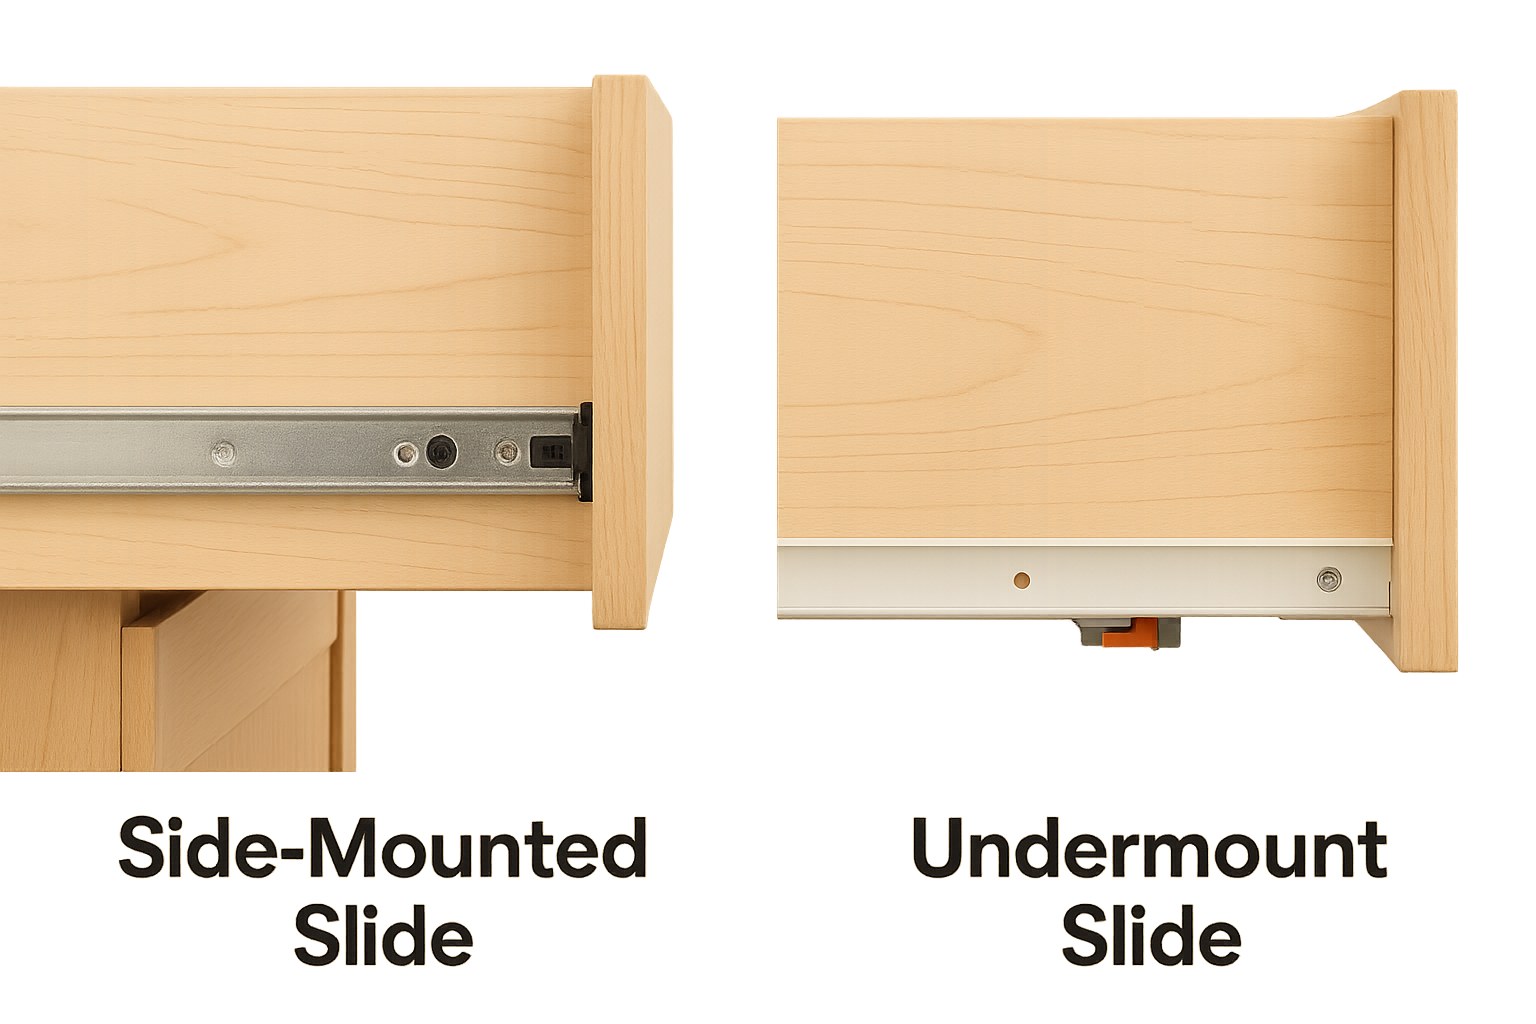
Once you've identified your slide type, you can jump to the correct section below.
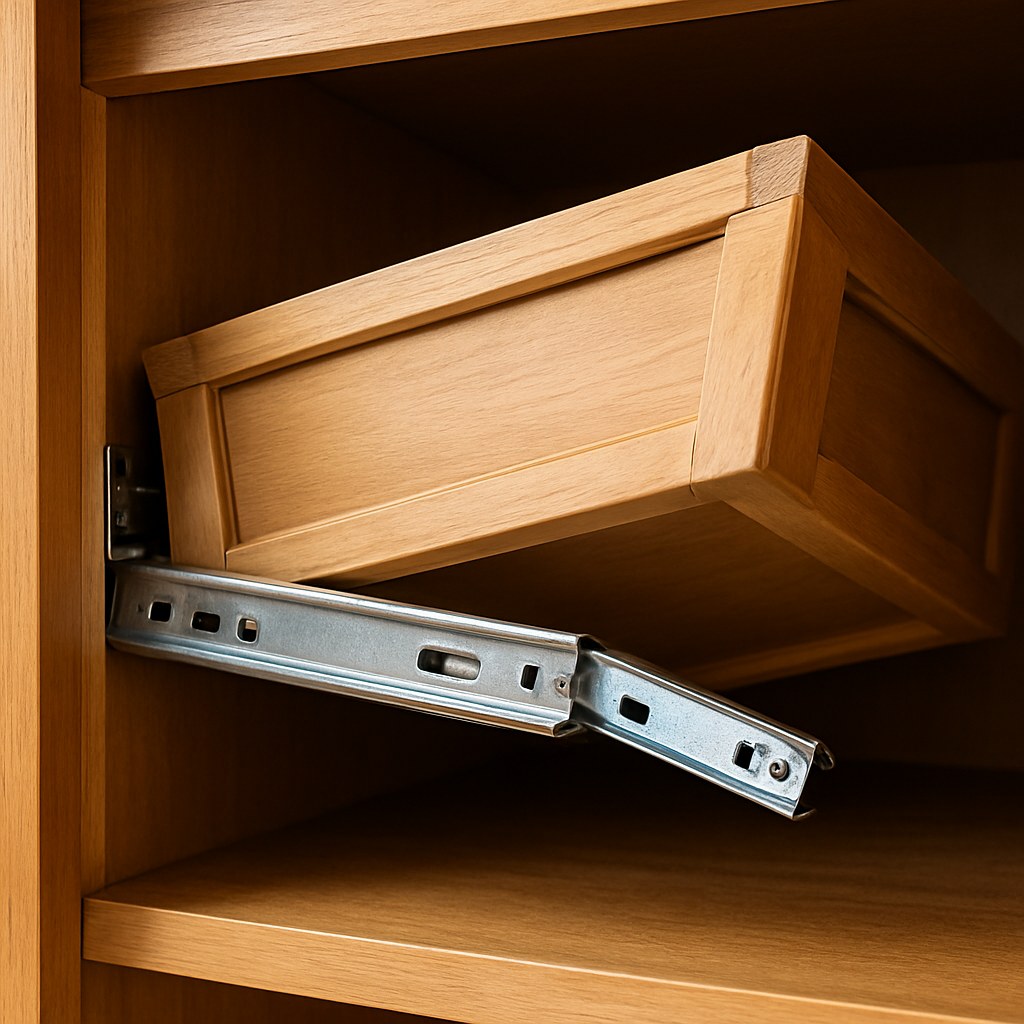
Fixing Side-Mounted Drawer Slides
Side-mounted slides are generally the easiest to inspect and repair.
Inspection
First, let's get a good look at the hardware.
- Remove the drawer completely. To do this, you might need to lift the front of the drawer slightly as you pull it out. Some slides have a small lever or tab you need to press to release the drawer.
- Set the drawer on a flat surface.
- Examine the slides attached to the drawer and those still inside the cabinet. Look closely for any obvious damage: bent metal, cracked plastic rollers, or missing pieces.
- Check all the mounting screws. Are any of them loose or missing? Jiggle the slides with your hand to see if they feel secure.
If you don't see any damage and the screws are just loose, you're in luck! A simple adjustment should do the trick. If you see bent metal or broken parts, you'll need to replace the slides.
Guide: How to Adjust and Tighten Side-Mounted Slides
- Time: 15-20 minutes
- Difficulty: Easy
- Tighten All Screws: Using your Phillips screwdriver, go through and tighten every screw on both the cabinet and drawer slides. Don't overtighten, but make sure they are snug.
- Level the Rails: Place your small level on one of the slide rails inside the cabinet. If it isn't perfectly level, loosen the front screw slightly, adjust the rail's height until the bubble is centered, and then retighten the screw. Repeat this for the other rail, ensuring both are at the exact same height. This is critical for smooth operation.
- Clean the Tracks: Use a clean paintbrush or a rag to clear out any dust, hair, or debris from the inside of all four slide parts.
- Lubricate: Apply a thin coat of silicone lubricant spray to the tracks. This reduces friction and prevents sticking.
- Re-install the Drawer: Carefully slide the drawer back into the cabinet, ensuring the rollers on the drawer engage correctly with the tracks in the cabinet. Open and close it a few times to test your work. It should glide smoothly and stay on track.
Guide: How to Replace Damaged Side-Mounted Slides
- Time: 25-30 minutes
- Difficulty: Moderate
If your slides are bent or broken, a replacement is necessary. Pro Tip: Take one of the old slides with you to the hardware store to ensure you buy a replacement of the same length and style.
- Remove the Old Slides: With the drawer already removed, use your screwdriver to remove all the mounting screws holding the old slide rails to the drawer box and the cabinet walls.
- Install the New Cabinet Rails: Position one of the new rails on the cabinet side. Make sure its front edge is flush with the cabinet's front face and that it's perfectly level. Secure it with the provided mounting screws. Repeat for the other side.
- Install the New Drawer Rails: Attach the matching rails to the drawer box, again making sure they are flush with the drawer's front face and parallel with the bottom of the drawer.
- Re-install the Drawer: Slide the drawer back into the newly installed tracks. Test it by opening and closing it several times.
Fixing Bottom-Mounted (Undermount) Drawer Slides
Undermount slides are a bit trickier to see, but the repair process is very similar.
Inspection
- Remove the drawer. Most undermount slides have release clips or levers underneath the drawer box near the front. You'll likely need to squeeze or push these simultaneously while pulling the drawer forward and up.
- Examine the hardware. Look for bent brackets, broken plastic clips, or damaged rollers. Check that all mounting screws are tight.
Guide: How to Adjust and Tighten Undermount Slides
- Time: 15-20 minutes
- Difficulty: Easy
- Tighten All Screws: Secure any loose screws on the rails inside the cabinet and those attached to the bottom of the drawer.
- Check Alignment: Ensure the front edge of the cabinet rails are flush with the front of the cabinet frame. If not, loosen the screws, adjust the position, and retighten.
- Clean and Lubricate: Brush out any debris and apply a thin coat of silicone lubricant to the moving parts.
- Re-install the Drawer: Align the drawer with the cabinet slides and push it back until you hear the release clips "click" into place.
Guide: How to Replace Damaged Undermount Slides
- Time: 30-35 minutes
- Difficulty: Moderate
- Remove the Old Hardware: Unscrew and remove the damaged rails from both the cabinet and the underside of the drawer.
- Install the New Cabinet Rails: Position the new rails on the cabinet bottom, flush with the front face, and secure them with screws.
- Install the New Drawer Rails: Attach the matching hardware to the underside of the drawer, making sure it is perfectly centered and parallel.
- Re-install the Drawer: Slide the drawer back in and listen for the click of the locking mechanism. Test its movement to ensure a smooth glide.
Cost to Fix vs. Hiring a Pro
One of the best parts about this fix is the savings.
- DIY Cost: If you only need to tighten and lubricate, the cost is practically zero. If you need to replace the slides, a new set typically costs between $15 and $50, depending on the quality and features like soft-close.
- Professional Cost: Hiring a handyman for this job is also an option. According to Angi, you can expect to pay anywhere from $75 to $250 for a handyman to fix a drawer, depending on labor rates in your area and the complexity of the job.

Your Go-To Partner for Home Maintenance
Fixing a faulty drawer is a satisfying project that restores a small but important part of your home's function. By following these steps, you can solve the problem yourself and save money in the process.
Feeling empowered? There are dozens of other common home repairs you can tackle just as easily with the right guidance. For more step-by-step tutorials, expert advice, and a direct line to trusted professionals when you need them, download the Casa app today! Casa is designed to be your all-in-one partner for maintaining and improving your home, making DIY simple and stress-free.


