Whether you have an electric or a gas model, the problem usually boils down to one of a few key areas: power supply, airflow, or a faulty heating component. It might seem intimidating, but with a little guidance, you can play detective and get your dryer working again.
In this comprehensive guide, we'll walk you through the process step-by-step, just like we're on the phone with you. We'll help you diagnose the problem and, in many cases, fix it yourself in under an hour.
First Things First: Is Your Dryer Gas or Electric?
Before we can start troubleshooting, we need to know what kind of dryer we're working with. The way a gas dryer creates heat is completely different from an electric one, so this first step is crucial. Don't worry, it’s easy to find out.
- Safety First: Unplug the dryer from the wall outlet.
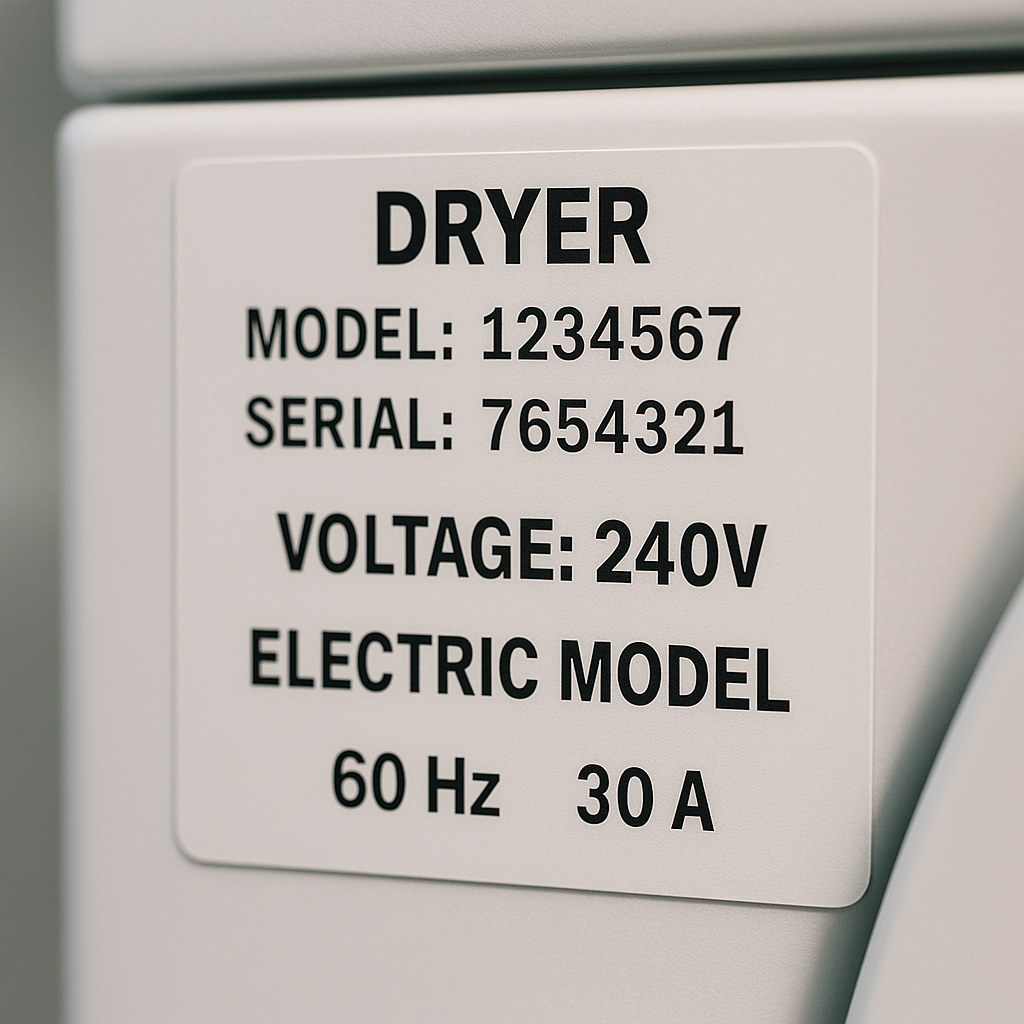
- Find the Label: Open the dryer door and look for the model and serial number label. It's usually on the door jamb or the frame of the dryer opening.
- Read the Clues: This label holds the key.
- If you see voltage information like “120/240 V” or a high amperage rating (like 30A), you have an electric dryer.
- If you see a BTU rating or any mention of “Natural Gas” or “LP Gas,” you have a gas dryer.
Now that you know your dryer type, let's follow the right path to get it heating again.
How to Fix an Electric Dryer That Isn't Heating
Electric dryers use a powerful heating element, similar to the coils in an oven, to generate heat. When they fail to heat, the problem is almost always related to either the power supply or one of the heating components.
Step 1: Check Your Circuit Breaker
This is the most common culprit and the easiest fix! Electric dryers require 240 volts of power to run the heating element. This is supplied by a double-pole circuit breaker in your home's electrical panel.
Here's the tricky part: sometimes, only one of the two poles in the breaker will trip. When this happens, the dryer will still have enough power (120 volts) to turn on and tumble the drum, but it won't have the full 240 volts needed to power the heating element.
How to Fix It:
- Go to your home's main electrical panel (often in the basement, garage, or a utility closet).
- Look for the breaker labeled "Dryer." It will be a large, double-wide breaker.
- Firmly flip the breaker all the way to the "OFF" position, then flip it back to the "ON" position. This ensures both poles are reset.
- Go back to the dryer and run a test cycle. If it heats up, you’ve just saved yourself a service call!
If resetting the breaker didn't work, we need to confirm the outlet is providing the correct power.
Step 2: Test the Outlet Voltage (For Advanced DIYers)
If you're comfortable and have a multimeter, you can test the outlet itself. Safety Warning: This involves working with live electricity. Please use caution and wear insulated gloves.
- Set your multimeter to measure AC voltage (VAC) in a range that can handle over 250V.
- Carefully insert the two probes into the two vertical or angled "hot" slots of the 240V dryer outlet.
- A properly functioning outlet should give you a reading of approximately 220-240 volts.
If your reading is low (around 120V) or zero, the problem lies with your home's electrical supply, not the dryer. In this case, you should contact a qualified electrician to investigate.
Step 3: Inspect the Internal Heating Components
If the breaker is on and the outlet has power, the issue is likely a failed component inside the dryer. The most common failures are the heating element, the thermal fuse, or the high-limit thermostat. These parts are designed to shut off the heat to prevent overheating, but sometimes they can fail and break the circuit permanently.
To test them, you'll need your multimeter set to the "Continuity" setting (it usually has a symbol that looks like sound waves). Continuity means there's a complete path for electricity to flow.
How to Test the Components:
- Unplug the dryer! This is non-negotiable. Pull the dryer away from the wall to give yourself room to work.
- Remove the Rear Panel: Use a Phillips screwdriver or a nut driver to remove the screws holding the thin metal access panel on the back of the dryer.
- Locate the Components:
- Heating Element: This is a large metal canister or housing containing the heating coils.
- Thermal Fuse & Thermostats: These are small, coin-sized plastic or ceramic components with two wires attached. They are typically mounted on the heating element housing or the blower exhaust duct.
- Test for Continuity:
- Disconnect one wire from the component you want to test. This prevents you from getting a false reading from other parts of the dryer.
- Touch one multimeter probe to each of the component's metal terminals.
- If the multimeter beeps or reads zero, the component has continuity and is likely good.
- If the multimeter is silent and the screen doesn't change, the component is "open" and has failed. It needs to be replaced.
If you find a failed component, you've found your problem! You can order a replacement part online using your dryer's model number. If you're not comfortable replacing it yourself, this is the perfect time to call a professional.
How to Fix a Gas Dryer That Isn't Heating
Gas dryers create heat using a burner assembly, much like a gas furnace. The troubleshooting process is quite different from an electric model.
Step 1: Check the Gas Ignition Sequence
First, let's make sure the gas is on and the igniter is working.
- Check the Gas Valve: Behind your dryer, there is a gas supply line with a shut-off valve. Make sure the valve handle is parallel to the pipe, which means it's in the open position.
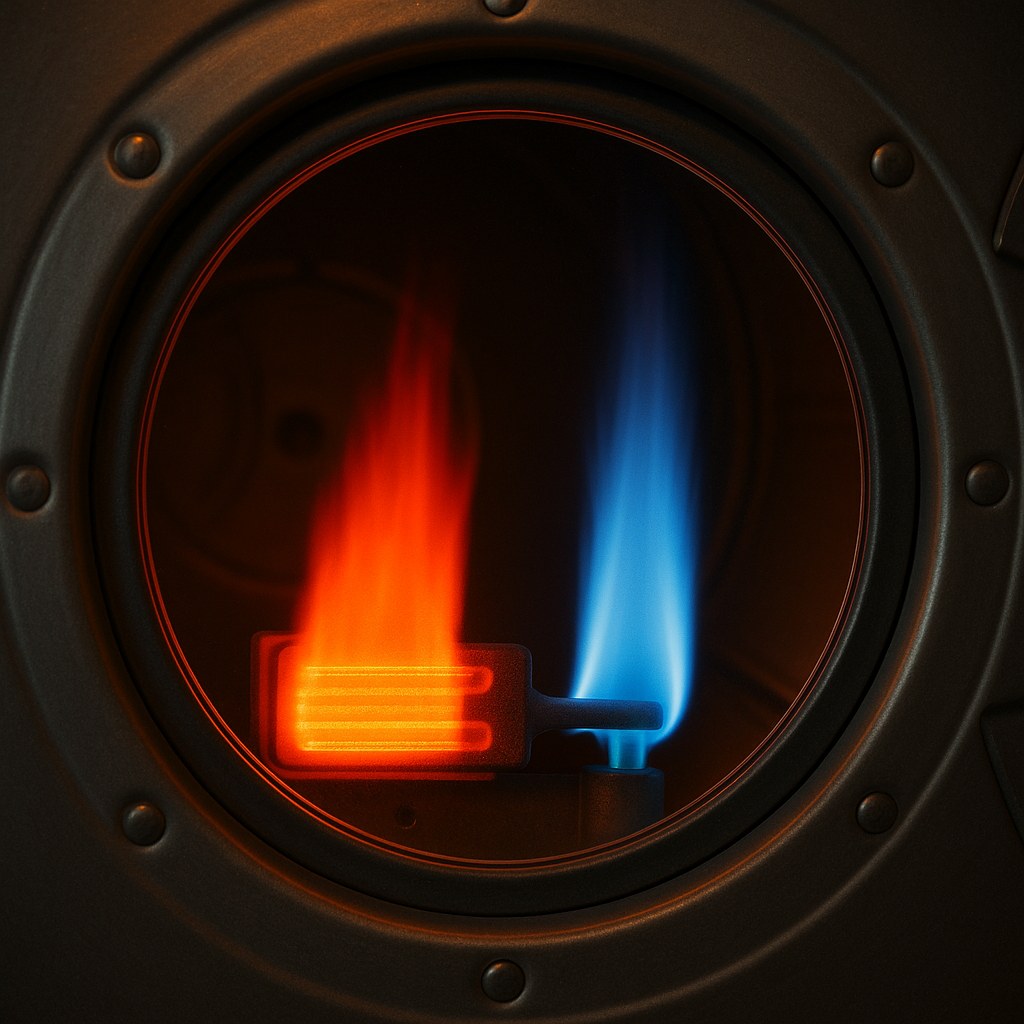
- Observe the Igniter:
- Set your dryer to a high-heat cycle and start it.
- Look through the small, circular viewport on the lower front panel of the dryer. If there isn't one, you may need to remove the lower panel (usually held by clips or a couple of screws at the bottom).
- You should see a component called the igniter begin to glow bright orange. After 30-60 seconds, you should hear a "click" and see a steady blue flame ignite. The flame will cycle on and off throughout the drying cycle.
If you see the igniter glow and the flame light, but your clothes still aren't drying, the problem is almost certainly a clogged vent. If the igniter doesn't glow or the flame won't stay lit, proceed to Step 3.
Step 2: Clean Your Dryer Vents (The #1 Culprit)
A clogged dryer vent is the most common cause of poor heating in gas dryers and is also a major fire hazard. According to the U.S. Fire Administration, nearly 3,000 home fires are caused by dryers each year, and failure to clean is the leading factor.
When the vent is blocked with lint, hot, moist air can't escape. This triggers a safety thermostat inside the dryer to shut off the gas burner to prevent overheating.
How to Clean Your Vents:
- Unplug the dryer and pull it away from the wall.
- Clean the Lint Trap: Pull out the lint filter and thoroughly clean it.
- Disconnect the Vent Hose: Loosen the clamp holding the flexible vent hose to the back of the dryer and the wall duct.
- Vacuum Everything: Use a shop vacuum with a hose attachment to clean out the flexible hose, the port on the back of the dryer, and as far as you can reach into the duct in the wall. You can also buy specialized dryer vent cleaning brushes that attach to a drill to clean the entire length of the ductwork to the outside.
- Reconnect and Test: Put everything back together, plug in the dryer, and run a test cycle. In most cases, your heat will be back and stronger than ever.
Step 3: Inspect the Ignition Components
If cleaning the vent didn't work, or if you noticed the igniter wasn't glowing in Step 1, you likely have a faulty ignition component. The most common failures are the igniter, flame sensor, or gas valve coils.
Safety First: Unplug the dryer and turn the gas supply valve OFF (handle perpendicular to the pipe).
Using a multimeter set to continuity, you can test these parts just like the electric components:
- Remove the Lower Front Panel to access the burner assembly.
- Test the Igniter: Disconnect its wiring harness. A good igniter will have a continuity reading (or a specific resistance value, check your model's specs). Also, inspect it visually; they are very fragile and often have visible cracks when they fail.
- Test the Flame Sensor: This sensor sits next to the igniter and must detect the flame. Test it for continuity.
- Test the Gas Valve Coils: These are two small solenoids on top of the gas valve that open to allow gas to flow. Test each one for continuity.
If you find a faulty part, you've found the source of your problem. Due to the nature of working with gas appliances, we highly recommend contacting a certified appliance repair technician to perform the replacement.
Cost to Fix a Dryer That Won't Heat
- DIY Repairs: If you do it yourself, the cost is just the price of the part.
- Thermal Fuse: $5 - $15
- Gas Dryer Igniter: $15 - $40
- Electric Heating Element: $40 - $100
- Professional Service Call: Hiring a professional will typically cost between $150 and $400, depending on the repair needed and your location.
Don't Let Laundry Pile Up – Take Control!
Fixing a dryer that doesn't heat is a very rewarding DIY project. By following these steps, you can save money and get your laundry routine back on track.
But we know that not every repair is straightforward, and sometimes you just need a helping hand. That’s where Casa comes in. The Casa app is your go-to resource for home maintenance. You'll find more easy-to-follow guides like this one, get timely reminders for tasks like cleaning your dryer vent, and, if you run into a problem you can't solve, we can connect you with a network of trusted, pre-vetted professionals in your area.
Download the Casa app today and make home maintenance simple, stress-free, and empowering.


