An overheating dryer isn’t something to ignore. According to the National Fire Protection Association (NFPA), failure to clean the dryer is the leading cause of home clothes dryer fires. The good news is that the most common culprits behind an overheating dryer are simple airflow issues that you can often fix yourself in under an hour.
Let’s walk through the steps to diagnose why your dryer is overheating and how to get it running safely and efficiently again.
Why Your Dryer Is Overheating and Shutting Off
Your dryer works by tumbling clothes through heated air and then exhausting that hot, moist air outside through a vent. If that exhaust air can't escape properly, heat and moisture build up inside the drum. This triggers a safety device, like a thermal fuse or thermostat, to shut the machine off to prevent a fire.
Here are the three most common reasons for this restricted airflow:
- Clogged Lint Filter: This is the number one suspect. If you’re not cleaning the lint screen after every single load, lint builds up quickly, acting like a blanket that traps hot air inside.
- Blocked Dryer Vent Duct: Over time, lint can bypass the filter and accumulate deep inside the flexible vent hose behind your dryer and the rigid ductwork running through your walls to the outside. This creates a serious blockage and fire hazard.
- Cramped Installation: Dryers need space to breathe. If your dryer is pushed too tight against the wall or enclosed in a small closet without proper ventilation, it can’t pull in enough cool, ambient air to function correctly.
Before we dive into fixing these issues, let's get your dryer ready for a safe inspection.
Safety First: Prepping Your Dryer
Whenever you work on an appliance, safety is paramount. Follow these two simple steps before you begin.
- Unplug the Dryer: Disconnect the dryer's power cord completely from the wall outlet. You don't want any risk of electrical shock.
- Turn Off the Gas (for Gas Dryers): If you have a gas dryer, locate the gas shut-off valve on the supply line behind the machine. Turn the valve handle so it is perpendicular (at a 90-degree angle) to the pipe. This stops the flow of gas.
With the dryer safely powered down, you’re ready to start troubleshooting.
Step-by-Step Guide to Fixing an Overheating Dryer
We’ll start with the easiest and most common fix and work our way up.
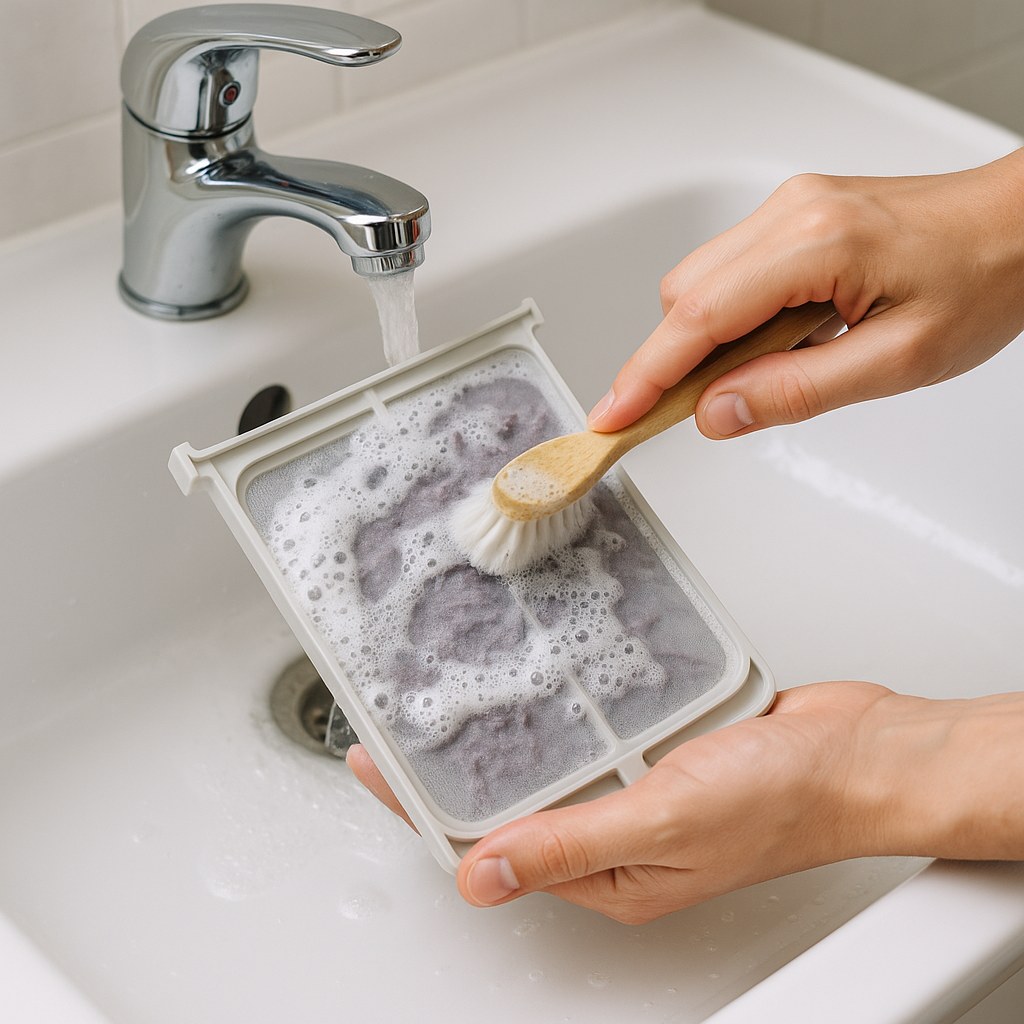
Step 1: A Thorough Lint Filter Cleaning
You probably pull the big sheet of lint off your filter after each load, but a hidden film of residue from dryer sheets and fabric softener can build up over time, further blocking airflow.
- Locate and Remove the Filter: Pull the lint filter straight out of its housing. It’s usually located either on top of the dryer or just inside the door.
- Remove Surface Lint: Peel off any visible lint with your fingers and throw it away.
- Wash the Filter: Take the filter to a sink and run it under warm water. Gently scrub both sides with a soft brush (an old toothbrush works great) and a little bit of dish soap. This will break down the invisible film. You'll know it's clean when water passes through the mesh easily instead of pooling on top.
- Dry Completely: Rinse the filter thoroughly and let it air-dry completely before putting it back in the dryer. A wet filter can damage electronic components.
Once the filter is clean and dry, slide it back into place, plug your dryer in (and turn the gas back on if you have a gas model), and run a timed, high-heat cycle with the dryer empty for 5 minutes. If it completes the mini-cycle without shutting off, you may have just solved your problem! If it still shuts down, it’s time to check the main exhaust line.
Step 2: Check Your Exterior Vent Airflow
This quick test will tell you if there’s a blockage somewhere between your dryer and the outside of your house.
- Start the Dryer: Turn the dryer on any heated cycle.
- Go Outside: Find the exterior vent hood on the side of your house where the dryer exhausts.
- Feel the Airflow: Hold your hand a few inches from the vent opening. You should feel a steady, strong stream of warm, moist air. If the airflow is weak, nonexistent, or you see lint clinging to the outside of the vent cover, you’ve almost certainly found your culprit: a clogged vent duct.
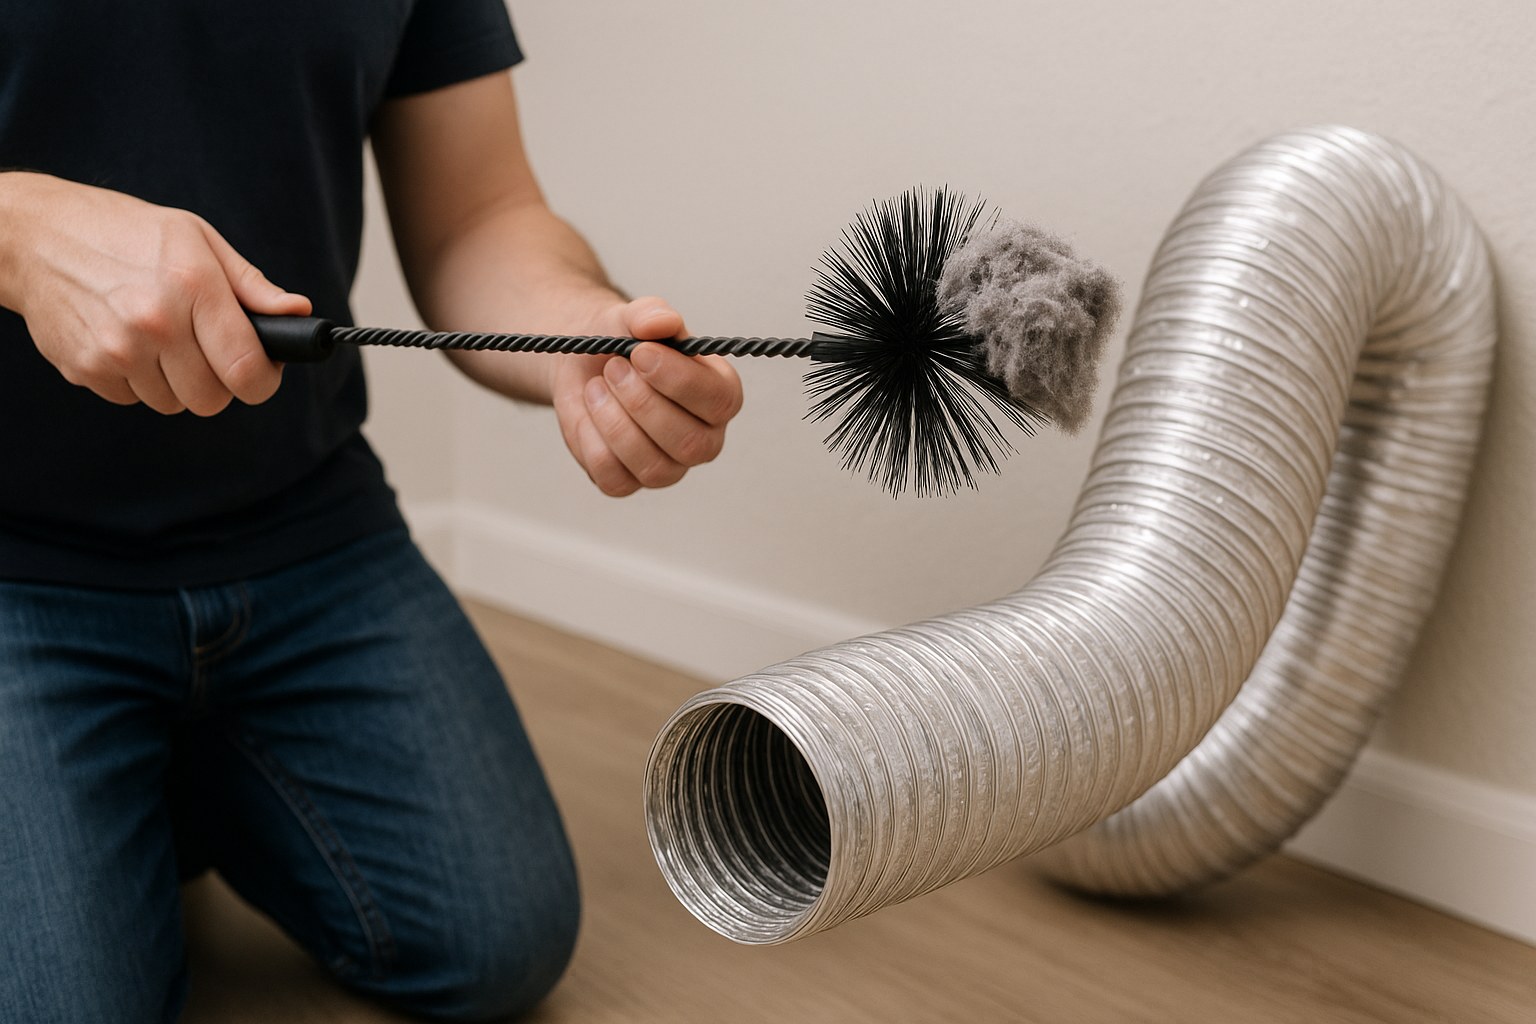
Step 3: Clean the Dryer Exhaust Duct
Cleaning the dryer vent is a crucial piece of home maintenance that should be done at least once a year. For this, you’ll likely need a screwdriver and a specialized dryer vent cleaning kit, which includes a long, flexible brush that can be attached to a power drill. These kits are inexpensive and available at most hardware stores.
- Disconnect the Dryer: Make sure the dryer is unplugged again. Carefully pull the machine forward about two feet so you can comfortably access the back.
- Detach the Vent Hose: Use a screwdriver or nut driver to loosen the clamp holding the flexible vent hose to the back of the dryer. Slide the hose off the exhaust port.
- Clean the Hose and Dryer Port: Use the vent cleaning brush to manually scrub out the inside of the hose. Push it in and out, rotating it to dislodge stubborn lint. Also, be sure to clean out any lint buildup from the exhaust port on the dryer itself.
- Clean the Full Duct Run: Attach the brush to your power drill and feed it into the duct opening in the wall. Run the drill at a low speed as you push the brush all the way through to the exterior vent. You’ll be amazed (and probably a little horrified) at how much lint comes out.
- Reconnect and Test: Once the duct is clear, reattach the vent hose securely to the dryer and the wall port, making sure there are no kinks or sharp bends. Push the dryer back into place, plug it in, and run another 5-minute empty test cycle.
In the vast majority of cases, a thorough vent cleaning will solve any overheating issues.
Step 4: Improve Your Dryer's Ventilation
If your lint screen and vents are clean but the problem persists, the issue might be the dryer’s environment.
- Check for Space: Pull the dryer out from the wall. Ensure there are at least 4-5 inches of open space behind it for proper air circulation and to prevent the vent hose from being crushed. There should also be at least an inch of clearance on both sides.
- Open Closet Doors: If your dryer is in a closet, always run it with the closet door wide open. A closed door can starve the dryer of the fresh air it needs to operate.
- Clear the Area: Remove any laundry baskets, boxes, or other items stored on top of or directly next to the dryer that could be blocking its air intake.
After creating more space, try running a full cycle with a normal load of wet clothes. If it runs to completion, you’ve fixed it!
When It’s Time to Call a Professional
If you have meticulously cleaned the lint filter, cleared the entire vent duct, and ensured your dryer has plenty of space, but it still overheats and shuts off, the problem is likely an internal component failure. This could be a faulty:
- Cycling Thermostat: The part that monitors and regulates the temperature inside the drum.
- Thermal Fuse: A fail-safe device that blows to cut power when it detects dangerously high temperatures.
- Heating Element: The coils that produce heat can sometimes short out and cause control issues.
- Control Board: The electronic brain of the dryer may be malfunctioning.
These repairs involve working with the dryer’s internal wiring and are best left to a qualified professional. The cost to hire an appliance repair technician typically ranges from $100 to $250 for a service call and diagnosis, plus the cost of any parts.
Keep Your Dryer Running Smoothly
A dryer that shuts off mid-cycle is a clear warning sign you shouldn't ignore. By performing these simple maintenance steps, you not only fix the immediate problem but also improve your dryer’s efficiency, lower your energy bills, and drastically reduce the risk of a house fire.
For more easy-to-follow DIY guides and a direct line to trusted, vetted professionals for the jobs you can’t handle yourself, download the Casa app today. We’re here to help you manage your home with confidence, one project at a time.


