A chimney cap is the unsung hero of your roofing system. It’s the small metal cover that sits atop your chimney, tirelessly working to keep rain, snow, animals, and debris out of your flue. When it comes loose, it leaves your home vulnerable to a host of expensive and dangerous problems.
The good news is that securing a loose chimney cap is often a manageable DIY project for a homeowner who is comfortable working at heights. With a focus on safety and the right instructions, you can silence that rattling and protect your home in an afternoon. In this guide, we'll walk you through everything you need to know, from the initial safety preparations to tightening the final screw.
Why You Can't Ignore a Loose Chimney Cap
It’s easy to dismiss a wobbly chimney cap as a minor annoyance, but its importance can't be overstated. A secure cap is your chimney’s first line of defense. Here’s what can happen when it fails:
- Water Damage: A loose or missing cap allows rain and snow to pour directly into your chimney flue. This moisture can erode mortar joints, rust your damper assembly, damage the flue liner, and eventually seep into your home’s walls and ceilings, leading to mold and costly structural repairs.
- Animal Intrusion: Chimneys are an inviting nesting spot for birds, squirrels, raccoons, and other critters. A secure cap with intact mesh prevents them from setting up camp, which can block your flue and create a serious fire hazard.
- Debris Blockage: Without a cap, leaves, twigs, and other debris can fall into the chimney, creating a blockage. This obstruction can prevent smoke from venting properly, causing dangerous carbon monoxide to back up into your home.
- Downdraft Prevention: Chimney caps are designed to prevent strong winds from creating downdrafts that push smoke and combustion gases back into your living space.
- Spark Arresting: The mesh screen on a chimney cap, known as a spark arrestor, is a critical safety feature. It stops hot embers and sparks from escaping the chimney and landing on your roof or nearby flammable materials, significantly reducing the risk of a fire.
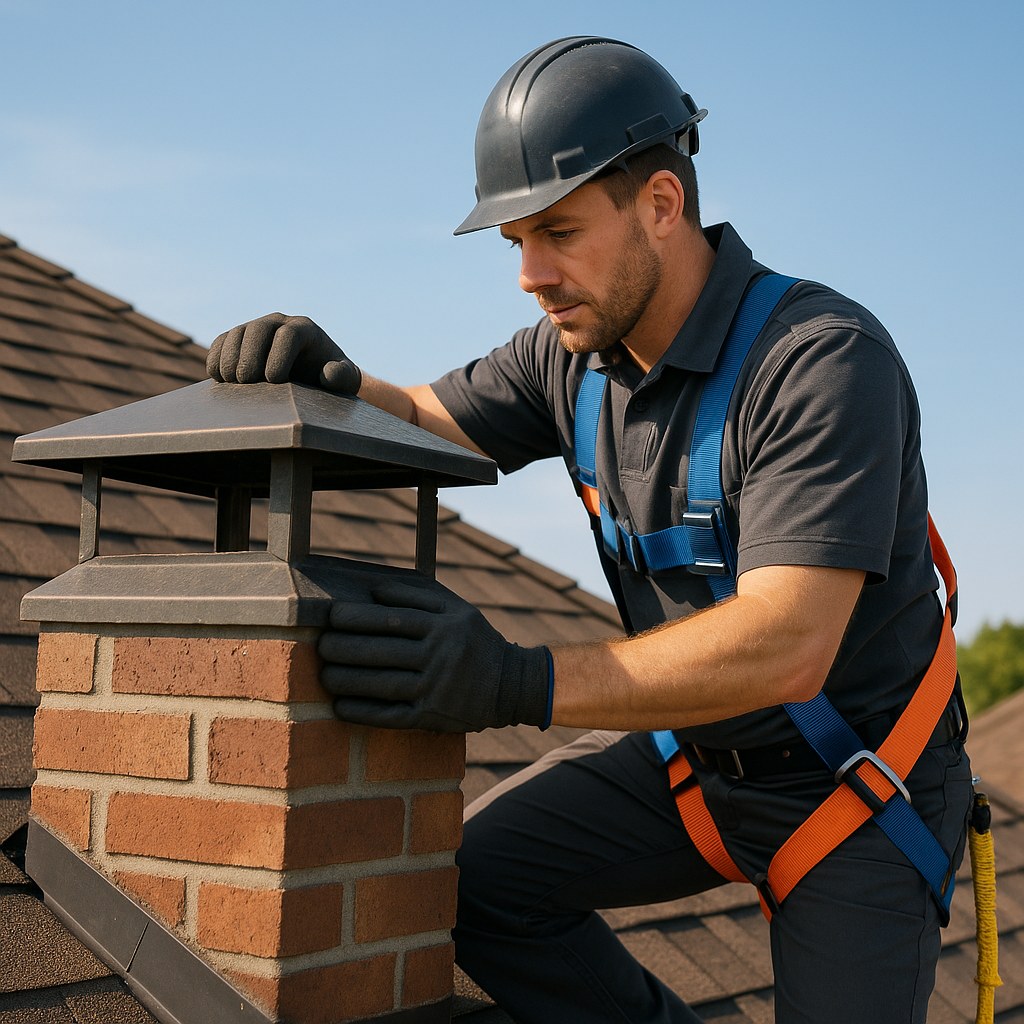
Safety First: Preparing for a Rooftop Inspection
Before you even think about climbing up there, let’s talk about safety. Working on a roof is inherently dangerous, and no repair is worth risking a serious fall. If you are not completely comfortable with heights, or if your roof is particularly steep or slippery, your first and only step should be to call a professional.
If you are proceeding, you must use the proper safety equipment.
Your Safety Checklist:
- Sturdy, reliable ladder: Your ladder should be in excellent condition and tall enough to extend at least 3 feet above the edge of the roof.
- Roof safety harness: This is non-negotiable. A proper harness connected to a secure roof anchor is your lifeline.
- Heavy-duty work gloves: Protect your hands from sharp metal edges and rough masonry.
- Non-slip footwear: Wear shoes or boots with excellent grip.
Steps for Safe Roof Access:
- Set the Ladder: Place your ladder on firm, level ground. Use the 4-to-1 rule: for every four feet of height, the base of the ladder should be one foot away from the wall.
- Secure the Ladder: Once in place, secure the top of the ladder with a tie-down rope to the roof gutter or another solid anchor point to prevent it from slipping.
- Harness Up: Before stepping onto the roof, put on your safety harness and securely attach the lanyard to a certified roof anchor.
- Move with Caution: As you walk toward the chimney, move slowly and deliberately. Always maintain three points of contact with the roof surface (two feet and one hand, or two hands and one foot).
If at any point you feel unsafe or unsure, stop immediately and call a professional.
Step-by-Step Guide to Fixing Your Chimney Cap
Once you’re safely at the chimney, it’s time to diagnose the problem. The repair process will depend on the type of chimney you have.
First, Identify Your Chimney Type
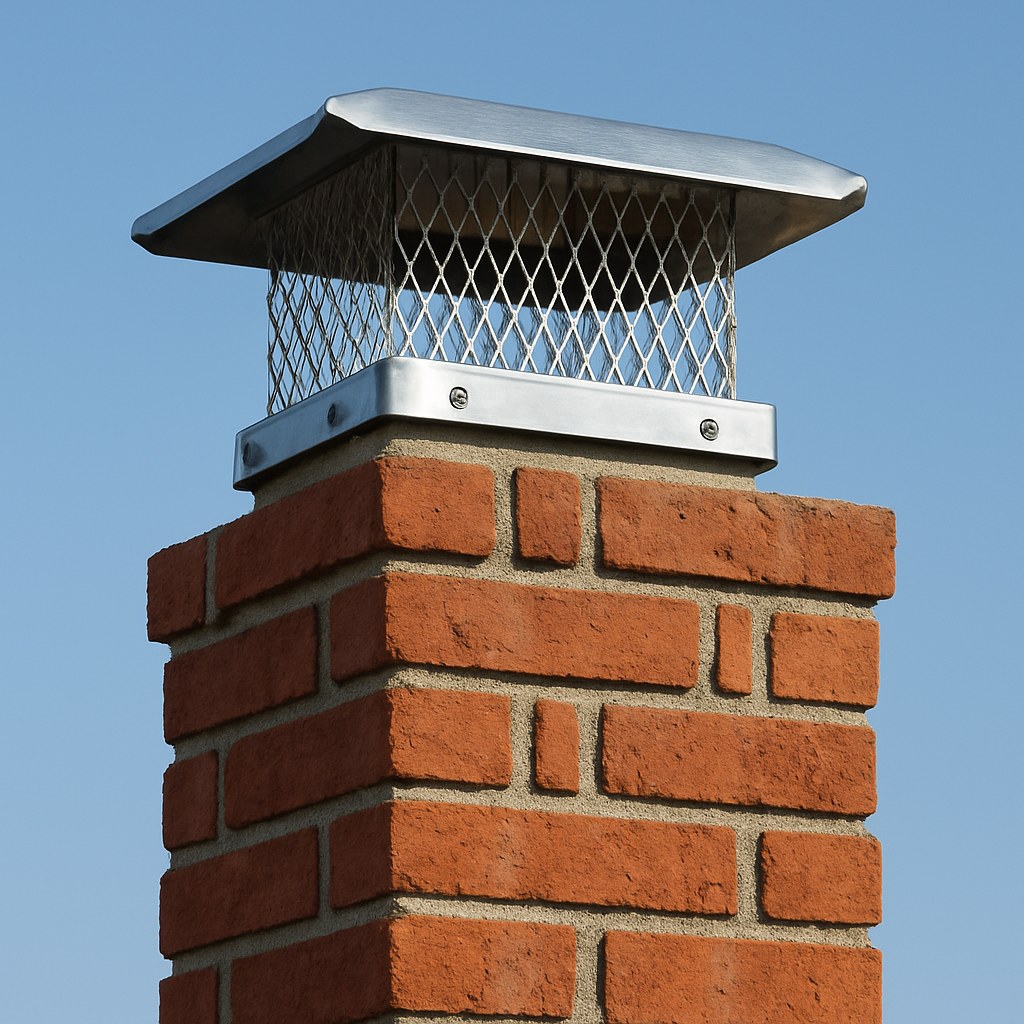
- Masonry Chimney: These are the traditional chimneys built from brick or stone. The cap is typically secured with screws and anchors into the top of the flue tile or the mortar crown.
- Metal Chimney: These are pre-fabricated chimneys, often a simple metal pipe extending from the roof. The cap usually attaches directly to the pipe with bolts, self-tapping screws, or a clamp band.

Part 1: Securing a Cap on a Masonry Chimney
Step 1: Inspect the Cap
- Check for Looseness: Firmly grip the chimney cap with both hands and gently try to rock it back and forth. This will reveal how loose it is and where the movement is coming from.
- Examine the Cap's Condition: Look for any signs of major damage. Are there large holes, significant rust, or warped sections? Is the spark arrestor mesh torn or missing?
- Inspect the Fasteners: Check every screw or anchor bolt. Are they rusted through, stripped, or missing entirely?
If the cap itself is badly damaged or rusted, it needs to be replaced. Tightening it is only a temporary fix. In this case, it’s best to call a chimney professional. If the cap is in good shape but the fasteners are the issue, you can proceed.
Step 2: Tighten or Replace the Fasteners
If the fasteners are present and just loose:
- Get the Right Tool: You’ll likely need a nut driver or a socket wrench.
- Tighten Securely: Place the nut driver over each loose screw or anchor bolt and turn it clockwise until it feels snug. Be careful not to over-tighten, as this could crack the flue tile.
- Confirm the Fix: Once all fasteners are tight, rock the cap again. If it’s solid and doesn’t move, you’re done!
If the fasteners are missing, rusted, or stripped:
- Remove Old Fasteners: Use your nut driver to remove any remaining pieces of the old screws.
- Prepare the Surface: Use a stiff wire brush to clean any dust, debris, or loose mortar from the edge of the flue tile where the cap will sit. This ensures a solid connection.
- Install New Fasteners: Position the chimney cap so its flange holes align over solid sections of the flue tile or mortar. Drive new, corrosion-resistant masonry screws through the holes until they are snug.
- Seal the Screws: For extra protection, dab a bead of high-temperature silicone sealant over each screw head. This will prevent moisture from getting into the screw holes and causing rust in the future.
- Final Check: Give the cap one last gentle rock to confirm it’s firmly secured.
Part 2: Securing a Cap on a Metal Chimney
Step 1: Inspect the Cap
- Check for Looseness: Hold the cap and gently try to twist or wiggle it. Metal chimney caps are often secured by pressure, so any movement is a sign of a problem.
- Examine the Cap's Condition: Look for dents, rust holes, or bent edges. Check that the spark arrestor mesh is fully intact.
- Inspect the Fasteners: Identify how the cap is attached. It could be with self-tapping screws, bolts that go through the pipe, or a clamp band that wraps around the base of the cap and the pipe. Check for corrosion, missing parts, or stripped threads.
If the cap is structurally damaged, you'll need a new one. Contact a professional to ensure you get the right size and type for your system. If the cap is sound, you can move on to the fix.
Step 2: Tighten or Replace the Fasteners
If the fasteners are present and just loose:
- Tighten Screws or Bolts: Use a nut driver or wrench to turn each loose fastener clockwise until it’s snug.
- Tighten a Clamp Band: If your cap is held by a clamp band, locate the tightening screw on the band and turn it clockwise until the band is tight against the chimney pipe and the cap no longer moves.
- Confirm the Fix: Gently twist the cap to make sure it is completely secure.
If the fasteners are missing or corroded:
- Remove Old Hardware: Use a nut driver to take out any old, rusted screws or bolts. If there's a loose clamp band, remove it.
- Position the Cap: Align the cap properly on the metal chimney pipe.
- Install New Screws: If your cap uses them, install new stainless steel self-tapping screws through the flange holes directly into the pipe collar.
- Install a New Clamp Band: If your cap uses a band, slide a new stainless-steel clamp band over the cap's collar and tighten it firmly.
- Final Check: Give the cap a final twist to ensure it is secure and won't budge.
Cost Breakdown: DIY vs. Hiring a Professional
One of the biggest motivations for tackling this job yourself is the potential cost savings.
- DIY Cost: If you only need to replace fasteners, you can expect to spend $10 - $20 on a small pack of masonry or self-tapping screws and some high-temperature sealant. If the entire cap needs replacing, a new one can cost anywhere from $50 to $150.
- Professional Cost: Hiring a professional roofer or chimney sweep to repair or replace a chimney cap typically costs between $200 and $700, according to Angi.com. The price depends on the height and accessibility of your chimney and the type of cap needed.
Final Thoughts: Secure Your Chimney, Secure Your Home
Fixing a loose chimney cap is more than just stopping an annoying noise—it’s an essential piece of home maintenance that protects your property from the elements. By following these steps and prioritizing safety above all else, you can successfully tackle this project and ensure your chimney is ready for whatever the weather throws at it.
Feeling a bit uneasy about climbing on the roof, or did you discover a bigger issue during your inspection? Don't hesitate to call for backup. Download the Casa app today to connect with trusted, local roofing and chimney professionals in your area. Casa makes it easy to get quotes and book qualified experts who can handle the job safely and efficiently, giving you ultimate peace of mind. Keep your home safe and sound, starting from the top down.


