But don’t call a handyman just yet! The good news is that fixing a loose wall fixture is one of the most common and satisfying DIY projects you can tackle. In most cases, you can solve the problem in under an hour with just a few basic tools. It’s all about understanding why it's loose and using the right technique to secure it for good.
Think of me as your expert on the line, ready to walk you through it. We'll figure out what’s going on behind your wall and get that fixture rock-solid again. Let’s get started.
Why Do Wall Fixtures Get Loose in the First Place?
Before we grab our tools, it helps to understand the root cause. A fixture usually comes loose for one of these reasons:
- The Wrong Anchor (or No Anchor at All): Most interior walls are made of drywall, which is essentially gypsum plaster pressed between two sheets of paper. It’s great for walls, but terrible at holding the threads of a screw on its own. If a screw was driven directly into drywall without an anchor, it was bound to fail.
- The Hole Has Become Stripped: Over time, the weight and leverage of the fixture can cause the screw to wiggle, gradually widening the hole in the wall or the stud behind it. Eventually, the screw threads have nothing left to bite into.
- Missing the Stud: Wall studs are the vertical wooden or metal beams that frame your walls. They are the strongest place to anchor anything heavy. If the installer missed the stud, the fixture is only relying on the much weaker drywall.
- Fixture is Too Heavy: Every mounting method has a weight limit. The fixture might simply be too heavy for the type of anchors used.
Identifying which of these is your culprit is the key to a lasting fix.
Step-by-Step Guide to Fixing a Loose Wall Fixture
Ready to get hands-on? Let’s work through the process, from diagnosis to the final, satisfying wiggle-free test.
Step 1: Inspect the Fixture and Find Out What’s Behind the Wall
First things first, clear the area. Remove any delicate items from the shelf or from the area below the fixture, just in case it shifts while you’re working.
Now, let's play detective.
- Gently hold the fixture with one hand to keep it stable.
- With your other hand, use a Phillips screwdriver to try tightening one of the mounting screws. Turn it clockwise just a quarter-turn.
- Pay attention to the feel. Does the screw tighten up and feel solid? Or does it just spin in place without getting any tighter? A spinning screw is a classic sign of a stripped hole or a screw in hollow drywall.
- Next, grab a stud finder. Place it flat against the wall, turn it on, and slide it horizontally over the screw location. Most stud finders will beep or light up when they detect a solid stud behind the drywall. Test a few spots to confirm.
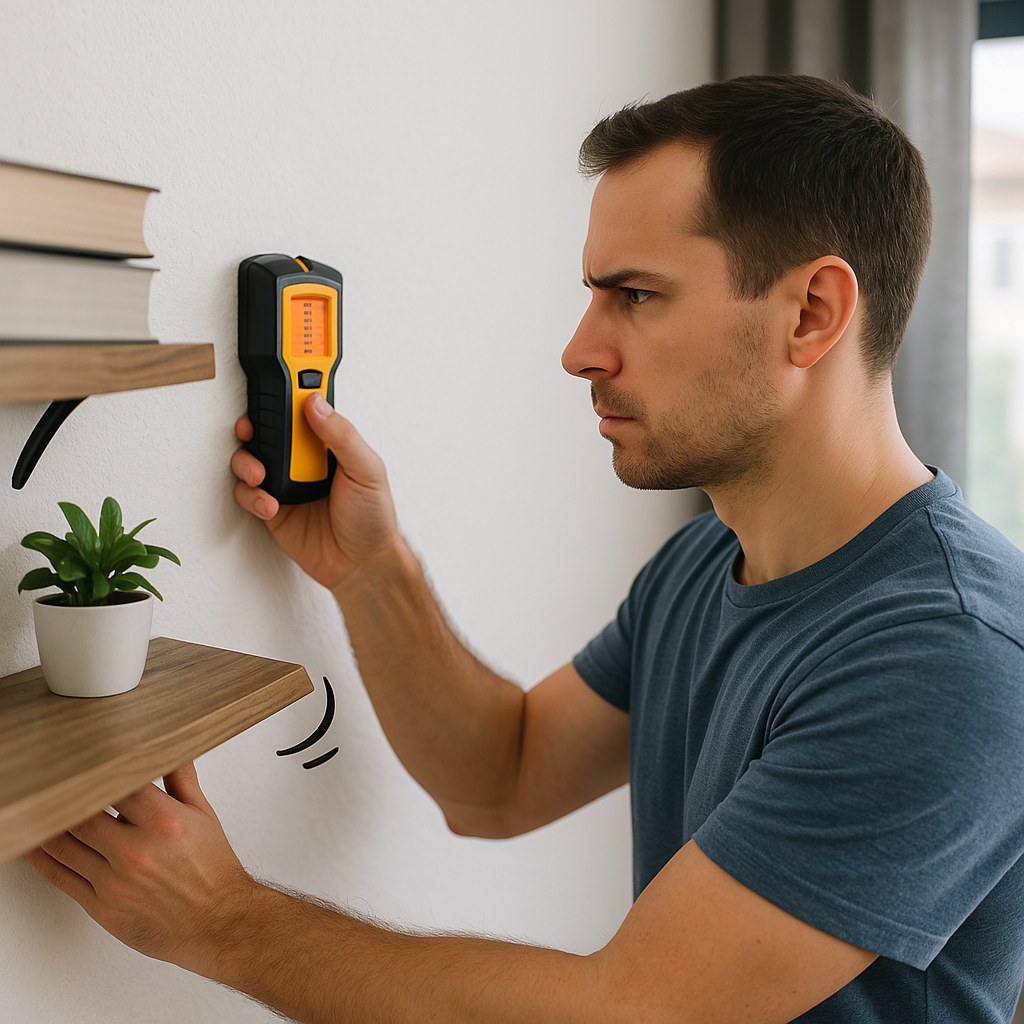
This simple test tells you everything. You’re now at a fork in the road: is your fixture mounted into a stud, or is it in a hollow part of the wall?
Solution A: If Your Fixture is Mounted into a Wall Stud
Finding a stud is great news! This is the most secure way to mount anything. If it's loose, the fix is usually straightforward.
First, Try Tightening the Screws
If the screw felt like it was starting to bite during your inspection, you might just need to snug it up.
- Use your screwdriver to turn each screw that goes into the stud clockwise until it’s firm.
- Important: Stop when you feel solid resistance. Over-tightening can strip the wood inside the stud, making the problem worse.
- Once tightened, gently try to wiggle the fixture. If it’s solid, use a level to make sure it's straight, and you’re done!
If the Screw Hole in the Stud is Stripped
If the screw just spins and spins, the wood fibers inside the stud are stripped out. Don't worry, this is also fixable. We just need to give the screw something new to grab onto.
- Remove the old screws completely and carefully take the fixture off the wall.
- You have two options: use a larger screw or move the location slightly. The best method is to move it.
- Mark new mounting points on the wall stud, about a half-inch above or below the old, stripped holes.
- Use a drill with a 1/8-inch bit to drill new, shallow pilot holes at your marks. A pilot hole clears a path for the screw and prevents the wood from splitting.
- Position the fixture back on the wall, lining it up with your new pilot holes.
- Drive new wood screws (that are the same length but slightly thicker than the old ones) into the pilot holes until the fixture is secure.
- Check with a level, make final adjustments, and you've got a super-secure mount.
Solution B: If Your Fixture is in a Hollow Wall (Drywall/Plaster)
This is the most common scenario for things like towel racks, toilet paper holders, and light-duty shelving. If there’s no stud, you absolutely need to use a wall anchor. The type of anchor you choose depends on the weight of your fixture.
For Lightweight Fixtures (15 pounds or less)
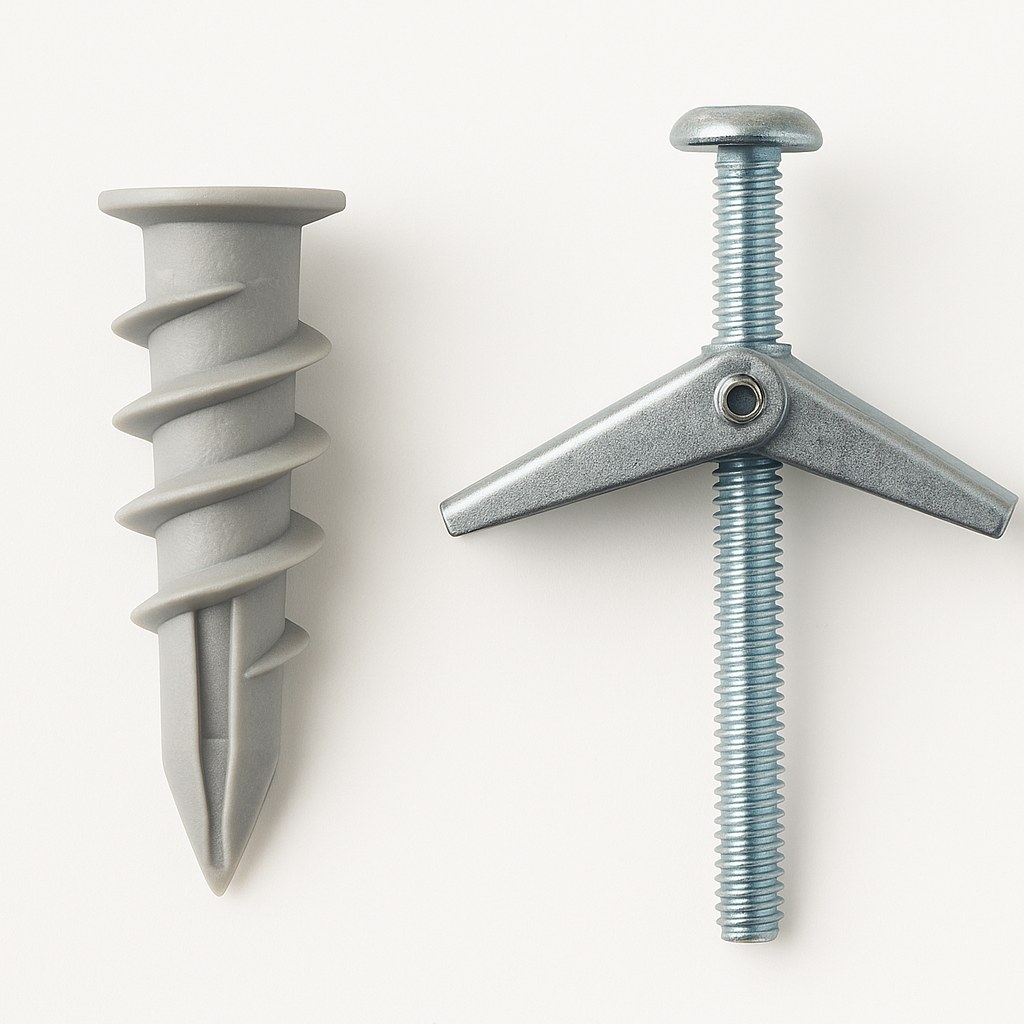
For small picture frames, lightweight decor, or other items that don't bear much weight, a simple plastic anchor is often enough.
- Take the fixture off the wall and remove the old, failed screws and anchors.
- Most standard plastic anchors require a 5/16-inch hole. Check the packaging for your new anchors. Use a drill to slightly enlarge the existing holes to the required size.
- Gently push or tap a new plastic wall anchor into each hole until its lip is flush with the wall.
- Place your fixture back on the wall, aligning its mounting holes with the new anchors.
- Drive the screws into the anchors with a screwdriver. You’ll feel the resistance increase as the anchor expands behind the drywall to create a secure fit.
- Check that it's level, and you’re all set.
For Heavier Fixtures (Over 15 pounds)
For anything that needs to hold significant weight—like a bookshelf, a heavy mirror, or a grab bar—a standard plastic anchor won’t cut it. You need to bring in the heavy-hitter of the anchor world: the toggle bolt.
A toggle bolt has spring-loaded wings that open up behind the drywall, distributing the weight over a much larger surface area.
- Remove the fixture from the wall. You will need to drill a larger hole for the toggle bolt—usually about ½-inch. Check the bolt's packaging for the exact size.
- Take one of the toggle bolts and thread the screw through your fixture's mounting bracket first. Then, screw on the spring-loaded wings, leaving them near the end of the screw.
- Pinch the wings together so they are flat against the screw.
- Push the wings and screw completely through the hole in the wall. You will hear and feel a "snap" as the wings open up on the other side.
- Gently pull the screw back toward you. This seats the open wings flat against the inside of the wall.
- While keeping tension on the screw, use your screwdriver to tighten it until the fixture is snug against the wall. Repeat for all mounting points, and use your level before the final tightening.
Solution C: If You Have Masonry Walls (Brick or Concrete)
Mounting on brick or concrete requires special tools and anchors, but the principle is the same.
- Remove the fixture from the wall.
- You will need a hammer drill and a masonry drill bit (usually ¼-inch, but check your anchor packaging). A regular drill won't be powerful enough.
- Hold the fixture in place and mark your new anchor locations.
- Drill holes at your marks to the depth specified by your masonry anchors (typically 1 ½ inches).
- Gently tap the plastic or metal anchor sleeves into the holes with a hammer until they are flush.
- Position the fixture and drive the provided screws into the anchors until secure.
How Much Does It Cost to Fix a Loose Fixture?
- DIY Cost: This is an incredibly budget-friendly project. A pack of high-quality wall anchors (plastic, toggle, or masonry) typically costs between $5 and $20. If you need to buy a stud finder or a basic drill, it’s a one-time investment for countless future projects.
- Hiring a Professional: According to Angi, the average handyman charges between $60 and $125 per hour. For a simple job like this, you can expect to pay for at least a one-hour minimum, potentially turning a $10 fix into a $100+ expense.
When Should You Call a Professional?
While this is a great DIY task, there are times when it’s best to call for help:
- If the wall stud itself feels soft or damaged, you may have a bigger structural issue.
- If the drywall around the fixture is crumbling or has extensive damage.
- If you are trying to hang an extremely heavy or valuable item and are unsure of the wall's integrity.
- If you simply aren't comfortable using power tools like a drill.
You’ve Got This!
Fixing a loose wall fixture is a project that delivers instant results and a huge confidence boost. By correctly identifying your wall type and choosing the right hardware, you can ensure your belongings are safe, secure, and exactly where they belong.
For more easy-to-follow guides, personalized home maintenance reminders, and a direct line to trusted professionals for the jobs you don’t want to do, download the Casa app today. We’re here to help you manage your home with confidence, one successful project at a time.


