The good news is that a microwave light that won't turn on is one of the most common and easily fixable appliance issues. Most of the time, the culprit is a simple burnt-out bulb. With a little guidance, you can likely solve this problem yourself in under 30 minutes, saving you the cost and hassle of a service call.
In this friendly, expert guide, we'll walk you through everything you need to know about how to fix a microwave light, from the initial diagnosis to the final fix. Let's get that microwave lit up again!

Before You Begin: The First Step is Always Safety
Before we dive into any troubleshooting, the single most important rule is to unplug your microwave from the wall outlet. Microwaves contain a high-voltage capacitor that can store a lethal electrical charge, even when the unit is turned off and unplugged. While we won't be touching any of those internal components, it’s a non-negotiable safety measure for any appliance repair.
Step 1: The Initial Assessment—Is It Just the Light?
First, we need to figure out if we're dealing with a simple bulb issue or a bigger power problem. This is a quick and easy check.
- Place a microwave-safe mug filled with water inside the microwave.
- Close the door and run it for 30-60 seconds on high power.
- Pay attention: Does the control panel light up? Does it count down? Do you hear the usual humming sound of the magnetron?
- Once the cycle is finished, carefully open the door and check if the water is warm.
If the microwave heats the water and operates normally (aside from the light), that’s great news! It strongly suggests the problem is isolated to the bulb or the circuit that controls it. You can proceed to the next steps.
What if the microwave doesn't heat or show any signs of life?
If the control panel is dark and the microwave doesn’t run at all, the problem isn't the bulb—it's the power supply. In this case, head to the next section.
Step 2: Checking the Power Supply
If your microwave is completely unresponsive, let's make sure it's getting electricity before assuming the appliance is broken.
- Check the Outlet: Unplug the microwave and plug in something you know works, like a small lamp or a phone charger. If it doesn't turn on, the outlet is likely the problem.
- Reset the Circuit Breaker: Head to your home's main electrical panel (often in the garage, basement, or a utility closet). Find the breaker labeled for your kitchen or appliances. It might be in the "off" position or tripped to the middle. Flip it firmly to the "off" position and then back "on" to reset it.
- Test Again: Plug the microwave back in. If the display comes on and the light now works, you've solved it! Sometimes breakers trip for minor, temporary reasons. However, if it trips again soon, you may have an overloaded circuit or a more serious electrical issue that requires an electrician.
If you've restored power but the light is still out (while the rest of the microwave works), it's time to focus on the bulb itself.
Step 3: How to Replace a Microwave Light Bulb
This is the most common fix. The process varies slightly between over-the-range and countertop models, but the principle is the same. Remember, your microwave should be unplugged for this entire process.
Finding the Bulb
First, you need to locate the light bulb housing. Consult your user manual if you have it handy, as it will show the exact location. If not, here’s where to look:
- For Over-the-Range Microwaves: The bulb is often located behind the vent grille at the top front of the unit. Sometimes it's on the underside, behind a small cover.
- For Countertop Microwaves: The bulb is usually accessed from the outside of the microwave's casing, often on the side or rear panel, behind a small, screwed-on cover. In some models, you might find it just inside the door along the top edge.
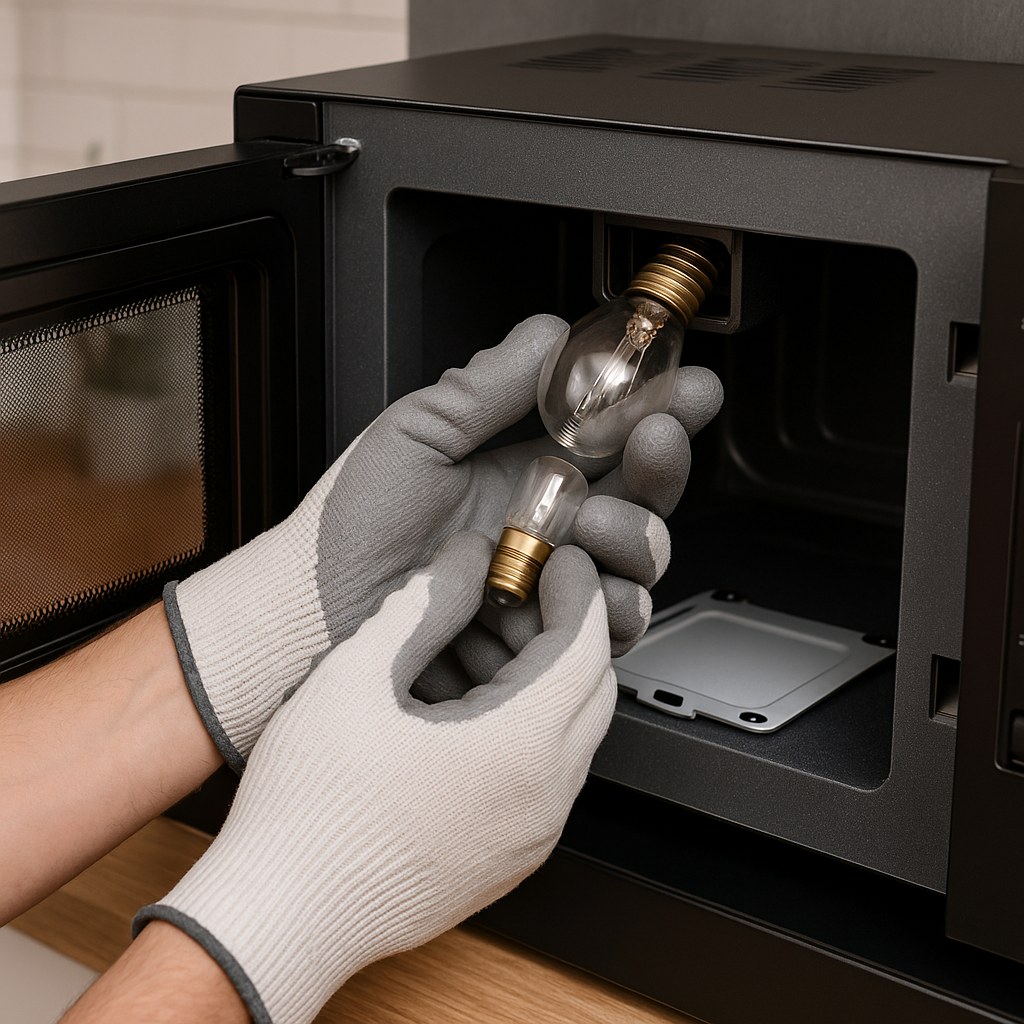
Replacing the Bulb: A Step-by-Step Guide
Tools you'll need:
- A Phillips head screwdriver
- A replacement appliance bulb (typically a 30- or 40-watt T8 bulb, but check your old bulb or manual to be sure)
- Gloves (optional, but recommended to keep oils from your fingers off the new bulb)
- Remove the Access Panel or Grille: Using your screwdriver, remove the screws holding the cover or vent grille in place. Set the screws aside in a safe place so you don't lose them.
- Locate and Remove the Old Bulb: You should now see the light bulb in its socket. Carefully unscrew it by turning it counter-clockwise. It might be a bit tight, so be gentle but firm.
- Check the Old Bulb: Look at the filament inside the old bulb. If you see a broken wire or a dark, smoky appearance inside the glass, it's a clear sign that the bulb has burned out.
- Install the New Bulb: Wearing gloves, gently screw the new appliance bulb into the socket clockwise until it is snug. Don't overtighten it.
- Test Your Work: Before you put everything back together, now is the moment of truth. Plug the microwave back into the outlet and open the door. If the light comes on, congratulations! You've fixed it.
- Reassemble: Unplug the microwave one last time. Re-secure the access panel or vent grille with the screws you set aside.
Step 4: The Bulb is Fine, But Still No Light? Check the Door Switches
If a new bulb didn't do the trick, the next likely culprit is a faulty or dirty door switch (also known as an interlock switch). These small switches tell the microwave's main control board that the door is safely closed, which allows it to run and also turns on the light. If one of these switches fails or is blocked by gunk, the light may not turn on.
- Unplug the microwave.
- Inspect the Latches: Open the door and look at the plastic hooks (latches) on the door itself and the openings they fit into on the microwave frame.
- Clean the Area: Dip a cotton swab in some water or isopropyl alcohol and wring out any excess. Thoroughly clean around the latch openings on the frame and the latches on the door. Food debris, grease, and grime can build up here and prevent the switches from engaging properly.
- Dry Thoroughly: Use a dry cotton swab or cloth to dry the area completely.
- Test It: Plug the microwave back in and open the door. If the light now comes on, a dirty switch was your problem!
When Is It Time to Call a Professional?
While many microwave light issues are easy DIY fixes, there are times when it's best to call in a professional appliance repair technician.
- You can't access the bulb. Some manufacturers, unfortunately, design their microwaves so the bulb is not user-serviceable. If you can't find an access panel and your manual confirms it's not replaceable, you'll need a pro.
- A new bulb and clean switches didn't work. This could indicate a problem with the light socket, the wiring, or the main control board, all of which are jobs for an experienced technician.
- The microwave is still under warranty. Don't attempt any repairs yourself! Doing so could void your warranty. Contact the manufacturer for service instead.
According to Angi, the average cost for a professional microwave repair is around $150, with prices ranging from $100 to $500 depending on the issue. Considering a replacement bulb costs only $5 to $15, trying the DIY fix first can save you a significant amount of money.
Let Casa Light the Way
Fixing a microwave light is a fantastic entry point into the world of DIY home repair. It's a quick, satisfying fix that builds confidence for tackling future projects. By following these steps, you can troubleshoot the issue safely and effectively.
For more helpful home maintenance guides, personalized reminders, and a direct line to vetted professionals for the jobs you can't handle alone, download the Casa app today! We're here to help you manage your home with ease and confidence, one small repair at a time.


