This is a very common issue, especially if the valves haven't been turned in a while. Mineral deposits can build up inside, or the internal mechanism can simply seize up from lack of use. The good news is that you can often fix this yourself with a few basic tools and a little bit of patience.
This guide will walk you through how to identify your radiator valve type and the steps to safely get it working again, so you can have consistent, even heat throughout your home.
 Image alt: A homeowner trying to turn a stiff radiator valve by hand.
Step 1: Identify Your Radiator Valve Type
Before you begin, you need to know what kind of valve you're working with. First, make sure your heating system is off and the radiator is completely cool to the touch. This is an important safety step.
Most radiators have two valves: one to control the flow of hot water in, and another on the opposite side to balance the system. The control valve is the one you’ll be working on. There are two main types:
- Thermostatic Radiator Valve (TRV): This valve has a larger head, often made of plastic, with numbers (usually 1-5) and other symbols on it. It automatically adjusts the water flow to maintain a set room temperature.
- Manual Valve: This is a simpler, cap-style valve that you turn by hand to open or close, much like a faucet. It doesn't regulate temperature automatically; it's either on or off.
The other valve is called a lockshield valve. It's usually covered with a plastic cap and is set by a professional to balance the heating system. You should generally avoid adjusting this valve unless it is also stuck.
Step 2: How to Loosen a Stuck Valve
Once you’ve identified your valve type and ensured the radiator is cool, you can gather your tools and get started.
Tools You'll Need:
- Penetrating oil (like WD-40 or a similar product)
- An adjustable wrench
- A towel or old cloth
For a Stuck Thermostatic Radiator Valve (TRV)
The most common issue with a TRV is a stuck pin inside the valve body, which stops it from opening or closing.
- Set the Valve to Max: Turn the numbered dial to the highest setting (e.g., "5"). This retracts the mechanism inside, which might be enough to free it. If it still won’t turn or doesn't solve the heating issue, proceed to the next step.
- Remove the Head: Unscrew the large plastic head from the metal valve body. Most TRV heads unscrew by hand, usually by turning a metal ring at the base counter-clockwise.
- Locate the Pin: Once the head is off, you will see a small metal pin sticking up from the center of the valve body. This is the part that gets stuck.
- Lubricate and Loosen: Spray a small amount of penetrating oil around the base of the pin. Using the handle of a screwdriver or a small pair of pliers, gently tap the pin down and see if it pops back up on its own. Press it in and out a few times to work the lubricant in. It should move freely about an eighth of an inch.
- Reassemble: Once the pin is moving freely, screw the thermostatic head back on, turn your heating on, and check if the radiator heats up as expected.
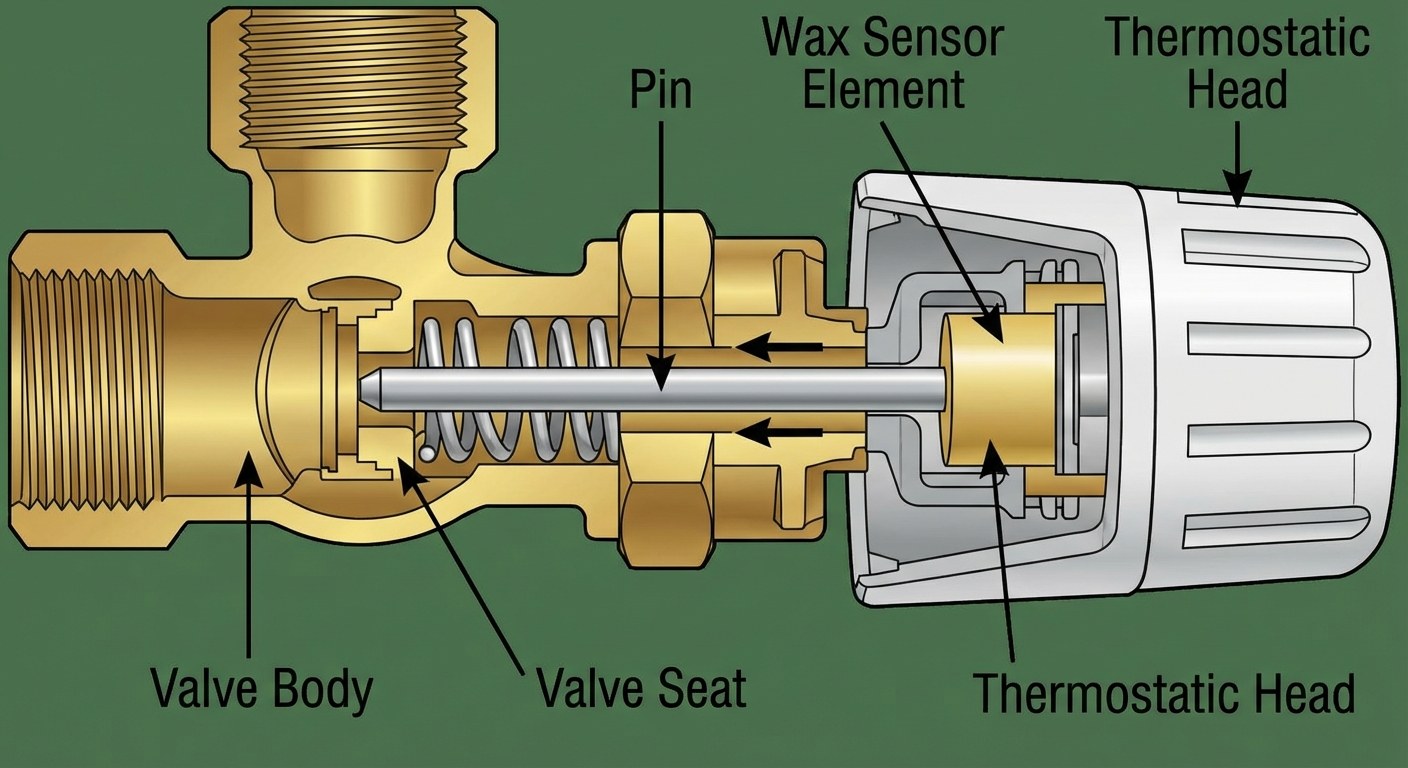 Image alt: A diagram illustrating the location of the pin inside a TRV after the head has been removed.
For a Stuck Manual Valve
A manual valve can seize up from mineral buildup, making the handle difficult or impossible to turn.
- Apply Lubricant: Place a towel under the valve to catch drips. Spray a small amount of penetrating oil where the valve stem (the part you turn) enters the main valve body. Let it sit for about 10 minutes to penetrate the mechanism.
- Protect the Valve: Wrap your cloth around the valve handle to prevent the wrench from scratching or damaging it.
- Gently Work it Loose: Adjust your wrench to fit snugly over the cloth-covered handle. Gently try to rock the valve back and forth—no more than an eighth of a turn in each direction. Use steady, gentle pressure. Do not force it, as this could break the valve and cause a leak.
- Check for Movement: Continue the gentle rocking motion until you feel the valve start to move more freely. Once it does, turn it fully open and then fully closed a few times to spread the lubricant.
- Test: Wipe away any excess oil, turn your heating on, and see if the radiator heats up properly.
When to Stop and Call a Professional
While fixing a stuck valve is often a straightforward task, there are times when it’s best to call for help.
Stop what you're doing and call an HVAC technician or plumber if:
- You apply gentle pressure with a wrench and the valve still won’t budge. Applying more force can snap the valve stem and create a serious leak.
- You notice any water dripping from the valve body or its connections during or after your work.
- You free the valve, but the radiator still doesn't heat up correctly. This could indicate a more significant issue with your heating system, like trapped air or a blockage.
- Both the control valve and the lockshield valve are stuck. While the process is similar, it can be a sign of a more widespread system problem.
Typical Time and Cost
- DIY Fix:
- Time: About 30-45 minutes, including the time for the radiator to cool down.
- Cost: Under $15 for a can of penetrating oil, assuming you already have a wrench and a cloth.
- Professional Repair:
- Cost: A service call from a professional typically ranges from $100 to $250. If the valve is broken and needs to be replaced, the cost will be higher, depending on parts and labor in your area.
Getting Your Heat Back on Track
A stuck radiator valve is a minor problem that can have a major impact on your comfort. By following these steps, you can often resolve the issue yourself and restore balanced heating to your home. Keeping track of small but important tasks like this is a key part of homeownership.
For more guidance on maintaining your home and keeping everything running smoothly, download the Casa app. Casa helps you manage repairs, plan for maintenance, and gives you the confidence to tackle common homeowner challenges.


