Don't panic! While cracked fireplace bricks and mortar should never be ignored, many common issues are well within the grasp of a determined DIYer. A few hairline cracks might just be a sign of age, but larger gaps could point to more serious structural or safety issues.
In this guide, we'll walk you through everything you need to know, just like a friendly expert on the phone. We’ll help you diagnose the problem, understand the difference between a minor cosmetic fix and a major repair, and provide step-by-step instructions to get your fireplace safely back in working order.
Why Do Fireplace Bricks and Mortar Crack?
Before we grab our tools, it helps to understand what causes these cracks in the first place. Your fireplace endures some extreme conditions, and several factors can contribute to wear and tear:
- Intense Heat Cycles: The constant expansion and contraction from heating up and cooling down puts immense stress on the masonry. Over time, this thermal stress can cause hairline cracks to form in the mortar and even the bricks themselves.
- House Settling: All homes settle over time. This gradual shifting can put pressure on the rigid structure of a chimney and fireplace, leading to stress cracks.
- Water Damage: Moisture is the arch-nemesis of masonry. Water can seep in from a damaged chimney cap or flashing, get absorbed by the bricks, and freeze. This freeze-thaw cycle can break down mortar and spall (flake or chip) the face of the bricks. You might notice white, salty deposits called efflorescence, a clear sign of moisture problems.
- Original Construction: Sometimes, the issue dates back to the original build. An improperly constructed foundation or the use of incorrect mortar can lead to premature failure.
Step 1: Is It a Masonry Fireplace or a Brick Veneer?
The first step in any repair is knowing what you're working with. Your repair method will depend on whether you have a traditional solid masonry fireplace or a modern brick veneer.
- Solid Masonry: This is the classic, old-school fireplace. It's a self-supporting structure made of full-depth bricks and mortar, from the foundation right up through the chimney.
- Brick Veneer: This is a decorative layer of thin bricks or "brick slips" applied over a structural wall (often the wood framing around a pre-fabricated firebox). It looks like solid brick but isn't structural.
How to Tell the Difference:
- Look at the Edges: Find an exposed edge, like the side of the fireplace opening or an ash clean-out door. A solid brick will be several inches deep, while a veneer is typically only about an inch thick.
- The Tap Test: Gently tap a brick with your knuckle. A solid brick will have a deep, dull thud. A veneer will often sound higher-pitched and hollow.
Once you’ve identified your fireplace type, you can move on to inspecting the damage.
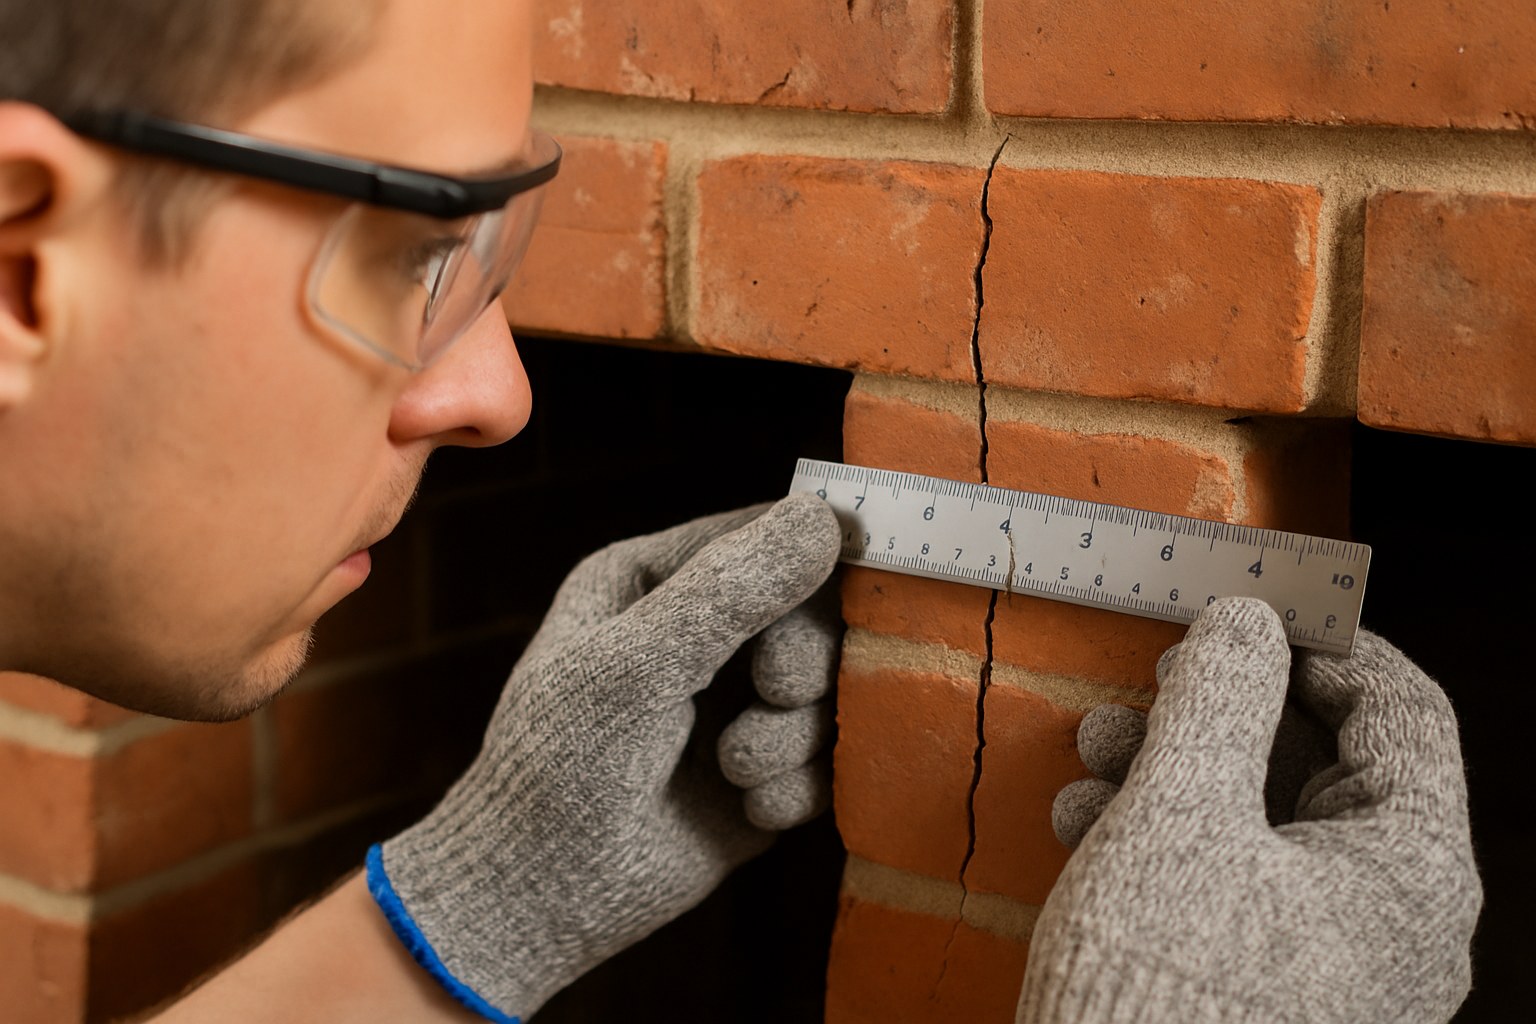
Step 2: Inspect the Damage and Assess the Severity
It’s time to play detective. Before you begin, make sure your fireplace has been completely cool for at least 12 hours. Grab a good flashlight, a ruler, and put on some safety glasses.
For Solid Masonry Fireplaces:
Shine your light inside the firebox, on the hearth (the floor of the fireplace), and as far up the chimney flue as you can see. Look for:
- Crack Size: Are the cracks hairline (less than 1/8 inch wide)? Or are they larger gaps? Use your ruler to measure.
- Loose Bricks: Gently press on several bricks with your fingertips. Do any of them shift or feel loose?
- Moisture Signs: Look for those white, powdery stains (efflorescence) or dark, sooty stains that could indicate water or smoke leaks.
For Brick Veneer Fireplaces:
Examine the entire surface of the fireplace surround.
- Crack Location: Are the cracks just in the mortar joints, or are the thin bricks themselves cracked?
- Loose Sections: Press gently on different areas. Do you notice any bulging, or are any of the veneer bricks loose to the touch?
Based on your inspection, you can decide if this is a DIY job or if it's time to call in a pro.
Step 3: The DIY Repair Guide
If your inspection revealed minor to moderate cracks with no signs of major structural or water issues, you’re ready to get to work!
How to Repair Minor Cracks (Under 1/8 inch) in a Masonry Fireplace
This is a common repair for small cracks in the firebox mortar.
Tools You'll Need:
- Drop cloth
- Safety glasses and work gloves
- Cold chisel or old screwdriver
- Stiff brush and a shop vacuum
- Spray bottle with water
- Pre-mixed refractory mortar (This is crucial! Regular mortar will crack under high heat.)
- Margin trowel and a sponge
Instructions:
- Prep: Spread your drop cloth to protect your hearth and floor.
- Clean the Cracks: Use the cold chisel to gently chip away any loose, crumbling mortar from inside the crack.
- Vacuum: Use the stiff brush and shop vacuum to completely remove all dust and debris from the joint. A clean surface is essential for a good bond.
- Dampen: Lightly mist the crack with your spray bottle. This prevents the dry bricks from sucking the moisture out of the new mortar too quickly.
- Apply Mortar: Scoop some refractory mortar onto your margin trowel and press it firmly into the crack, making sure it's completely filled.
- Smooth: Use the flat edge of the trowel to smooth the joint so it’s flush with the surrounding brick.
- Clean Up: Use a damp sponge to wipe away any excess mortar from the face of the bricks.
- Cure: Let the mortar cure for at least 24 hours before lighting a fire. Follow the manufacturer's instructions, as some may require a small initial "curing fire."
How to Repair Moderate Cracks in a Masonry Fireplace (Tuckpointing)
If you have wider cracks or several areas of failing mortar, you'll need to do a process called tuckpointing—removing the old mortar and replacing it.
Tools You'll Need:
- Everything from the minor repair list, plus:
- A joint raker or grinder with a masonry wheel
- Bagged refractory mortar and a bucket for mixing
- Pointing trowel
Instructions:
- Remove Old Mortar: Use a joint raker to scrape out the old, damaged mortar to a depth of about 1/2 inch. This is the most labor-intensive part.
- Clean and Dampen: Thoroughly brush and vacuum the joints, then mist them with water.
- Mix Mortar: Mix your bagged refractory mortar with water in the bucket according to the directions. Aim for a peanut butter-like consistency.
- Fill the Joints: Load mortar onto your pointing trowel and pack it firmly into the horizontal and vertical joints.
- Strike the Joint: Once filled, "strike" or smooth the joint with the edge of the trowel for a clean, professional finish that matches the existing joints.
- Clean and Cure: Wipe away excess mortar from the bricks with a damp sponge. Allow the repair to cure for 48-72 hours before using the fireplace.
How to Repair Minor Cracks in a Veneer Fireplace
For small cracks in the mortar of a veneer fireplace, a high-heat caulk is often the easiest and best solution.
Tools You'll Need:
- Drop cloth
- Safety glasses
- Stiff brush and sponge
- High-temperature fireplace mortar caulk
- Caulk gun and utility knife
Instructions:
- Clean: Brush out any debris from the crack and wipe the area with a damp sponge.
- Apply Caulk: Cut the nozzle of the caulk tube to a small, 1/8-inch opening. Squeeze a steady bead of caulk directly into the crack until it's filled.
- Smooth: Wearing a glove, run your finger along the bead to smooth it for a clean finish.
- Clean Up and Cure: Wipe away any excess with a damp sponge and let it cure for at least 24 hours.
When to Call a Professional
DIY is empowering, but it’s vital to know your limits. Your fireplace is a matter of home safety. Call a certified chimney professional or mason immediately if you see:
- Cracks wider than 1/4 inch.
- Any loose or shifting structural bricks.
- Bulging or leaning in the fireplace or chimney structure.
- Significant evidence of water damage or large areas of efflorescence.
- You simply don't feel comfortable tackling the repair yourself.
How Much Does It Cost to Fix a Cracked Fireplace?
The cost can vary dramatically based on the extent of the damage.
- DIY Repair: If you're fixing minor cracks, your costs will be minimal. A tub of refractory mortar or a tube of fireplace caulk costs between $20 to $50.
- Professional Repair: Hiring a mason for professional tuckpointing or minor repairs can range from $300 to $1,500. According to Forbes Home, more extensive structural repairs, like rebuilding a firebox, can cost $2,500 or more.
Investing in a professional inspection and repair for serious issues is always worth the price for the safety and peace of mind it provides.

Keep Your Home Safe and Cozy
Fixing a few cracks in your fireplace is a rewarding project that protects your home and restores the beauty of your hearth. By carefully diagnosing the issue and following the right steps, you can ensure many more seasons of safe, warm, and cozy fires.
Feeling a bit out of your depth or just want a guiding hand through your home maintenance projects? Download the Casa app today! Casa provides clear, step-by-step guides for hundreds of home repairs, helps you keep track of your maintenance tasks, and can connect you with trusted, vetted professionals in your area when you need one. Take the guesswork out of homeownership and let Casa be your partner in creating a safe and comfortable home.


