The good news is that you've found the problem, and you’re in the right place to solve it. Fixing the damage is a two-part process: first, you need to address the pest problem, and second, you need to repair the entry points and damage they’ve left behind. Ignoring the holes is like leaving the front door open for them to return.
In the U.S. alone, an estimated 14.8 million homes reported seeing rodents in a single year, so you are far from alone in this battle. In this guide, we'll walk you through everything, step-by-step, just like a friendly expert on the phone. We’ll cover how to inspect the scene, determine if the pests are still active, and show you how to repair holes in drywall, wood, and concrete.
Step 1: Become a Detective—Inspect and Document the Damage
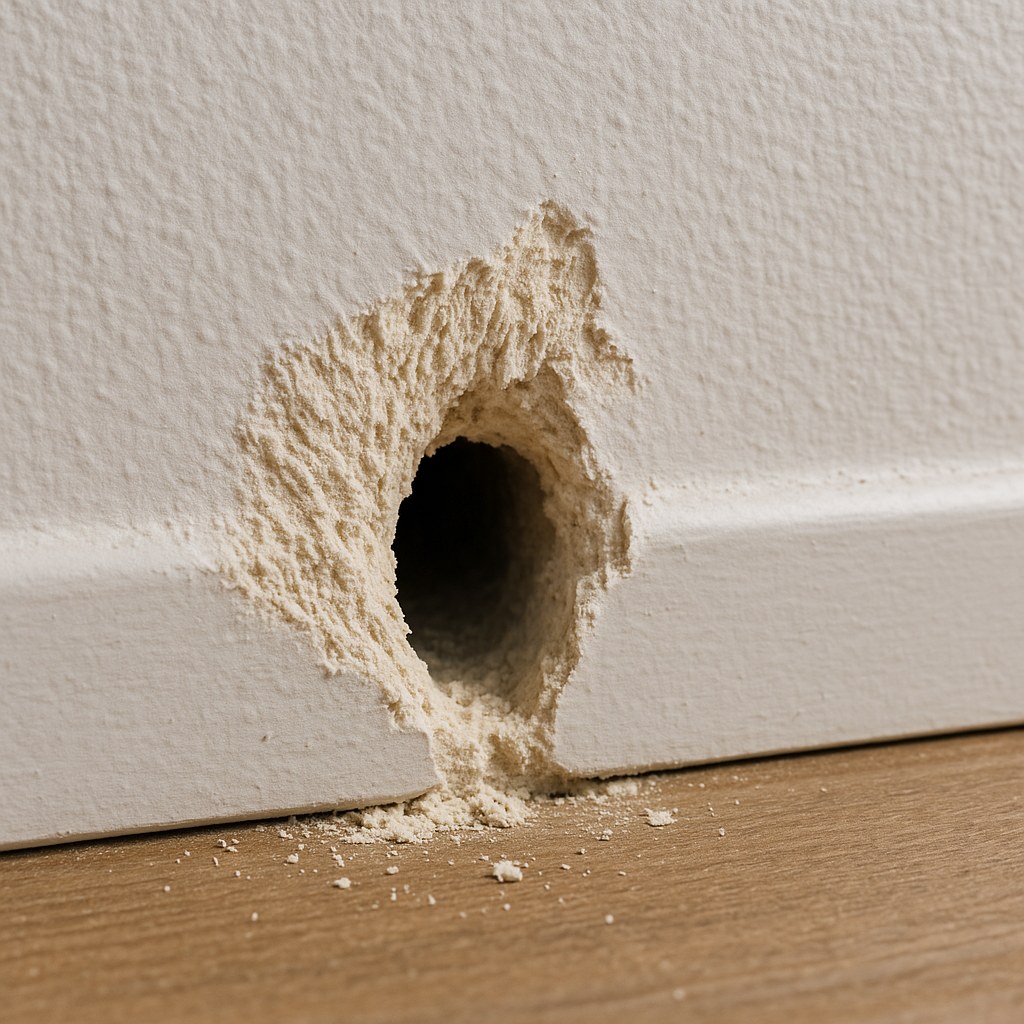
Before you can fix the problem, you need to understand its full scope. Don't just focus on the one hole you found; there are likely more. It's time to put on your detective hat and get a clear picture of what you're dealing with.
What you'll need:
- Disposable gloves
- A bright flashlight
- Tape measure
- Your smartphone
Here's what to do:
- Gear Up: Put on your disposable gloves. This is important for protecting yourself from any potential contaminants left by pests.
- Scan the Area: Using your flashlight, carefully inspect the walls, floors, and baseboards in the room where you found the damage. Pay close attention to corners, areas behind furniture, and entry points for utility lines.
- Measure and Record: For every hole you find, use your tape measure to determine its widest point. Jot down the measurements or make a note on your phone.
- Take Photos: Snap clear pictures of all the holes and gnaw marks. This documentation is useful for tracking the problem and will be helpful if you decide to call a professional later.
- Look for Clues of an Active Infestation: This is the most critical part of your inspection. Look for:
- Droppings: Small, dark, rice-shaped droppings are a classic sign of mice or rats.
- Nesting Materials: Check for shredded paper, insulation, or fabric tucked away in hidden corners.
- Ammonia Smell: A strong, stale, ammonia-like odor can indicate rodent urine and a well-established presence.
- Scratching Sounds: Listen carefully, especially at night, for scratching or scurrying sounds in the walls or ceiling.
Once your inspection is complete, you'll face a crucial question: are the pests gone, or are they still living in your home?
Step 2: Address the Root Cause—Is the Infestation Active?
Patching a hole while rodents are still inside is like locking a burglar in your house. You have to ensure the pests are gone before you seal up their entryways. If your inspection turned up fresh droppings, a distinct smell, or you've been hearing noises, you need to address the active infestation first.
What you'll need:
- Disposable gloves and an N95 mask
- Wooden snap traps
- Peanut butter for bait
Safety First: Always wear gloves and a mask when handling traps or cleaning up after rodents to protect yourself from diseases they can carry.
- Bait and Set the Traps: Dab a pea-sized amount of peanut butter onto the bait pad of several snap traps.
- Strategic Placement: Place traps perpendicular to the wall, with the baited end facing the wall. Rodents tend to run along baseboards, so this placement is most effective. Set them near the holes and any droppings you found.
- Arm and Monitor: Carefully arm the traps according to their instructions. Check them at least twice a day.
- Dispose and Reset: If you catch a rodent, wear gloves to dispose of it in a sealed plastic bag in an outdoor trash bin. Reset the trap.
- The All-Clear Signal: Continue this process until you have seven consecutive days with no new catches and no new signs of droppings or gnawing. This is a strong indicator that the immediate problem has been resolved.
If after a week you are still catching rodents or seeing fresh signs, it's time to call in the cavalry. A licensed pest control company has the tools and expertise to handle a persistent infestation.
Step 3: The Repair Phase—Patching the Holes
Once you're confident the pests are gone, it's time to repair the damage. The method you'll use depends on the material (drywall, wood, or concrete) and the size of the hole.
How to Repair Holes in Drywall
For Small Holes (Less than 1/2 inch):
This is a quick and easy fix.
- Prep the Area: Use a utility knife to carefully trim away any loose paper or jagged edges around the hole.
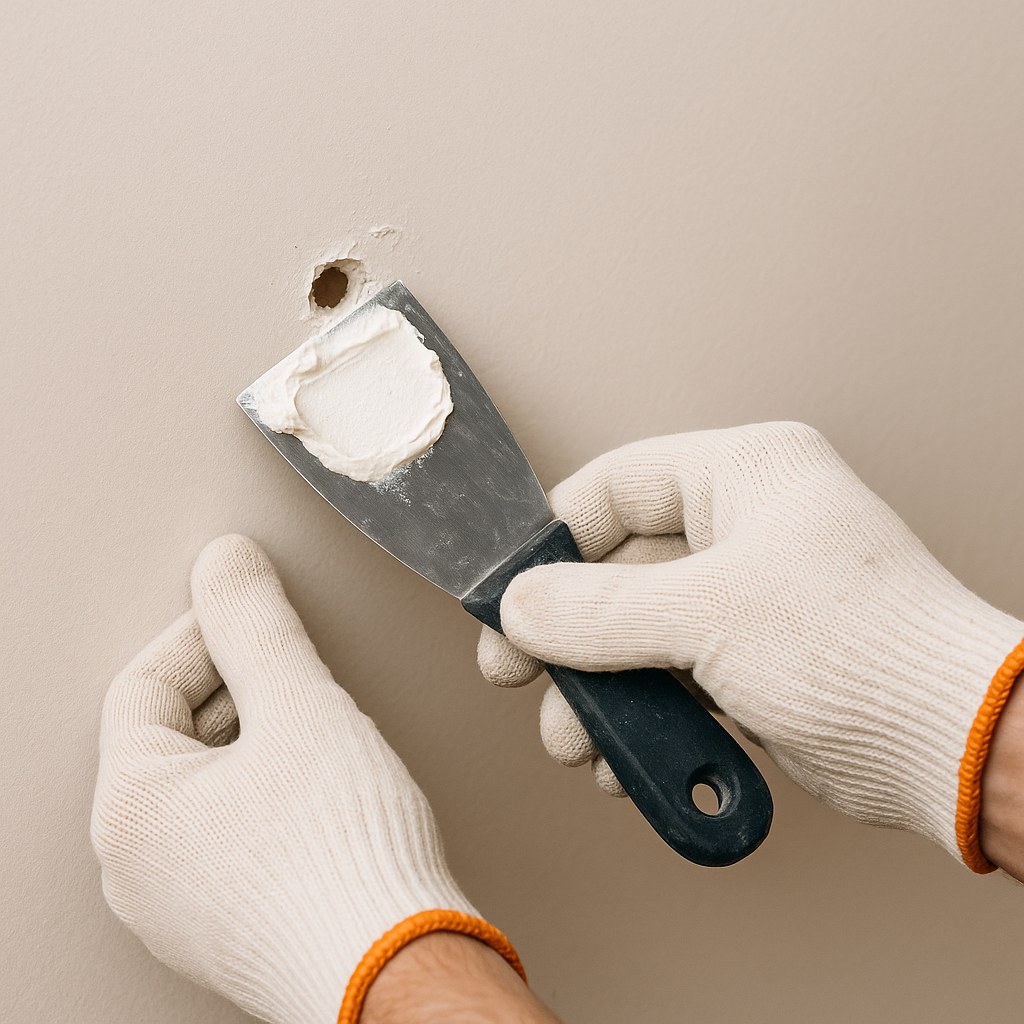
- Spackle: Using a putty knife, scoop up some lightweight spackle and press it firmly into the hole. Overfill it slightly.
- Smooth It Out: Scrape the putty knife across the patch to smooth it flush with the wall.
- Dry and Sand: Let the spackle dry (usually 15-30 minutes). Once dry, gently sand the area with fine-grit sandpaper until it's perfectly smooth.
- Paint: Wipe away the dust with a cloth and apply a coat of matching paint.
For Medium Holes (Up to 3 inches):
This requires a bit more support.
- Clean and Prep: Cut the damaged area into a clean square with a utility knife.
- Apply a Patch: Place a self-adhesive drywall mesh patch over the hole, ensuring it's centered and pressed down firmly.
- First Coat of Compound: Using a drywall knife, spread a thin layer of joint compound over the mesh, extending about two inches beyond the patch edges. Feather the edges to blend them with the wall.
- Dry and Sand: Let it dry completely (this can take a few hours). Once dry, sand it smooth.
- Second Coat: Apply a second, thinner coat of compound, feathering it out even wider than the first. Let it dry, then sand again.
- Prime and Paint: Wipe away all dust, apply a coat of primer over the patch, let it dry, and then paint it to match your wall.
How to Repair Holes in Wood Floors
For Small Gnaw Marks or Holes:
- Clean: Use a shop vacuum to remove any debris from the hole.
- Fill: Choose a wood filler that matches your floor color. Press it firmly into the damaged area with a putty knife until it's full.
- Smooth: Scrape the surface flush with the floor, moving in the direction of the wood grain.
- Dry: Wipe away any excess filler and let it harden according to the product's instructions (usually about 30 minutes). You can then apply a matching stain if needed.
For Medium Holes (Requires more skill):
- Drill a Clean Hole: Use a drill with a spade bit to turn the ragged, gnawed hole into a perfect, clean circle.
- Cut a Plug: Cut a piece of hardwood dowel to the exact depth of the hole.
- Glue and Set: Apply wood glue to the sides of the dowel plug and gently tap it into the hole with a rubber mallet until it's flush with the floor.
- Finish: Wipe away excess glue immediately. After the glue has set (about an hour), sand the plug smooth, stain it to match, and apply a coat of polyurethane to seal it.
How to Repair Holes in Concrete
For Small Holes:
- Prep: Sweep out any loose debris. Use a stiff wire brush to roughen the inside of the hole, which helps the new concrete bond.
- Dampen: Lightly mist the hole with water until it's damp but not puddled.
- Mix and Patch: Mix a small batch of fast-setting concrete mix. Pack it firmly into the hole with a trowel, making sure there are no air pockets.
- Smooth and Cure: Smooth the surface flush with the surrounding concrete and let it cure undisturbed for at least an hour.
Knowing When to Call a Professional
DIY is empowering, but it’s also important to know your limits. You should call a professional if:
- The Pest Problem Persists: If you're still seeing signs of rodents after a week of trapping, a pest control professional is your best bet. A professional service can cost between $200 and $600 but is worth it for peace of mind.
- The Damage is Extensive: If a hole is larger than 3 inches or you suspect there might be structural damage (e.g., chewed wires, damaged joists), call a general contractor immediately.
- You're Not Confident with the Repair: For complex cosmetic repairs, like perfectly matching a wood floor stain, a flooring professional or handyman can ensure a flawless finish.
Take Back Your Home
Finding and fixing damage from pests is a project every homeowner may face at some point. By following these steps—inspecting thoroughly, handling the infestation, and making careful repairs—you can restore your home and seal it off from future intruders.
Feeling overwhelmed or want more guided help for your home maintenance projects? Download the Casa app today. Our app provides easy-to-follow, step-by-step guides for hundreds of home repairs. And if you decide a job is too big to tackle alone, Casa can connect you with a network of trusted, vetted professionals to get it done right.
Related Reading


