Think of me as your friendly expert on the other end of the line. I’m here to walk you through every step, from making the first measurement to testing out your brand-new blinds. Let's get this done together and save you some money in the process!

Before You Begin: Your Pre-Installation Checklist
A little preparation goes a long way in ensuring a smooth installation. Before you even open the box, let’s make sure you have everything you need.
Gather Your Tools and Materials
Having the right tools on hand will make this job ten times easier. Here’s what you’ll likely need:
- Steel Tape Measure: For accurate measurements. Don’t eyeball it!
- Pencil: For marking your bracket locations.
- Drill with Drill Bits: To create pilot holes, which prevent wood from splitting.
- Screwdriver: A Phillips head is most common, but check the screws that come with your blinds.
- Level: A 2-foot or 4-foot level is crucial for ensuring your blinds hang straight, especially for outside mounts.
- Sturdy Ladder or Step Stool: Safety first!
- For removing old blinds: A flathead screwdriver can help pop open old bracket clips.
- For new installations into drywall: Plastic wall anchors are a must if you’re not drilling into a wooden stud.
The Big Decision: Inside Mount vs. Outside Mount
This is the first choice you'll make, and it determines how you measure and where you'll install the brackets.
-
Inside Mount: The blinds fit neatly inside the window frame or casing. This creates a clean, minimalist look that showcases your window trim. The downside is that it requires very precise measurements, and there will be small gaps on the sides where light can seep through.
-
Outside Mount: The blinds are mounted on the wall or the window trim outside the frame. This style is more forgiving with measurements and is excellent for blocking more light. It can also be used to hide less-than-perfect window frames or to make a window appear larger than it is.
There’s no right or wrong answer—it’s all about the look you want to achieve and the specifics of your window frame.
Part 1: Removing Old Blinds (If You're Replacing)
If you have old blinds to take down, let’s start there. This is usually a quick and simple process.
- Raise the Old Blinds: Fully retract the old blinds so they are neatly stacked at the top.
- Open the Bracket Clips: The headrail (the top bar) is held in place by mounting brackets. Most have a small clip or door on the front. Use a flathead screwdriver to gently pry these open.
- Remove the Headrail: With the clips open, the headrail should tilt forward and down. Carefully lift it out of the brackets and set it aside.
- Unscrew the Old Brackets: Use your screwdriver or drill to remove the screws holding the old brackets in place.
If you plan to use the same screw holes, great! If not, now is the perfect time to fill the old holes with a dab of wood filler for a clean, professional finish.
Part 2: The Most Important Step – Measuring Accurately
Whether you’re doing an inside or outside mount, accurate measurements are the key to success. Always use a steel tape measure for the best results.
How to Measure for an Inside Mount
For inside mounts, you need to be precise. The factory will make slight deductions from your measurements to ensure the blinds operate freely, so provide the exact window opening size.
- Measure the Width: Measure the width inside the window frame at three different points: the top, middle, and bottom. Record the narrowest of the three measurements. This ensures your blinds won’t get stuck.
- Measure the Height: Measure the height of the window opening from the top sill to the bottom sill at three points: left, middle, and right. Record the longest of the three measurements.

How to Measure for an Outside Mount
Outside mounts offer more flexibility. The goal here is to ensure adequate overlap for light control and privacy.
- Measure the Width: Measure the width of the area you want to cover. A good rule of thumb is to add at least 2-3 inches to each side of the window frame or trim. This overlap (4-6 inches total) minimizes light gaps.
- Measure the Height: Decide where you want the headrail to sit above the window frame (typically 2-4 inches above). Measure from that point down to where you want the blinds to fall (usually just below the bottom sill).
Part 3: The Installation Process
You’ve done the prep work, and now it’s time for the main event. Grab your new blinds and let’s get them up!
How to Install Inside Mount Blinds
- Mark Bracket Locations: Hold the mounting brackets inside the top corners of the window frame, typically about 2 inches in from each side. Use your pencil to mark where the screw holes will go.
- Drill Pilot Holes: At your marked spots, drill small pilot holes. This is a crucial step that prevents the wood of your window frame from cracking or splitting when you drive the screws in.
- Install the Brackets: Secure each bracket firmly with the screws provided. Make sure they are aligned and facing the correct direction according to the manufacturer’s instructions.
- Install Center Support (If Needed): If your blinds are particularly wide (usually over 48 inches), they will come with a center support bracket. Install this in the middle of the top frame to prevent the headrail from sagging.
- Snap in the Headrail: Lift the headrail and slide it into the open brackets. Push it firmly back until it clicks or snaps securely into place.
- Test Your Work: Lower and raise the blinds using the cord or wand. They should move smoothly without catching on the sides of the window frame.
How to Install Outside Mount Blinds
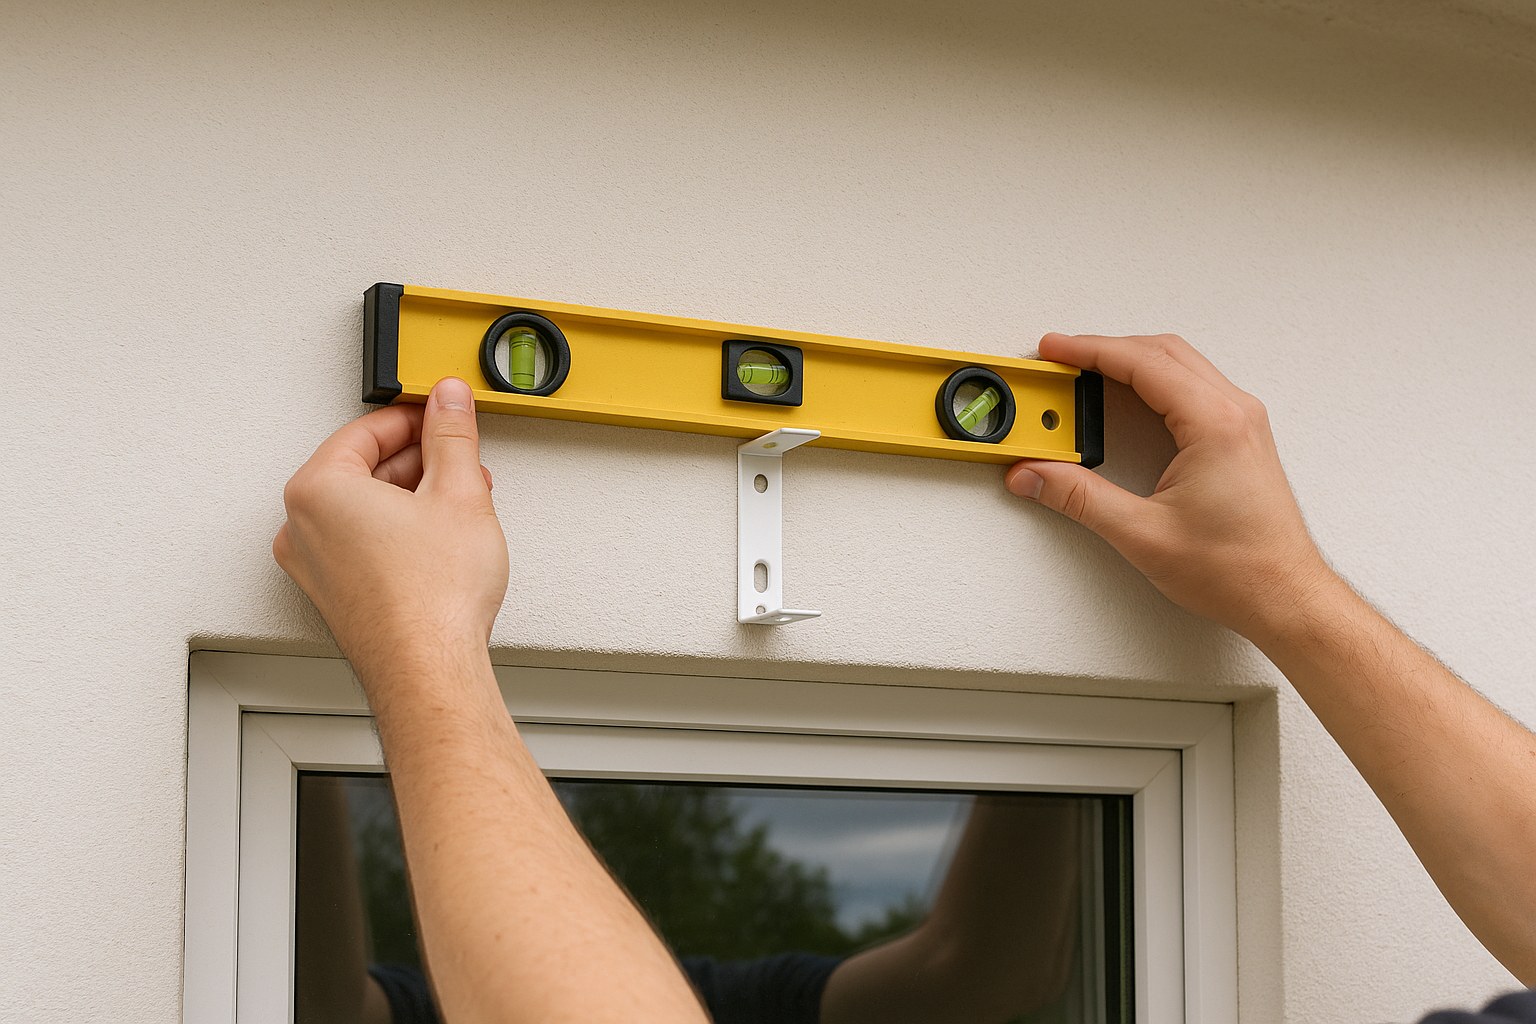
- Mark Bracket Locations: Measure and mark your bracket locations on the wall or window trim. Remember that overlap we talked about? This is where it comes into play. Use your level to draw a faint, straight line between your marks to ensure the brackets will be perfectly even. Your level is your best friend here!
- Drill Pilot Holes: Drill pilot holes at your marked locations.
- Use Wall Anchors (for Drywall): If you are drilling into drywall and not a wooden stud, you must insert plastic wall anchors first. Gently tap them into the pilot holes until they are flush with the wall. These anchors will expand as the screw goes in, providing a secure hold.
- Install the Brackets: Screw the brackets into place, making sure they are level.
- Install Center Support: Just like with an inside mount, add a center support bracket if your blinds are wide.
- Snap in the Headrail: Click the headrail into the brackets until it’s secure.
- Test for Smooth Operation: Raise, lower, and tilt the blinds to ensure they hang straight and operate without any issues.
DIY vs. Hiring a Professional: What's the Cost?
One of the biggest benefits of installing blinds yourself is the cost savings.
- DIY Cost: You'll pay for the blinds themselves, which can range from $20 for a simple vinyl blind to several hundred dollars for custom wood or motorized options. Your tool cost is minimal if you already own a basic toolkit.
- Professional Installation: According to Forbes Home, hiring a professional to install blinds typically costs between $50 and $150 per window, not including the cost of the blinds. For a whole house, that can add up quickly!
By tackling this project yourself, you’re not just saving money—you’re gaining a valuable home improvement skill.
You Did It!
Step back and admire your work. With a bit of careful measuring and a steady hand, you’ve successfully installed new blinds, instantly upgrading your space. This simple project makes a huge impact on a room's functionality and style.
Feeling confident? Ready for your next home project? Download the Casa app! It’s packed with easy-to-follow DIY guides just like this one. And for those jobs that feel a bit too big, Casa can connect you with trusted, local professionals to help you get it done right. Take control of your home maintenance with Casa today.


