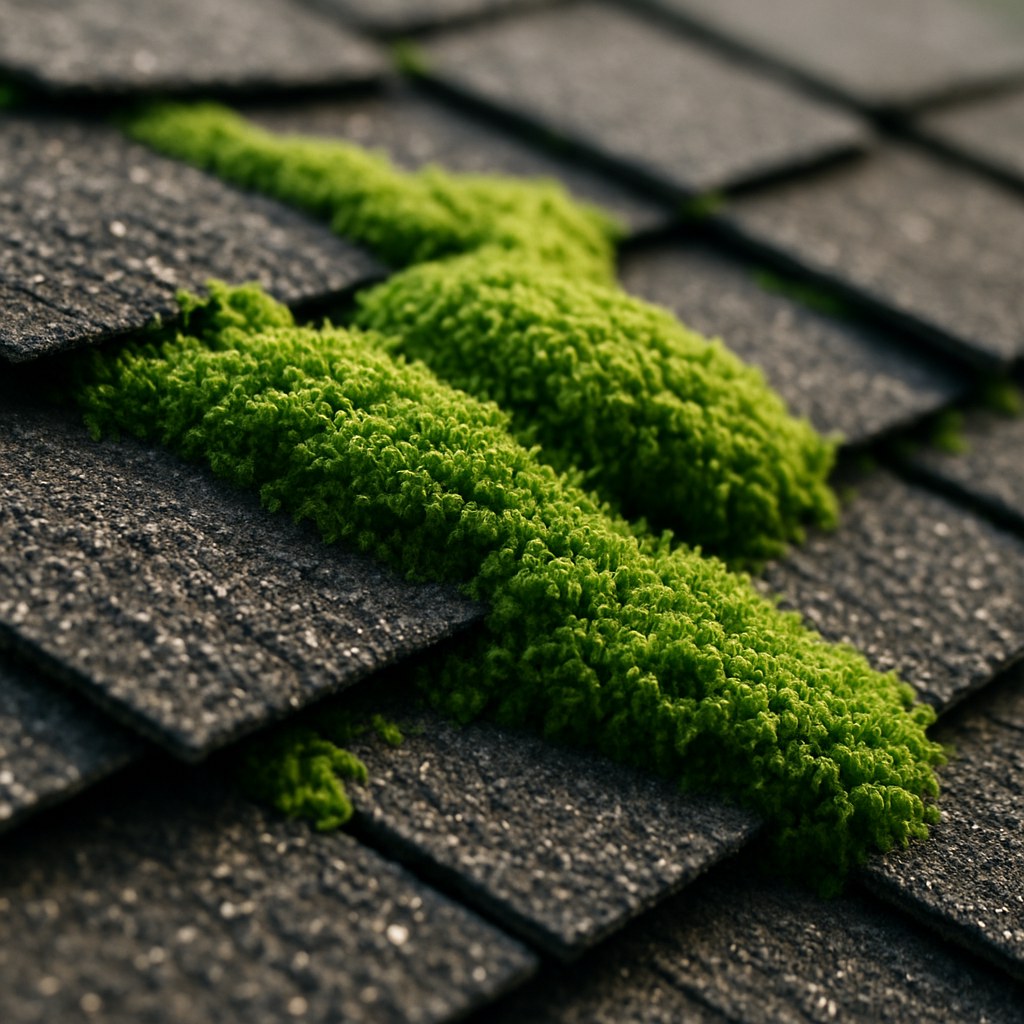
The good news is that removing moss from your roof is a very manageable DIY project for most homeowners. With the right tools, a bit of patience, and a strong focus on safety, you can restore your roof's health and curb appeal. Neglecting it, however, can lead to serious consequences. Moss acts like a sponge, holding water against your roof's surface, which can lead to rot on wood shakes and granule loss on asphalt shingles. In colder climates, this trapped moisture can freeze, expand, and crack your roofing materials.
In this guide, I'll walk you through everything you need to know, just like I would over the phone. We'll cover how to work safely on a roof, how to identify your roof type, and the specific, step-by-step cleaning methods for each. Let's get that moss off your roof for good.
Why You Can't Ignore Moss on Your Roof
Before we grab the ladder, let's quickly break down why roof moss removal is so important. Understanding the risks will help motivate you to get the job done right.
- Moisture Damage: As mentioned, moss is a moisture magnet. It holds rainwater against your shingles, preventing them from drying out properly. This constant dampness can accelerate wear and tear, and for wood roofs, it's a direct invitation for rot and decay.
- Shingle and Tile Damage: On asphalt shingle roofs, moss roots can grow underneath the shingles, lifting them and making them vulnerable to being torn off by wind. In the winter, the water held by the moss can freeze, causing a phenomenon known as "frost heave," which can crack shingles and tiles.
- Gutter Blockages: Large clumps of moss can get dislodged by heavy rain or wind, sliding right into your gutters. Clogged gutters can lead to water overflowing and damaging your home's siding, foundation, and landscaping.
- Reduced Curb Appeal: A moss-covered roof can make a well-maintained home look neglected. Cleaning it up can instantly boost your home's appearance and value.
Safety First: Your Guide to Working on the Roof
I can't stress this enough: your safety is the absolute number one priority. Working at heights is inherently dangerous, and a slippery, moss-covered roof adds another layer of risk. Before you even think about cleaning, you need to conduct a thorough safety and access evaluation.
Essential Safety Gear:
- Non-slip footwear: A pair of sturdy, rubber-soled boots with good grip is non-negotiable.
- Work gloves: To protect your hands from the cleaning solution and rough roof surfaces.
- Safety glasses: To protect your eyes from splashes of cleaning solution.
- Roof safety harness: For any roof, but especially for those with a moderate to steep pitch, a harness connected to a secure roof anchor is a critical piece of safety equipment.
Proper Ladder Use:
- Choose the right spot: Place your ladder on firm, level ground. Avoid soft soil or uneven patches.
- Get the angle right: The ladder should be angled so that for every four feet of height, the base is one foot away from the house.
- Extend it properly: The ladder must extend at least 3 feet above the roof edge to give you something to hold onto as you get on and off.
- Climb with care: Always maintain three points of contact with the ladder (two hands and one foot, or two feet and one hand).
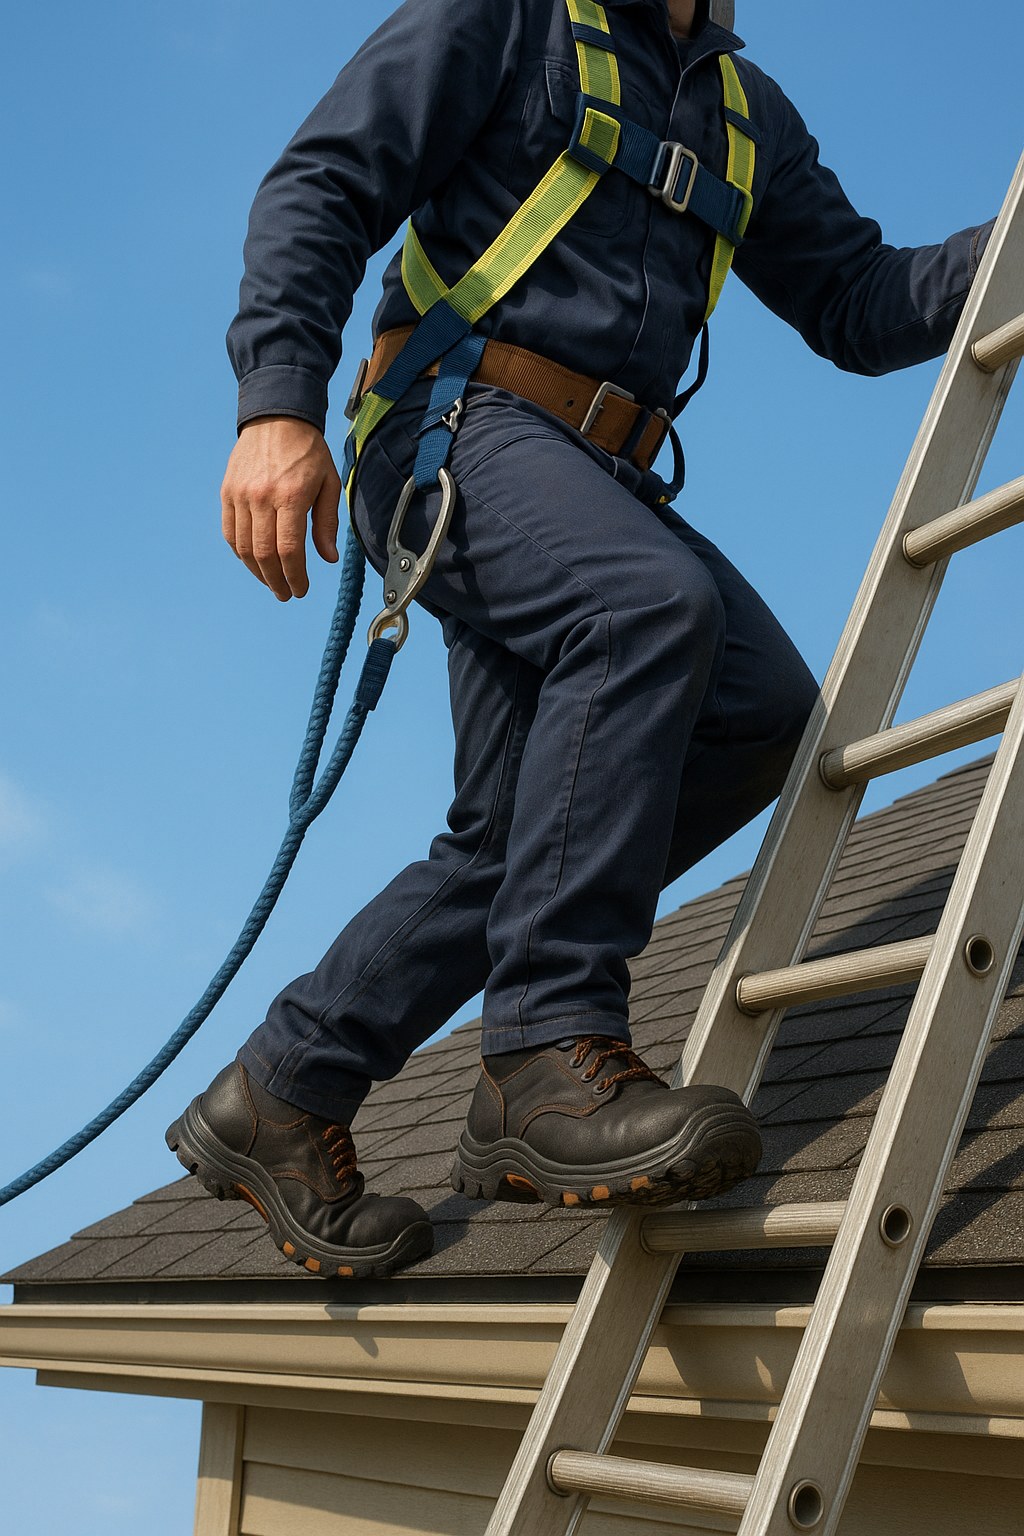
The Critical Question: Once you're at the top of the ladder, inspect the roof surface. Is it excessively steep? Are there damaged areas? Gently test your footing on the roof edge. Can you comfortably stand and move on the roof without slipping?
If the answer is no—or if you feel any hesitation at all—stop right there. There is no shame in calling a professional. A professional roofer has the experience, insurance, and specialized equipment to do the job safely. The cost to hire a pro for moss removal, typically ranging from $300 to $800, is a tiny fraction of the cost of a hospital visit or major roof repair.
Know Your Roof: Identifying the Material
The method you use to clean the moss depends entirely on your roofing material. Using the wrong technique can cause permanent damage. Take a close look at a clean section of your roof to identify what you're working with:
- Asphalt Shingles: The most common roofing material in North America. They have a gritty, sandpaper-like texture due to embedded granules.
- Metal or Glazed Tile: These can be interlocking metal panels or shiny, baked ceramic or clay tiles. They have a smooth, often slick surface.
- Wood Shakes: These are rough, overlapping pieces of wood, usually cedar. They have a natural, grained appearance.
Once you've identified your roof type, you're ready to choose the right cleaning method.
Step by Step Guide for Roof Moss Removal
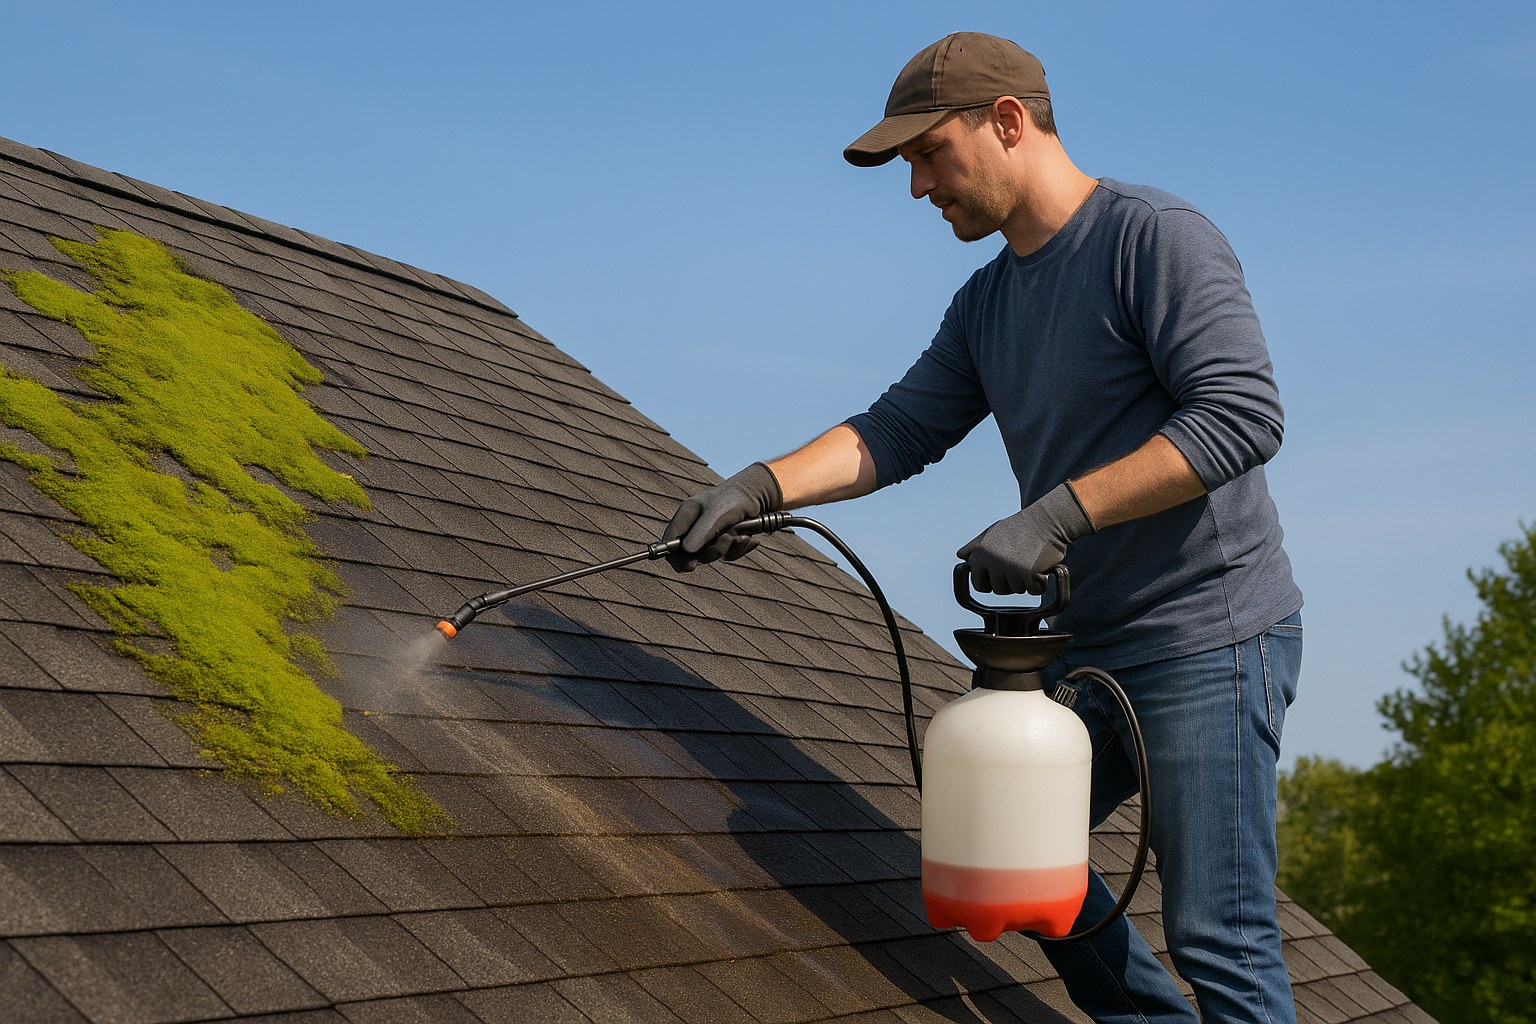
For all of these methods, we'll be using a solution made from an oxygen bleach powder (like OxiClean or a similar product). Do NOT use chlorine bleach, as it can damage roofing materials and harm your surrounding plants. Always follow the manufacturer's dilution instructions.
How to Clean Moss Off Asphalt Shingles
- Gear Up: Put on your safety glasses, gloves, and roof safety harness.
- Mix Your Solution: Fill a pump garden sprayer with the oxygen bleach solution.
- Spray the Roof: Start at the roof's ridge (the peak) and work your way down. Lightly spray the solution directly onto the moss-covered areas. Working from the top down prevents you from standing on wet, slippery surfaces.
- Let It Dwell: Allow the solution to sit for about 20-30 minutes. This gives the oxygen bleach time to kill the moss and loosen its grip. You should not let it dry completely.
- Gentle Brushing: Using a soft-bristle brush on an extension pole, gently scrub the moss patches. Always brush in a downward motion. Brushing upward can lift the shingles and break their seal, leading to leaks. Let the cleaner and the brush do the work; don't apply excessive force.
- Rinse Thoroughly: With a standard garden hose on a low-pressure setting, rinse the roof from the top down, washing away the loosened moss and cleaning solution. Never use a pressure washer, as it can strip the protective granules off your shingles.
- Clean the Gutters: Scoop all the moss and debris out of your gutters to ensure they flow freely.
How to Get Rid of Moss on a Metal or Tile Roof
The process for metal or tile is similar, but the tool you use to physically remove the moss is different to avoid scratching the surface.
- Gear Up & Mix Solution: Same as above.
- Spray the Roof: Apply the oxygen bleach solution from the ridge downward, covering all the moss.
- Let It Dwell: Wait about 20-30 minutes for the solution to work.
- Scrape Gently: Instead of a brush, use a plastic scraper or putty knife to gently lift the larger clumps of moss. Always push the scraper in a downward motion along the panels or tiles.
- Rinse Thoroughly: Use a garden hose on low pressure to rinse all debris and solution off the roof.
- Clean the Gutters: Clear out any moss that has washed into the gutters.
Removing Moss from Wood Shakes
Wood is more absorbent and delicate, so it requires a slightly different approach.
- Gear Up & Mix Solution: You know the drill.
- Pre-Wet the Roof: Before applying the cleaner, lightly wet the wood shakes with your garden hose. This prevents the wood from absorbing too much of the cleaning solution, which could cause it to dry out.
- Apply the Cleaner: Spray the oxygen bleach solution evenly over the moss.
- Let It Dwell: Give it about 30 minutes to work its magic.
- Scrub with the Grain: Using a soft-bristle brush on an extension pole, gently scrub downward, following the natural grain of the wood. This will help prevent splintering.
- Rinse Thoroughly: Rinse from top to bottom with a low-pressure hose.
- Clean the Gutters: Make sure to clear out all the dislodged moss and wood fibers.
How to Prevent Moss from Growing Back
Once your roof is clean, you want to keep it that way. Here are the most effective long-term prevention strategies:
- Install Zinc or Copper Strips: This is a fantastic preventative measure. Nail a continuous strip of zinc or copper metal along the ridge cap, just under the top row of shingles or tiles. When it rains, metallic particles wash down the roof, creating an inhospitable environment for future moss, algae, and lichen growth.
- Trim Overhanging Trees: Moss thrives in damp, shady conditions. Pruning tree branches that hang over your roof will allow more sunlight to reach it, helping it dry out faster after it rains.
- Keep Gutters and Roof Clear: Regularly remove leaves, pine needles, and other debris from your roof and gutters. This debris holds moisture and provides a fertile breeding ground for new moss spores.
Final Thoughts
A moss-free roof is a healthy roof. By tackling this project with a focus on safety and using the right techniques for your specific roof type, you can protect your home from damage and keep it looking its best.
Remember, if at any point you feel unsafe or the job seems too big, a professional is just a call away.
For more expert home maintenance guides, personalized project reminders, and easy access to trusted local professionals for the jobs you can't tackle alone, download the Casa app today. We're here to help you take the guesswork out of homeownership and empower you to manage your home with confidence.


