Casa logo

How to Remove Stubborn Mineral Deposits in Your Bathroom

Sep 12, 2025·Interiors·10 min read·By Tyler Fallon

If you’ve ever noticed that chalky, white, crusty film on your faucets, showerhead, or glass shower door, you’re not alone. Those stubborn spots are mineral deposits, often called limescale, and they’re the calling card of hard water. It’s an incredibly common issue—in fact, over 85% of American homes have hard water, which means most of us are in a constant battle against this buildup.

While it might seem like a permanent fixture in your bathroom, the good news is you can absolutely win this fight. A little bit of know-how and the right cleaning method can make your bathroom fixtures and surfaces sparkle like new.

Think of me as your expert on the line, ready to walk you through it. We’ll figure out what kind of surface you’re dealing with and choose the perfect approach, from gentle, natural solutions to heavy-duty removers for the toughest jobs. Let’s get that bathroom shining!

Close up of chalky faucet

What Are These White Spots Anyway?

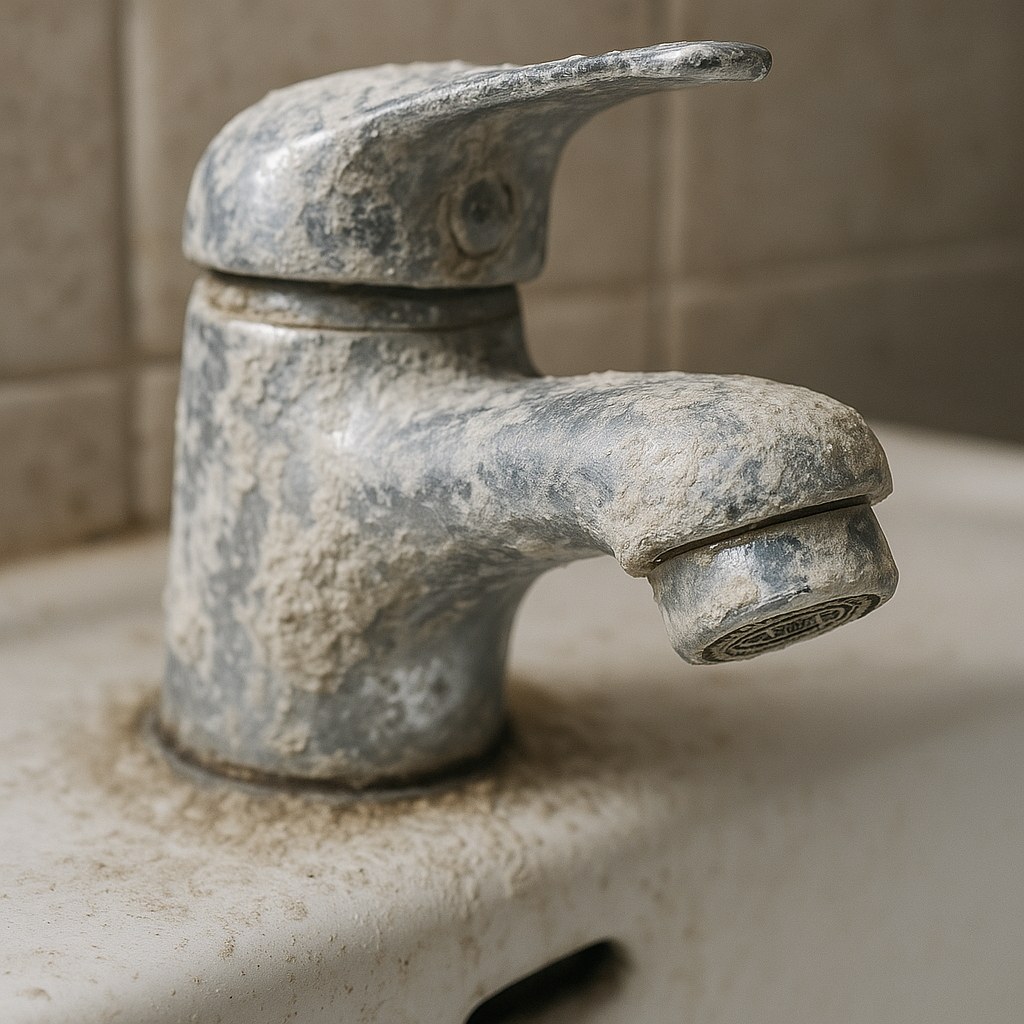
Before we dive into cleaning, let's quickly talk about what we're up against. Hard water is rich in minerals like calcium and magnesium. When water evaporates from a surface, it leaves these minerals behind. Over time, they build up into the chalky, scaly deposits you see. Besides being an eyesore, heavy buildup on faucets and showerheads can actually clog them and reduce water pressure. So, tackling this isn't just about looks—it's also about function.

Step 1: Inspect the Damage and Identify Your Surfaces

First things first, let's do a quick walkthrough of your bathroom to assess the situation. Grab a pair of rubber gloves and let’s play detective.

  1. Look around: Check all the common culprits—faucets, showerheads, tap handles, tiles (especially in the shower), glass doors, mirrors, and the edges of your sink and tub.
  2. Do a scrape test: Try to flake off a small spot with your fingernail. Does it come off easily, or is it a hard, solid crust? This will help us decide if we need a light touch or a more heavy-duty approach.
  3. Identify the material: This is the most important step! The right cleaning method depends entirely on the surface. Are the deposits on natural stone (like a marble vanity or travertine tile), metal fixtures (chrome, stainless steel), or glass, porcelain, and ceramic tile? Using the wrong cleaner, especially on natural stone, can cause permanent damage.

Once you know what you're working with, you can jump to the right section below.

How to Clean Mineral Deposits on Natural Stone

Natural stone like marble, travertine, or limestone is beautiful but delicate. It's porous and sensitive to acids—that means common cleaners like vinegar or lemon juice are a huge no-no, as they can etch and dull the surface permanently. For stone, we need to be gentle.

For Light, Filmy Buildup

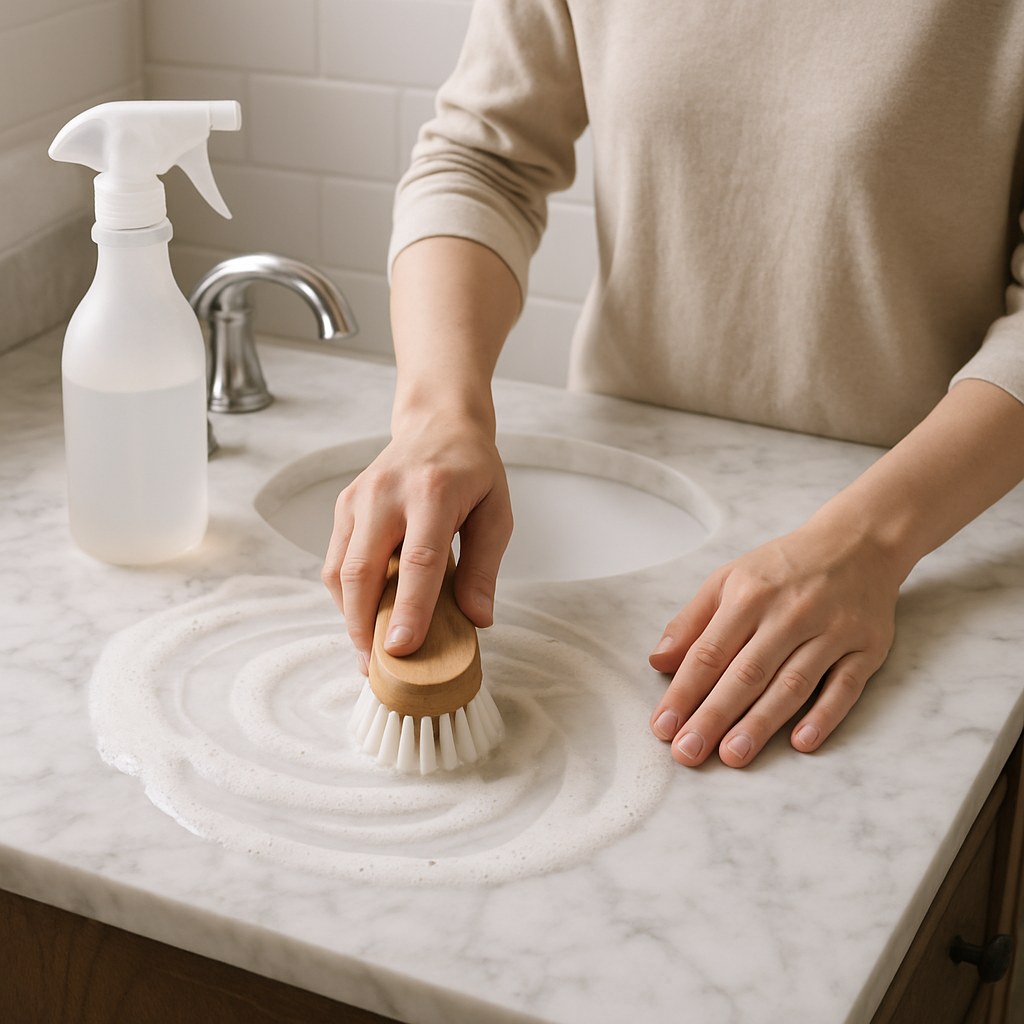
If the deposits are just a light film, a simple, pH-neutral solution is all you need. A pH-neutral cleaner is one that isn't acidic or alkaline, making it safe for sensitive surfaces.

What You'll Need:

  • A spray bottle
  • pH-neutral stone cleaner (available at hardware stores)
  • A soft-bristled brush or old toothbrush
  • Microfiber cloths

Instructions:

  1. Fill your spray bottle with warm water and a few drops of the pH-neutral stone cleaner.
  2. Spray the solution directly onto the affected stone areas.
  3. Let it sit for about 5 minutes. This gives the cleaner time to start breaking down the mineral film.
  4. Gently scrub the area with your soft brush. Use light, circular motions to avoid any scratches.
  5. Rinse the surface thoroughly with a cup or spray bottle of clean water.
  6. Dry the area completely with a clean microfiber cloth. This is key to preventing new water spots from forming right away!

person scrubbing marble countertop gently

For Heavy, Crusty Buildup

If your fingernail test revealed a hard crust that won’t budge, we need to bring out a slightly stronger, yet still stone-safe, method: a baking soda poultice. This paste will work to draw the minerals out of the stone.

What You'll Need:

  • Safety glasses and rubber gloves
  • Baking soda
  • A plastic bowl and plastic spatula
  • Plastic wrap and painter's tape
  • Microfiber cloths

Instructions:

  1. In your plastic bowl, mix baking soda with a small amount of water until it forms a thick paste, similar to the consistency of toothpaste.
  2. Using the plastic spatula, spread the paste over the mineral deposits, covering them completely.
  3. Cover the paste with a piece of plastic wrap and tape down the edges with painter's tape. This keeps the paste moist and allows it to work longer.
  4. Let it sit for at least 15-20 minutes.
  5. Remove the plastic wrap and gently wipe away the paste with a damp microfiber cloth.
  6. Rinse the area thoroughly with clean water and dry it completely with a fresh cloth.

If deposits remain: If you still see significant buildup after this treatment, it’s best to stop here. Further DIY attempts could damage the stone. This is the time to call a professional stone-care specialist who has the tools and expertise for resurfacing or deep cleaning without causing harm.

How to Clean Mineral Deposits on Metal Fixtures

Metal fixtures like faucets and showerheads are magnets for limescale. Luckily, they are generally durable enough to handle a mild acid like vinegar, which works wonders at dissolving calcium and magnesium.

For Light Scale on Faucets

If you just have some light spots around the base or on the handles, a quick spray-and-scrub will do the trick.

What You'll Need:

  • A spray bottle
  • White vinegar
  • Paper towels or a rag
  • An old toothbrush
  • A microfiber cloth

Instructions:

  1. Fill your spray bottle with a 50/50 solution of warm water and white vinegar.
  2. Spray the solution generously onto the fixture.
  3. For stubborn spots, soak a paper towel in the vinegar solution and wrap it around the fixture. Let it sit for about 10-15 minutes.
  4. Remove the paper towel and use an old toothbrush to gently scrub away the loosened deposits. Pay special attention to crevices.
  5. Rinse the fixture with warm water and dry it with a microfiber cloth to a brilliant shine.

For Heavy Buildup on Showerheads and Aerators (The Baggie Method)

If your showerhead is sputtering or the faucet aerator is clogged, it’s time for a deep soak. This hands-off method is incredibly effective.

What You'll Need:

  • A plastic sandwich bag
  • White vinegar
  • A rubber band or twist tie
  • An old toothbrush

Instructions:

  1. Place the plastic bag around the showerhead or faucet aerator.
  2. Fill the bag with enough pure white vinegar to completely submerge the parts with buildup.
  3. Secure the bag tightly with a rubber band.
  4. Let it soak for at least 45 minutes. For extremely heavy buildup, you can leave it for a few hours.
  5. Remove the bag and discard the vinegar.
  6. Use a toothbrush to scrub off any remaining deposits, which should now be soft and easy to remove.
  7. Run the water for a minute to flush out any debris inside the fixture, then rinse and dry the outside.

If deposits remain: If a long soak doesn’t clear the clog, the fixture might have internal buildup that requires disassembly. At this point, you may want to call a plumber. They can either take the fixture apart for a deep clean or recommend a replacement if it’s too far gone.

How to Clean Mineral Deposits on Glass, Tile, and Porcelain

These surfaces are the toughest in your bathroom and can handle more aggressive cleaning methods.

For Everyday Water Spots and Film

The same vinegar solution that works on metal is perfect for glass, ceramic tile, and porcelain sinks or tubs.

What You'll Need:

  • A spray bottle with a 50/50 white vinegar and water solution
  • A non-scratch scrub pad
  • A squeegee (for glass) or microfiber cloths

Instructions:

  1. Spray the solution liberally onto the glass doors, tiles, or porcelain surfaces.
  2. Let it sit for about 5 minutes to dissolve the minerals.
  3. Scrub the surfaces with a non-scratch pad.
  4. Rinse thoroughly with clean water.
  5. On glass, use a squeegee for a perfect, streak-free finish. On tile and porcelain, dry completely with a microfiber cloth.

For Heavy, Caked-On Deposits

If you’re dealing with years of buildup, especially when combined with soap scum, vinegar might not be enough. It’s time to move on to a commercial cleaner designed specifically for this job.

What You'll Need:

  • Rubber gloves
  • A commercial lime and calcium remover (like CLR or Lime-A-Way)
  • A sponge or non-scratch scrub pad
  • Good ventilation (open a window or turn on the fan)

Instructions:

  1. Safety first! Put on your gloves and make sure the bathroom is well-ventilated, as these products have strong fumes.
  2. Following the directions on the product label, apply the remover to the stubborn deposits using a sponge.
  3. Let it sit for the recommended time (usually 5-10 minutes). Don't let it dry on the surface.
  4. Scrub with your non-scratch pad until the deposits loosen and dissolve.
  5. Rinse the area thoroughly with plenty of clean water and dry with a microfiber cloth.

If deposits remain: Some mineral buildup can be so severe that it etches the surface. If commercial cleaners don't work, a professional cleaning service can help. For an average cost of $75 to $150, they can bring in specialized tools and stronger, professional-grade products to restore your surfaces without damage.

sparkling clean bathroom with shiny fixtures

Prevention: The Best Way to Fight Mineral Buildup

Tired of scrubbing? The best long-term strategy is prevention.

  • Wipe Down Surfaces: After showering, use a squeegee on glass doors and wipe down fixtures with a microfiber cloth. This takes 30 seconds and prevents minerals from ever settling.
  • Clean Regularly: A quick weekly spray-down with your vinegar solution will prevent light buildup from becoming a major project.
  • Consider a Water Softener: If you live in an area with very hard water, the ultimate solution is a whole-house water softener. A licensed plumber can install one, which will remove the minerals from your water before they ever reach your pipes and fixtures. It's an investment, but it protects your appliances, makes cleaning easier, and can even improve the feel of your skin and hair.

Take Control of Your Home Maintenance with Casa

Fixing mineral deposits is a satisfying DIY project that can make a huge difference in your bathroom’s appearance and function. By identifying your surfaces and using the right tools, you can handle almost any level of buildup.

For more easy-to-follow guides and expert advice for every corner of your home, download the Casa app today. Whether you’re tackling a project yourself or need to find a trusted, vetted professional—like a plumber or stone-care specialist—Casa is your go-to resource for seamless home maintenance. Stop letting small problems build up and take control with Casa in your corner.

Download Casa

QR Code for App Download
Download on the App Store