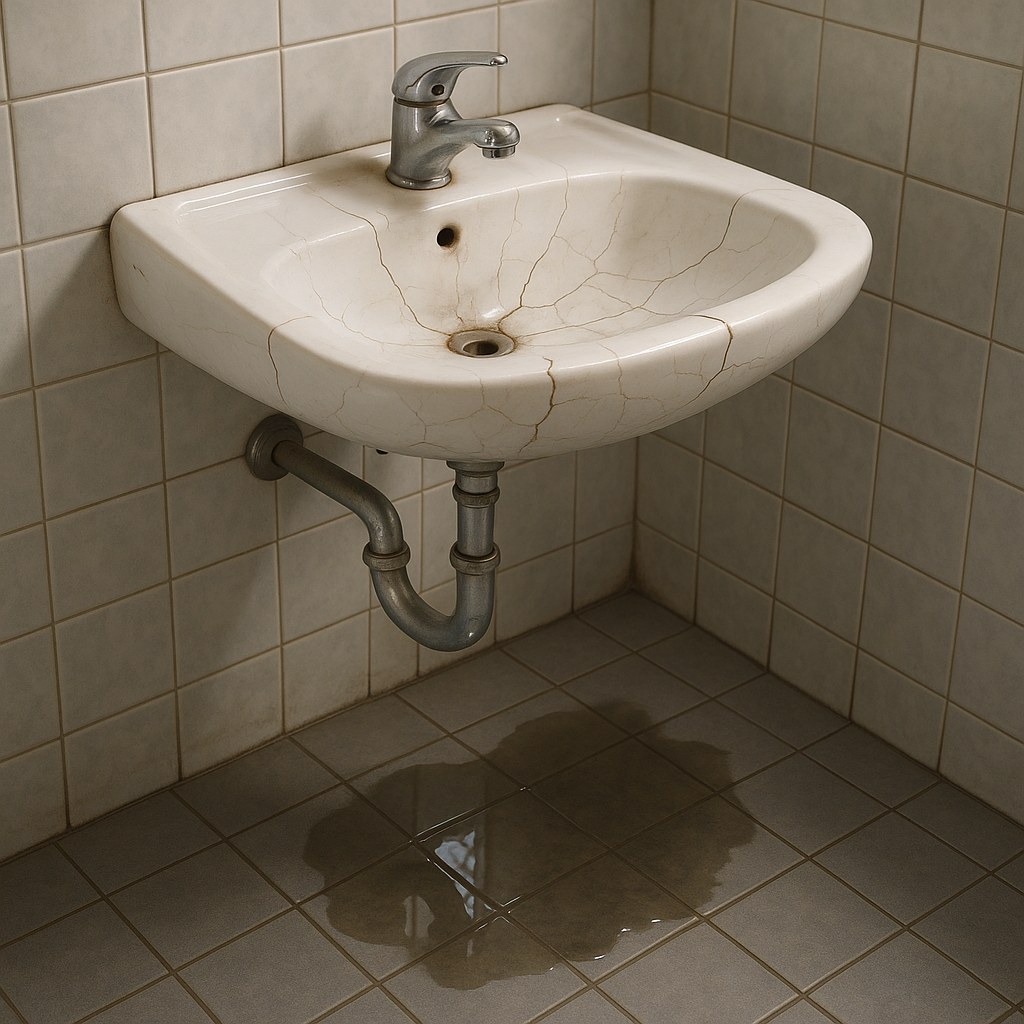
You might think this is a job reserved for a professional plumber, but with the right guidance, it’s a surprisingly manageable DIY task. Taking it on yourself can save you a significant amount of money. While the cost of a new sink can range from $50 to over $500, hiring a plumber for the installation can add another $200 to $600 in labor costs.
Think of us as your expert guide on the other end of the line. We'll walk you through everything, from preparing the area and removing your old sink to installing the new one and making sure it's perfectly sealed. Let’s get started!
Before You Begin: What You Need to Know
A little preparation goes a long way in making this project smooth and successful. Before you touch a single pipe, let's cover a few key considerations.
1. Identify Your Sink Type
The first step is to figure out what kind of sink you have. There are two main types, and the installation process is different for each:
- Drop-In Sink (or Top-Mount): This is the most common type. It has a visible rim that rests on top of the countertop. It’s "dropped in" from above into the cutout.
- Undermount Sink: This sink is installed from below the countertop, creating a seamless look where the counter edge drops directly into the basin. These are common with solid-surface countertops like granite or quartz.
There's one major exception to look out for: integrated sinks. If your sink and countertop are molded together as one continuous piece (often made of cultured marble or solid surface materials), replacing just the basin isn't possible. This job requires replacing the entire countertop and is best left to a professional contractor.
2. Gather Your Tools and Materials
Having everything you need on hand will prevent frustrating mid-project trips to the hardware store. Here’s a typical checklist:
Tools:
- Adjustable wrench
- Putty knife
- Flathead and/or ratcheting screwdriver
- Bucket
- Drill and jigsaw (if countertop modification is needed)
- Safety glasses
- Rags or old towels
Materials:
- Your new sink basin
- Plumber's putty (for drop-in sinks)
- 100% Silicone sealant (for undermount sinks)
- Potentially new water supply lines and drain parts (P-trap, tailpiece)

Step 1: Removing Your Old Sink
With your prep work done, it's time to get the old sink out of the way.
Prepare the Area for Removal
- Clear Everything Out: Start by completely emptying the cabinet beneath the sink. You'll need plenty of room to work.
- Turn Off the Water: Locate the two water supply shut-off valves under the sink—one for hot and one for cold. Turn them clockwise until they are fully closed.
- Drain the Lines: Turn on the faucet to release any remaining water and relieve the pressure in the lines.
- Disconnect the Supply Lines: Place your bucket under the connections to catch any drips. Use an adjustable wrench to disconnect the water supply lines from the faucet tails.
- Disconnect the Drain: The curved pipe under your sink is called the P-trap. It holds water to block sewer gases. Place your bucket directly underneath it and unscrew the slip-joint nuts to remove the trap. Water will spill out, so be ready!
How to Remove a Drop-In Sink
If you have a drop-in sink, carefully slice through the caulk or putty seal between the sink's rim and the countertop using your putty knife. Then, get under the sink and look for small metal clips holding the sink to the countertop. Use a screwdriver to turn the screws counter-clockwise and loosen all the clips. Once they're loose, you should be able to lift the sink straight up and out.
How to Remove an Undermount Sink
For an undermount sink, you’ll need to support it from below before you release it. Place a sturdy box or a stack of books inside the cabinet that’s just tall enough to support the sink's weight. Use your putty knife to cut the silicone seal between the sink rim and the underside of the countertop. Then, use a screwdriver to loosen the screws on the mounting brackets. The sink will drop onto your support, and you can then carefully slide it out of the cabinet.
Step 2: Preparing for the New Sink Installation
This is the "measure twice, cut once" phase. Don't skip these checks!
- Test the Fit: Carefully place your new sink into or up against the countertop cutout. Does it fit properly? A new drop-in sink should drop in freely, and its rim should cover the cutout completely. An undermount sink should fit snugly within the opening.
- Check Plumbing Alignment: With the new sink temporarily in place, check if the drain opening lines up with your existing drain pipe. Also, make sure your water supply lines are long enough to reach the new faucet connections without kinking. If the drain doesn't line up, you may need a new, different-sized tailpiece (the straight pipe coming down from the sink drain).
- Modify the Countertop (If Necessary): If your new sink is a different size or shape, you may need to modify the countertop. Warning: This can be a tricky job. While possible on laminate or wood countertops with a jigsaw, we highly recommend hiring a professional contractor for modifying stone countertops like granite or quartz to avoid costly cracks.
Step 3: How to Install Your New Sink Basin
It's time for the main event! The process varies slightly depending on your sink type.
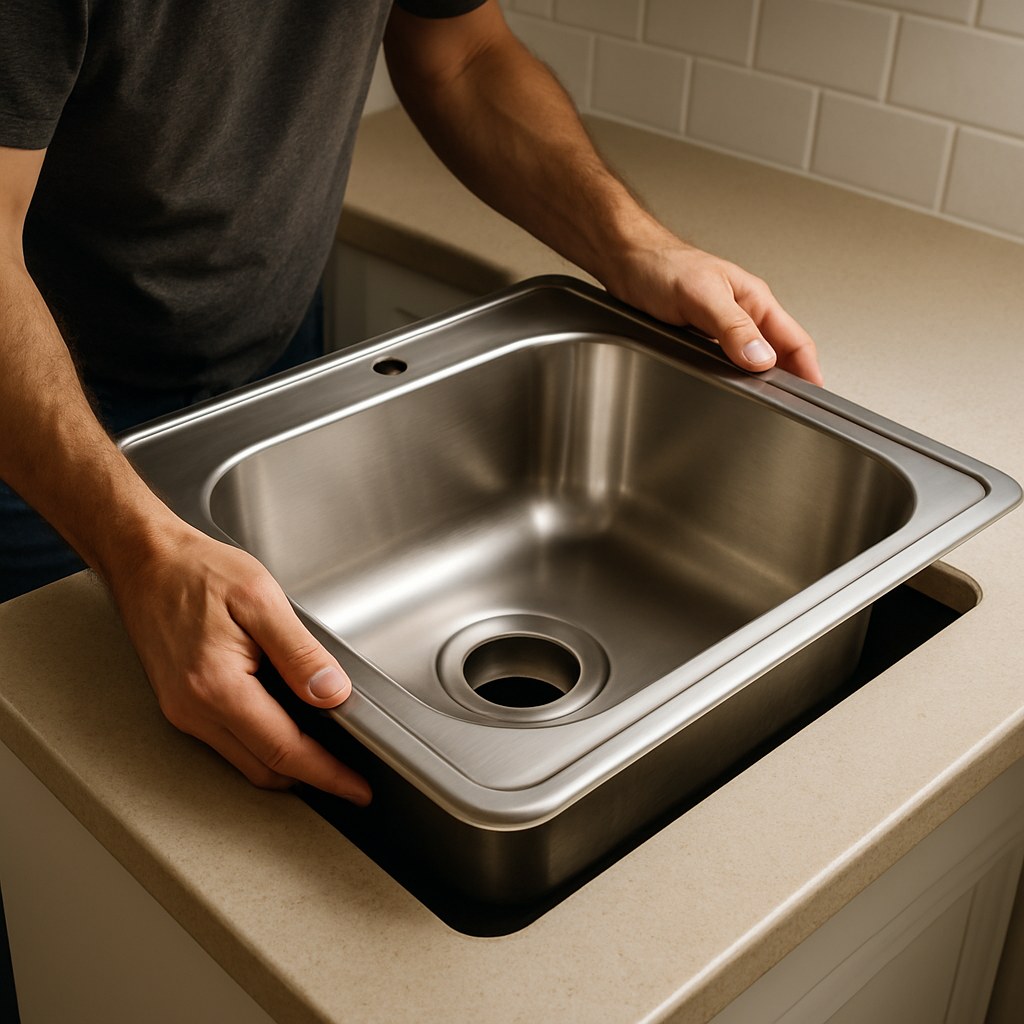
Installing a New Drop-In Sink
- Apply Plumber's Putty: Turn the new sink upside down. Roll a rope of plumber's putty and apply it around the entire underside of the sink's rim. This will create a watertight seal.
- Set the Sink: Carefully lower the sink into the countertop cutout, pressing down firmly to seat it in the putty.
- Secure the Clips: From underneath, attach the sink clips provided with your new sink. Tighten them evenly, alternating from side to side, until the sink is snug. Don't overtighten.
- Clean Up: Wipe away the excess putty that squeezed out around the rim with a damp cloth.
- Install the Drain: Apply plumber's putty to the underside of the sink drain flange and press it into the drain opening from inside the basin. From below, attach the gasket and tighten the locknut to secure it.
- Reconnect Everything: Reconnect the P-trap to the new sink tailpiece and the water supply lines to the faucet. Hand-tighten the nuts first, then give them a final quarter-turn with your wrench.
Installing a New Undermount Sink
- Apply Silicone Sealant: Clean the top rim of the sink and the underside of the countertop around the cutout with rubbing alcohol. Apply a continuous bead of 100% silicone sealant around the sink's top rim.
- Position the Sink: Lift the sink into position under the countertop, pressing it firmly to create a seal. Use your box or another support to hold it in place.
- Attach Brackets: Secure the sink by installing the undermount brackets. Tighten the screws evenly, moving from side to side to ensure even pressure all around.
- Clean Up: Wipe away any excess silicone that squeezed out into the sink basin.
- Install Drain and Reconnect Plumbing: Follow steps 5 and 6 from the drop-in sink installation guide above to install the drain and reconnect the P-trap and water supply lines.
Step 4: The Final Check
You're almost there! The last step is the most important one: checking for leaks.
- Turn the Water On: Slowly turn the shut-off valves counter-clockwise to restore the water supply.
- Run the Faucet: Let the water run for at least 60 seconds.
- Inspect Every Connection: While the water is running, get underneath the sink with a flashlight and a dry paper towel. Carefully wipe every connection point: the supply lines at the valve and the faucet, the P-trap nuts, and around the base of the sink drain. If your paper towel comes away wet, you have a leak.
If you find a drip, try tightening the connection another quarter-turn. If it still leaks, you may need to re-seat the connection. If you can't get it to stop, it's better to be safe than sorry and call a plumber.
Your New Sink is Ready!
Congratulations! You’ve successfully replaced your sink basin, upgraded the look of your room, and prevented potential water damage—all while saving a bundle on labor costs.
This is the kind of empowering home maintenance project we love at Casa. For more easy-to-follow guides, personalized maintenance reminders, and a direct line to vetted professionals when a job feels too big, download the Casa app today! Let us be your trusted partner in caring for your home.