According to the National Fire Protection Association (NFPA), failure to clean chimneys is a leading factor in home heating fires. This buildup, whether it's creosote from a wood-burning stove or soot from a gas furnace, can ignite or block the flue, putting your home and family at risk.
But don't worry, we're here to walk you through it. Think of us as your friendly expert on the other end of the line. In this guide, we'll help you understand what that black buildup is, determine if it's a job you can tackle yourself, and provide clear, step-by-step instructions for a safe cleaning.

What Is That Black Buildup in My Chimney?
First things first, let's identify what you're dealing with. The type of black gunk in your chimney depends entirely on what kind of fuel you use.
For Wood-Burning Fireplaces and Stoves: Creosote
If you burn wood, that black residue is creosote. It's a highly combustible byproduct of wood smoke that condenses on the cool walls of your chimney. Creosote isn't all the same; it appears in three distinct stages, each more dangerous than the last:
- Stage 1 (Flaky Soot): This is the earliest stage. It's a loose, dusty, or flaky powder that is relatively easy to remove with a chimney brush. This is the only type you should consider cleaning yourself.
- Stage 2 (Crunchy or Tar-Like): As buildup continues, the creosote becomes harder, crunchier, and forms tar-like flakes. It’s much more difficult to remove and significantly more flammable.
- Stage 3 (Glazed or Puffy): This is the most dangerous form. It looks like a thick, shiny, hardened layer of tar coating the flue. It's extremely difficult to remove and can fuel a chimney fire that burns at incredibly high temperatures.
If you see Stage 2 or 3 creosote, stop using your fireplace immediately and call a certified chimney sweep. This is not a DIY job.
For Gas or Oil Appliances: Soot
If your chimney vents a gas or oil furnace or boiler, the black buildup is likely soot. Soot is a fine black powder that results from incomplete combustion. While it's not as flammable as creosote, it's still a problem. A heavy layer of soot can:
- Block the flue: This prevents toxic gases like carbon monoxide from venting properly, causing them to back up into your home.
- Corrode the chimney liner: Soot can mix with moisture to create acidic compounds that eat away at metal chimney liners, leading to costly repairs.
If the soot you see is loose and powdery, you may be able to clean it. However, if it feels oily, sticky, or wet, it indicates an appliance malfunction that needs professional attention from an HVAC or chimney expert.
DIY vs. Calling a Pro: Know Your Limits
A key part of home maintenance is knowing when to roll up your sleeves and when to pick up the phone. When it comes to chimney cleaning, safety is paramount.
You can likely handle this DIY if:
- You have a wood-burning fireplace with less than 1/8 inch of flaky, Stage 1 creosote.
- You have a gas/oil appliance with a light coating of loose, dry, powdery soot.
- You are comfortable and physically able to safely work on a ladder and your roof.
- You have the correct safety gear and tools.
Call a certified professional immediately if:
- The creosote buildup is thicker than 1/8 inch.
- The creosote looks shiny, tar-like, or glazed (Stage 2 or 3).
- The soot from your gas/oil appliance is oily or sticky.
- Your chimney has not been professionally inspected or cleaned in over a year.
- You see any cracks, rust, or holes in your chimney liner.
A professional chimney sweep typically costs between $150 and $375, a small price to pay for the safety and peace of mind of a job done right.
Step-by-Step Guide to Cleaning Light Chimney Buildup
If you've assessed the situation and determined it's a safe DIY job, let's get started.
Step 1: The Initial Safety Inspection
Before you do anything else, you need to get a clear look at what you're dealing with.
What You'll Need:
- Work gloves
- Safety glasses
- N95 dust mask
- A sturdy drop cloth
- A powerful flashlight
The Process:
- Ensure Everything is Cool: Make absolutely sure any fireplace, stove, or heating appliance connected to the chimney is completely off and cool to the touch.
- Protect Your Home: Lay a drop cloth on the floor in front of your fireplace or around your furnace to catch any falling debris.
- Open the Damper: Reach into the firebox and open the damper all the way. This metal plate closes off the flue when not in use.
- Inspect the Flue: Shine your flashlight up into the chimney flue. Take note of the color, texture, and thickness of the buildup on the walls. This is where you'll make that crucial call: is it light, flaky creosote, or something that needs a pro?
Step 2A: Cleaning a Wood-Burning Chimney (Light Creosote Only)
This process involves cleaning from the top down to push all the debris into the firebox for easy cleanup.
What You'll Need:
- A sturdy ladder
- A wire chimney brush correctly sized for your flue
- Flexible fiberglass cleaning rods that screw together
- Plastic sheeting and painter's tape
- A shop vacuum with a filter
The Process:
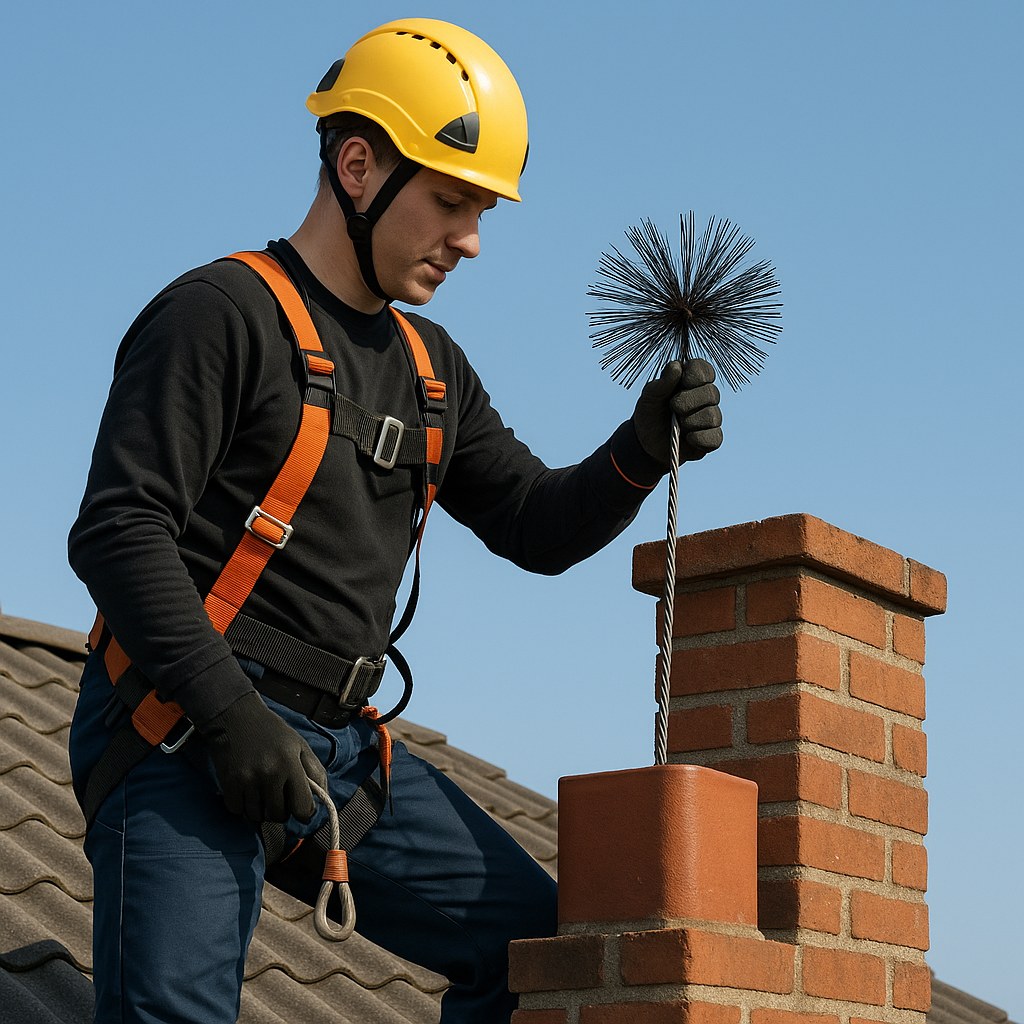
- Seal the Fireplace: Tape plastic sheeting over the fireplace opening, sealing it completely. This is crucial for preventing a massive soot cloud from entering your home.
- Get on the Roof Safely: Using a sturdy ladder and a spotter if possible, carefully access your roof.
- Remove the Chimney Cap: Most caps are removed by unscrewing a few bolts. Set it aside in a secure spot.
- Assemble Your Brush and Rods: Attach the wire brush to the first fiberglass rod.
- Start Scrubbing: Lower the brush into the flue. Begin scrubbing the walls with vigorous up-and-down strokes. As you work your way down, screw on additional rods to extend your reach all the way to the smoke shelf at the bottom.
- Replace the Cap: Once you've scrubbed the entire length of the flue, withdraw the brush and rods. Securely re-install the chimney cap.
- Clean Up Below: Carefully head back inside. Gently remove the plastic sheeting. You'll find a pile of dislodged creosote in your firebox. Use a shop vacuum to clean it all up.
Step 2B: Cleaning a Gas or Oil Chimney (Loose Soot Only)
This process is typically done from the bottom up, right at the appliance connection point.
What You'll Need:
- A polypropylene chimney brush (a wire brush can damage metal liners)
- Flexible cleaning rods
- A nut driver or screwdriver set
- A shop vacuum with a filter
The Process:
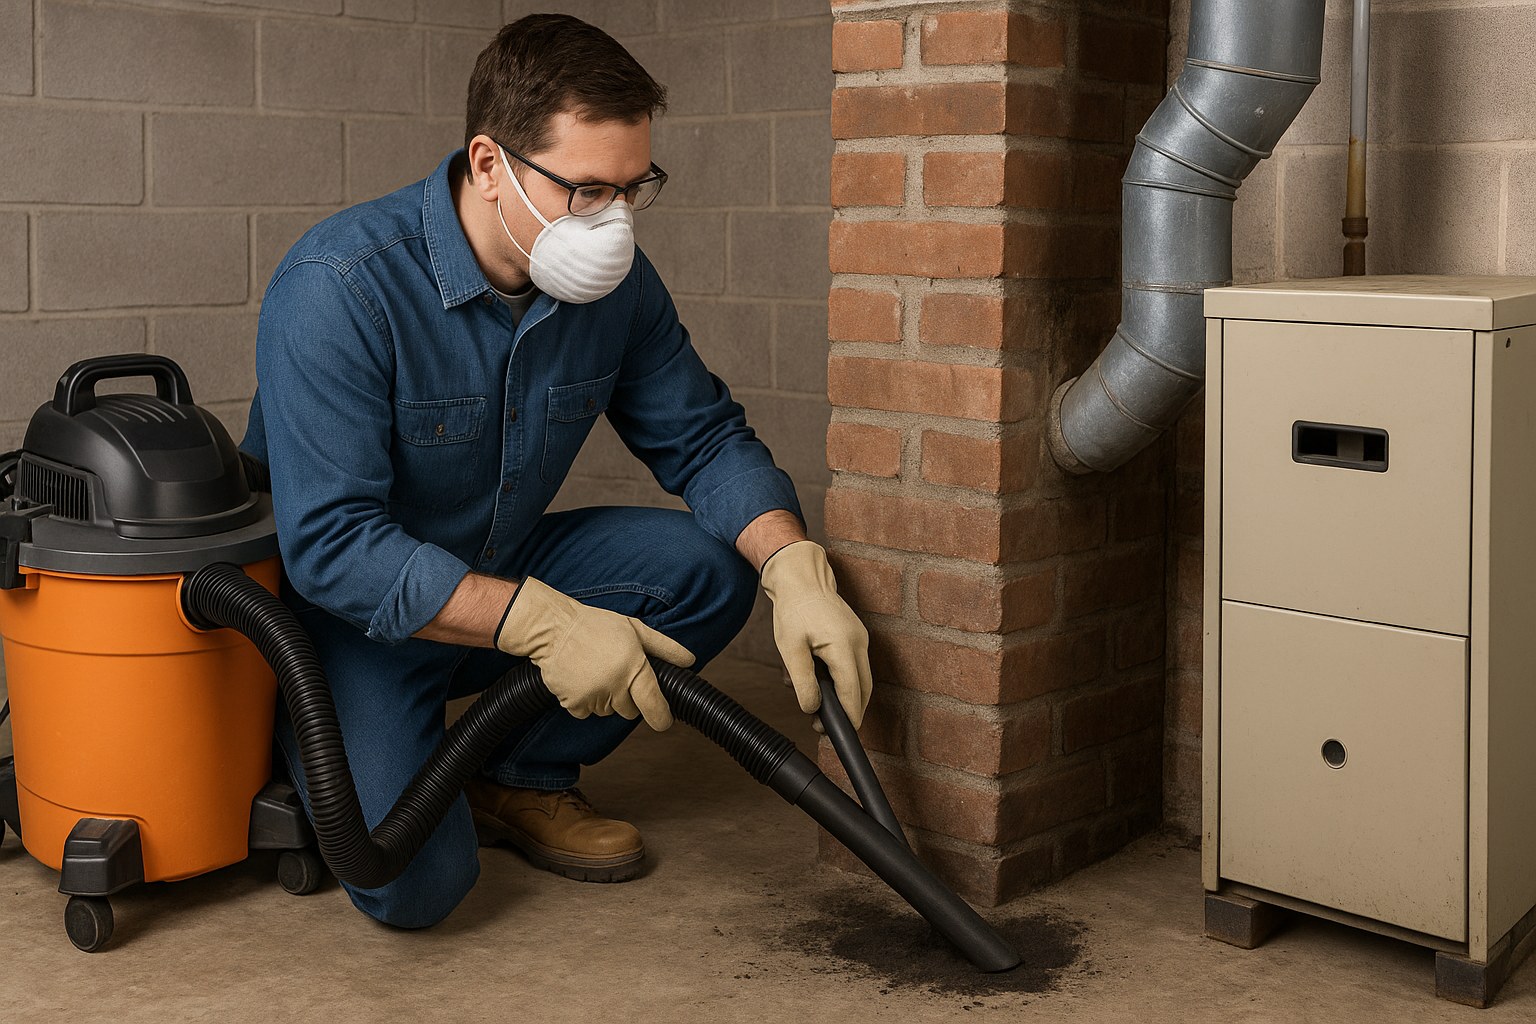
- Power Down: Turn off all power to your furnace or boiler at the circuit breaker.
- Access the Flue: The appliance is connected to the chimney by a metal vent connector pipe. Use a nut driver or screwdriver to detach this pipe from the base of the chimney flue, giving you access.
- Scrub from the Bottom: Assemble your polypropylene brush and rods. Insert the brush into the opening and scrub the flue with up-and-down motions. Work your way up as far as you can. Since you're just removing light soot, you don't need to be as aggressive as with creosote.
- Vacuum the Debris: Use your shop vacuum to clean out all the loosened soot from the base of the flue and inside the vent connector pipe.
- Reconnect and Seal: Carefully reattach the vent connector pipe. Make sure all screws are tight and the connection is secure to prevent exhaust leaks.
- Test the System: Restore power to the appliance. Let it run for a few minutes and check to ensure the exhaust is flowing smoothly up the chimney.
Final Thoughts: Prevention is the Best Medicine
Congratulations! You've taken a major step toward keeping your home safe. A running fireplace is a wonderful thing, but it's a partnership. Do your part, and it will keep you warm and safe for years to come. Remember the NFPA's recommendation for an annual professional inspection, even if you do light cleanings yourself.
DIY projects can be rewarding, but some jobs require a professional touch. If you felt overwhelmed by these steps or discovered a more serious issue during your inspection, don't hesitate to get help.
For expert guidance on all your home maintenance projects, download the Casa app. Casa helps you keep track of your home's needs, provides more easy-to-follow guides like this one, and connects you with trusted, certified professionals in your area when you need them. Take the guesswork out of homeownership and keep your home in top shape with Casa.


