
Dec 29, 2025
How to Fix a Smoking Vacuum Cleaner and Burning Smell
A smoking vacuum or a burning smell is a serious warning sign. This guide walks you through the essential safety steps and troubleshooting, from simple fixes like a full bag or tangled brush roll to knowing when it's time to call a pro.
You’re in the middle of your cleaning routine, and suddenly, an alarming smell hits your nose—something like burning rubber or melting plastic. Or even worse, you see a faint wisp of smoke coming from your vacuum cleaner. It’s a moment that can cause instant panic, and for good reason. A smoking or burning vacuum isn’t just a sign of a malfunction; it's a potential fire hazard.
Looking for more guidance? Take a look at our Maintenance overview.
But don't toss your vacuum out just yet. While the situation is serious, the cause is often a simple, fixable issue that you can handle yourself. From a simple clog to a worn-out belt, many common problems can cause your vacuum to overheat and produce those scary symptoms.
Here at Casa, we believe in empowering you to tackle home maintenance with confidence. We’re here to walk you through it, just like a friendly expert on the phone. This guide will help you safely diagnose the problem, fix it if possible, and understand when it’s time to call in a professional.

Safety First: What to Do Immediately
Before you even think about what’s wrong, your immediate priority is to ensure safety. A burning smell or smoke means something is overheating, which can lead to fire or electrical shock.
Follow these steps right away:
- Power Down: Immediately turn off the vacuum using its power switch.
- Unplug It: If you have a corded vacuum, unplug the power cord from the wall outlet. Don't just turn it off; disconnect it from the power source entirely.
- Remove the Battery: For cordless models, find the battery pack release and remove the battery. This cuts off all power to the motor.
- Move to a Safe Area: Carefully move the vacuum to a well-ventilated area with a hard, non-flammable surface, like a garage floor or a tiled kitchen. Keep it away from carpets, curtains, and anything else that could catch fire.
- Let It Cool Down: Do not touch any internal parts. Let the vacuum sit for at least 10-15 minutes to allow the motor and other components to cool down completely. This prevents burns and reduces immediate fire risk.
Once the vacuum is cool and in a safe location, you can move on to diagnosing the problem.
Step 1: The Visual Inspection—Is There Smoke or Melted Plastic?
Your first diagnostic step is a close visual inspection. Are there clear signs of a serious electrical or motor failure?
Look closely at the vacuum's housing, especially around the motor vents. Do you see any visible smoke, black burn marks, or areas where the plastic casing has warped or melted? If you do, the problem is likely severe and involves the motor.
If you see smoke, burn marks, or melted plastic:
STOP. Do not attempt to fix the vacuum yourself or plug it back in. This is a job for a professional.
- Is your vacuum under warranty? If so, your best bet is to contact the manufacturer’s service center. Attempting a repair yourself could void the warranty. They will guide you on how to get it repaired or replaced safely.
- Is the warranty expired? It's time to find a qualified appliance repair technician. A professional can safely open up the motor housing, diagnose the electrical fault, and determine if it’s repairable.
Trying to fix a malfunctioning motor without the right expertise is dangerous.
Step 2: Check the Basics—The Bag or Dust Bin
If you didn’t see any obvious signs of melting or burning, the problem is most likely related to airflow. A vacuum cleaner's motor relies on a steady stream of air to keep it cool. When that airflow is blocked, the motor works harder, heats up, and can create a burning smell.
The most common culprit? A full bag or a clogged filter.
For Vacuums with a Disposable Bag
An overstuffed vacuum bag is the number one cause of overheating. When the bag is full, air can no longer pass through it easily, putting a major strain on the motor. The smell is often that of hot dust and motor oil.
Here’s how to check and fix it:
- Locate and open the bag compartment.
- Slide out the full vacuum bag. Be careful not to tear it and release a cloud of dust.
- Seal the old bag and throw it away.
- Insert a new, clean bag that is compatible with your vacuum model. Using the wrong type of bag can also impede airflow.
- Close the compartment until it clicks shut.
- Take the vacuum to an open area (like your garage or back porch), reconnect the power, and run it for 30 seconds. If the smell is gone, you’ve found your problem!
For Bagless Vacuums
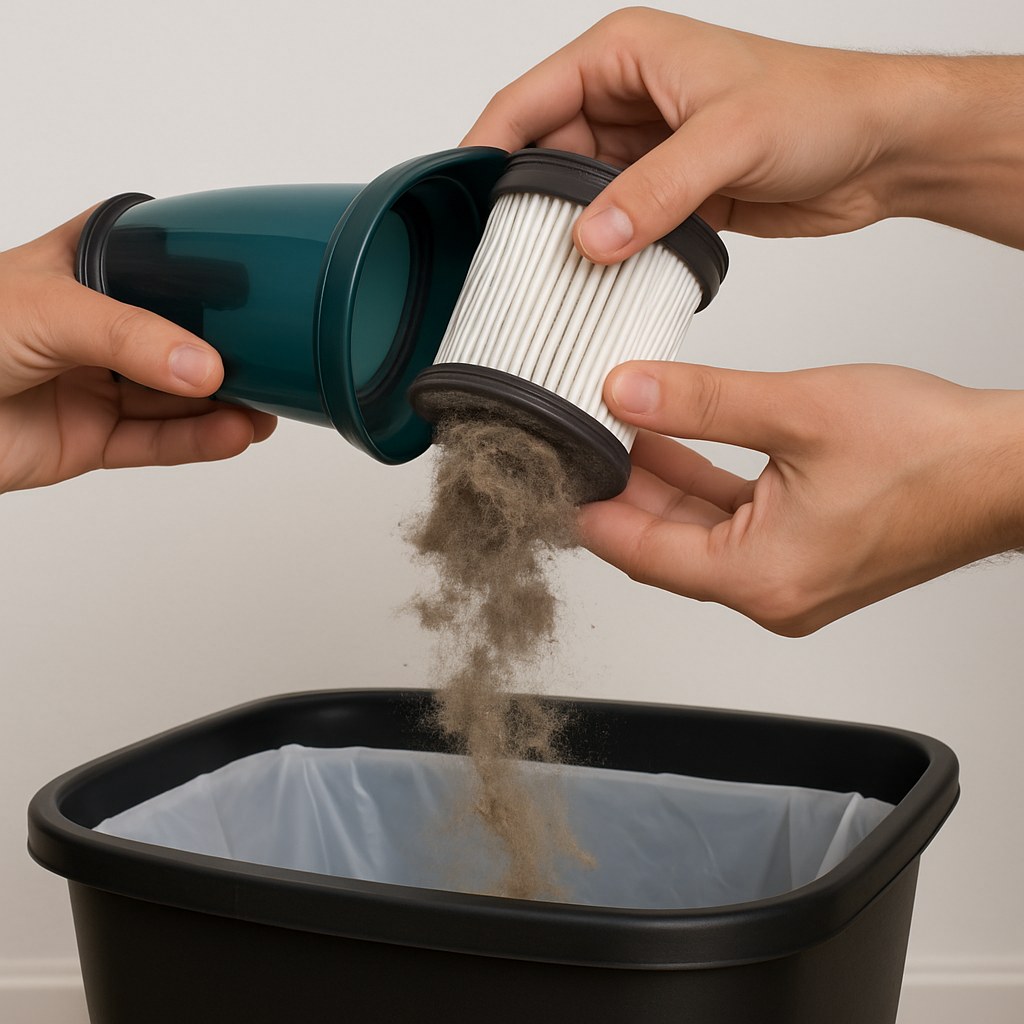
Bagless vacuums have a dust bin and filters that need regular cleaning. A clogged filter has the same effect as a full bag—it suffocates the motor.
- Remove the dust bin from the vacuum.
- Empty all the debris into a trash can.
- Clean the dust bin. Most can be rinsed with warm water and a little soap. Make sure it is completely dry before reattaching it.
- Locate and remove the filters. There is usually a foam or HEPA filter near the dust bin. Some models have a second post-motor filter as well.
- Clean the filters. Tap them against the side of a trash can to remove loose dust. If your filters are washable (check your user manual!), rinse them under cool water until the water runs clear.
- Let the filters air-dry completely. This is a crucial step! A damp filter can grow mold and damage the vacuum's motor. This can take up to 24 hours.
- Once everything is dry, reassemble your vacuum, power it on, and see if the smell persists.
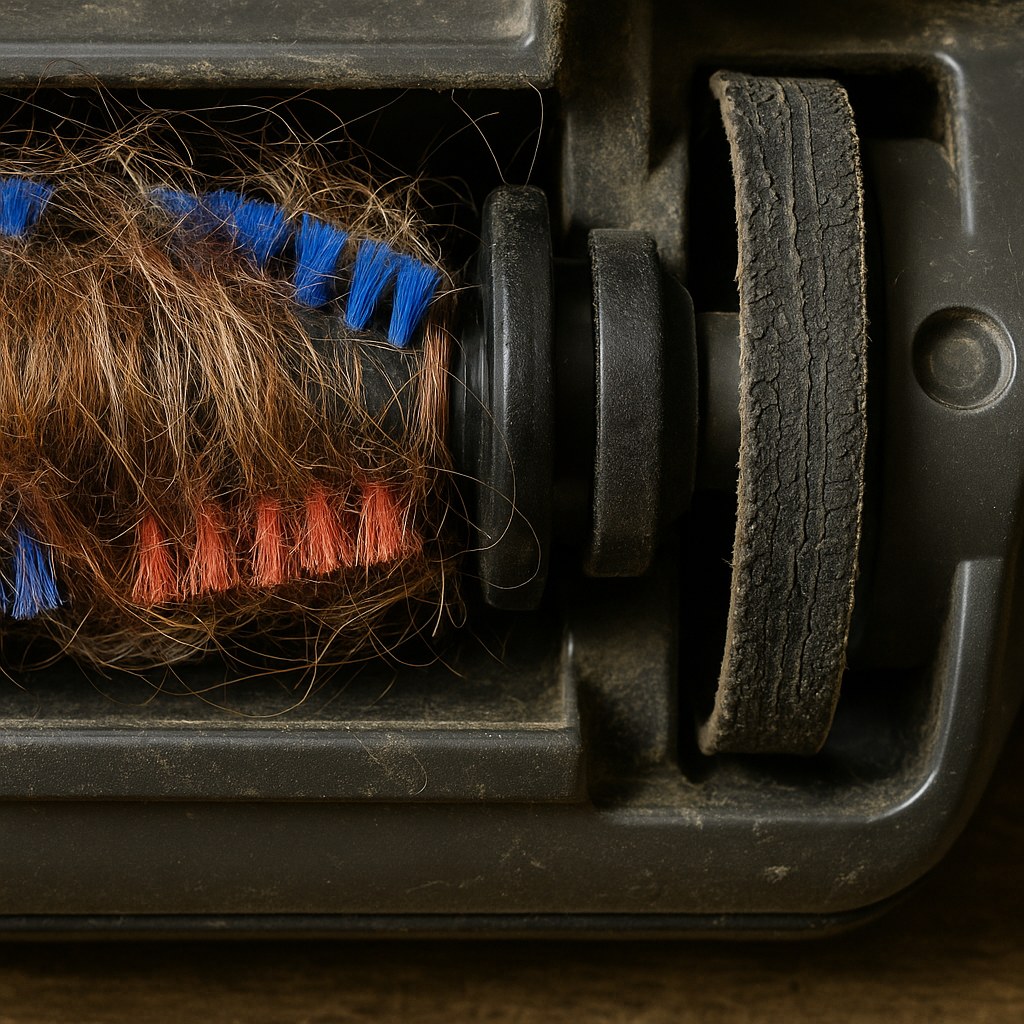
Step 3: Clear the Brush Roll and Inspect the Belt
If a new bag or clean filter didn’t solve the issue, the next place to look is the brush roll (also known as the beater bar). This is the spinning brush at the bottom of the vacuum that agitates the carpet. The smell associated with this problem is usually a distinct burning rubber odor.
Hair, string, carpet fibers, and other debris can get tightly wound around the brush, causing it to jam. When the brush can’t spin freely, the rubber drive belt that connects it to the motor shaft continues to move at high speed. The friction of the spinning motor on a stationary or slow-moving belt creates intense heat, causing the belt to stretch, melt, and eventually break.
Here’s how to fix it:
- Disconnect the power! Unplug the vacuum or remove the battery.
- Flip the vacuum over to access the bottom plate.
- Remove the bottom plate. You will likely need a Phillips screwdriver to undo the screws holding it in place. Keep the screws somewhere safe.
- Clean the brush roll. Use scissors or a seam ripper to carefully cut away all the tangled hair, string, and fibers. Pull out all the debris until the brush can spin freely by hand.
- Inspect the drive belt. Look for signs of damage: cracks, thinning, a shiny glazed surface, or melted spots. If it looks worn or loose, it needs to be replaced.
- Replace the belt (if necessary). To do this, you’ll typically slide the brush roll out, loop the old belt off the motor spindle, and then loop the new belt around the spindle and the brush roll. Reseat the brush roll, ensuring the belt is properly tensioned.
- Reassemble. Put the bottom plate back on and tighten the screws.
- Test it out. Power up the vacuum and listen. The burning rubber smell should be gone.
When a DIY Fix Isn't Enough: Calling a Professional
You’ve changed the bag, cleaned the filters, and cleared the brush roll, but that burning smell just won’t quit. If you’ve tried all the steps above and the issue persists, the problem is likely internal—probably with the motor itself.
At this point, it is crucial to stop using the vacuum and seek professional help. According to Angi, the average cost for a professional vacuum repair is between $40 and $100, which is often far cheaper than buying a new machine.
A repair technician can safely diagnose and fix issues like:
- A failing motor bearing.
- An electrical short.
- Worn-out carbon brushes in the motor.
Keep Your Vacuum Healthy: A Simple Prevention Checklist
The best way to fix a smoking vacuum is to prevent it from happening in the first place. A little regular maintenance goes a long way.
- Change the bag or empty the bin regularly. Don’t wait until it’s overflowing. A good rule of thumb is to change it when it’s two-thirds full.
- Clean your filters once a month. Refer to your manual for specific instructions on washing or replacing them.
- De-tangle the brush roll every few weeks. Make it a habit to flip your vacuum over and snip away any hair or string.
- Be mindful of what you vacuum. Avoid picking up large, hard objects like coins, screws, or gravel, as they can damage the fan or motor.
Your Partner in Home Maintenance
Facing a smoking appliance can be stressful, but with a calm, methodical approach, you can often solve the problem yourself. By understanding the common causes—airflow blockages and brush roll jams—you’re already halfway to the solution.
For more expert guidance on everything from appliance repair to plumbing, download the Casa app today. Casa is designed to be your go-to resource for home maintenance, offering step-by-step DIY guides and connecting you with trusted, vetted professionals for the jobs you can’t handle alone. Keep your home running smoothly with Casa in your corner.