
Nov 27, 2025
How To Fix Cracks In Your Driveway
Cracks in your driveway are more than just an eyesore—they can lead to serious structural damage. Learn how to diagnose and repair cracks in asphalt, concrete, and paver driveways to boost your curb appeal and prevent costly future repairs.
That small crack in your driveway you’ve been ignoring? It has a way of becoming a big, expensive problem if you let it. Driveway cracks aren't just an eyesore; they're an open invitation for water to seep underneath, erode the foundation, and turn a simple repair into a full-blown replacement project. In colder climates, that water freezes and expands, making cracks even wider in a process known as the freeze-thaw cycle.
Looking for more guidance? Take a look at our Repairs overview.
The good news is that catching and fixing these cracks early is a manageable DIY project that can save you a ton of money and extend the life of your driveway. While major driveway repairs can cost thousands, Forbes notes that professional concrete repairs can range from $300 to over $4,000. In contrast, a DIY fix for minor cracks can often be done for under $50.
So, where do you start? The right repair method depends entirely on your driveway’s material—asphalt, concrete, or pavers—and the size of the cracks. Don’t worry, we’ll walk you through it. Think of us as your expert on the line, guiding you step-by-step.
First Things First: A Thorough Inspection
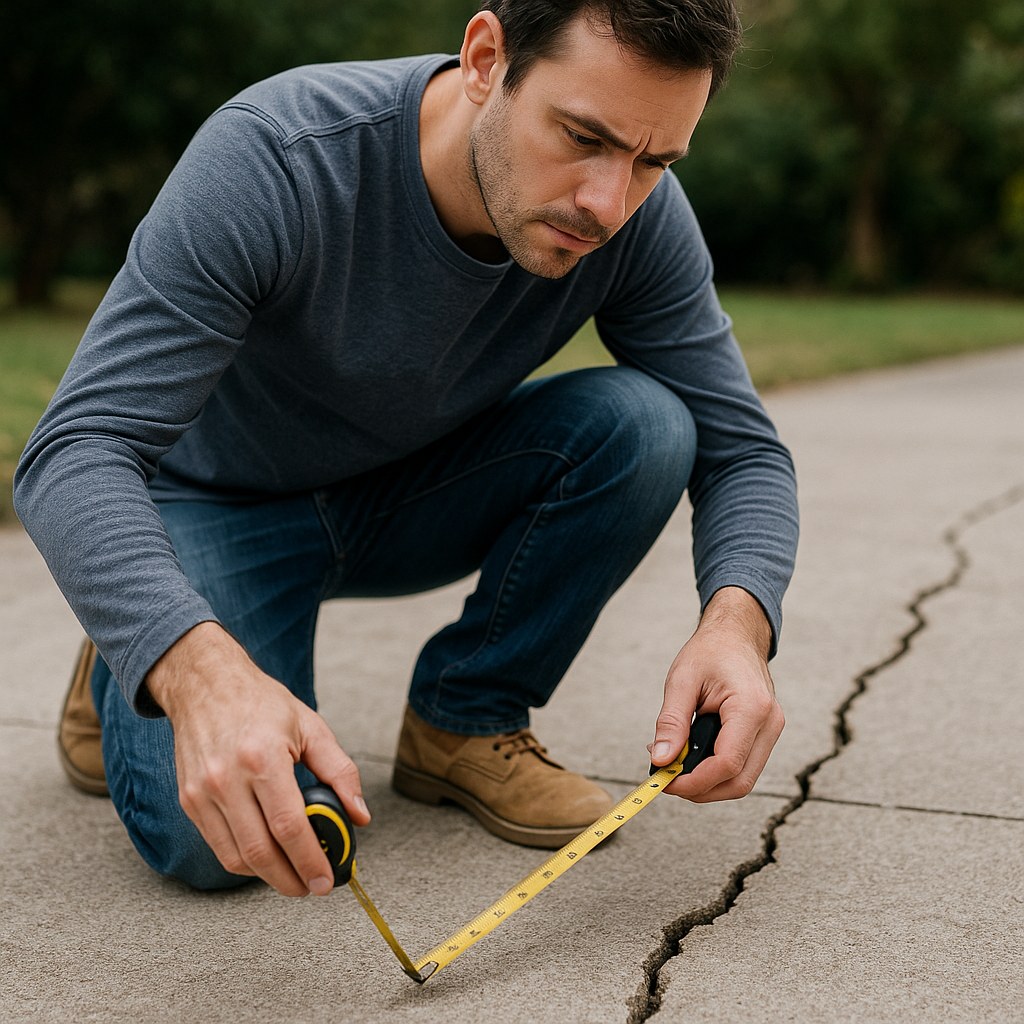
Before you buy any materials, you need to play detective. A proper inspection will tell you exactly what you’re dealing with and what kind of repair is needed. Grab a notebook, a measuring tape, and let’s take a walk.
- Walk the Entire Driveway: Look for every single crack, no matter how small. Pay attention to uneven spots, sunken areas, or places where water tends to pool.
- Measure the Cracks: Use your measuring tape to check the width and, if possible, the depth of a few representative cracks. This is crucial because the size of the crack determines the type of filler you’ll need.
- Note the Pattern: Are the cracks random, isolated lines? Or are they interconnected in a web-like pattern, often called "alligator cracking"? This pattern is a red flag for more serious base failure.
- Check for Drainage Issues: If you see cracks near downspouts or in low-lying areas, poor drainage is likely a contributing factor.
Once you have a good understanding of the damage, you can figure out the best plan of attack based on your driveway type.
How to Fix Cracks in an Asphalt Driveway
Asphalt is flexible, but it's still prone to cracking from sun exposure, temperature changes, and heavy loads. The key is to distinguish between minor surface cracks and deep structural ones.
For Small Cracks (Less than 1/2 inch wide)
If you're dealing with small, shallow cracks, you’re in luck. This is a straightforward DIY fix that will prevent them from growing.
Tools You'll Need:
- Stiff wire brush or stiff broom
- Leaf blower or shop vac
- Disposable gloves
- Asphalt crack filler (comes in a caulk-style tube or a pourable bottle)
- Putty knife
Step-by-Step Guide:
- Clean the Crack Thoroughly: This is the most important step! The filler won’t stick if there’s dirt, dust, or weeds in the way. Use a wire brush to scrub out any loose asphalt and debris.
- Blow it Out: Use a leaf blower or shop vac to remove any remaining dust from the crack. It needs to be completely clean and dry.
- Apply the Filler: Put on your gloves. Squeeze the asphalt crack filler directly into the crack. Fill it slightly above the driveway surface, as the filler will shrink a bit as it dries.
- Smooth the Surface: Use a putty knife to smooth the filler so it’s flush with the surrounding asphalt.
- Let it Cure: Follow the product’s instructions for curing time, which is typically at least a few hours. Avoid walking or driving on the repaired area until it’s fully set.
For Deep or "Alligator" Cracks
If you see wide cracks (over 1/2 inch) or a pattern that looks like an alligator's skin, a simple filler won't solve the problem. This type of cracking indicates that the foundation underneath your driveway has failed. Water has gotten into the base layer and weakened it, causing widespread damage.
At this point, a DIY repair is just a temporary bandage. The cracks will reappear quickly. This is when it's time to call in a professional paving contractor. They can assess the base failure and determine if a section needs to be cut out and replaced or if the entire driveway needs repaving.
How to Fix Cracks in a Concrete Driveway
Concrete is strong but rigid, so cracks from soil settlement, heavy loads, or shrinkage during curing are common. As with asphalt, the size of the crack matters.
For Small Hairline Cracks (Less than 1/8 inch wide)
These tiny cracks can often be sealed to prevent water from getting in and making them worse.
Tools You'll Need:
- Safety glasses
- Cold chisel and hammer
- Wire brush
- Hose or pressure washer
- Concrete crack sealant or vinyl concrete patching compound
- Putty knife or trowel
Step-by-Step Guide:
- Widen the Crack (Slightly): This might seem counterintuitive, but for the sealant to get a good grip, you need to give it something to hold onto. Put on your safety glasses. Use a hammer and cold chisel to gently chip the edges of the crack, creating a V-shaped groove that is wider at the top than the bottom.
- Clean it Out: Use a wire brush to remove all loose debris. Then, use a hose or pressure washer to thoroughly clean the inside of the crack. Let any standing water drain and allow the crack to become damp but not soaked.
- Apply the Sealant: Squeeze the concrete crack sealant into the groove. Overfill it slightly.
- Smooth and Finish: Use a putty knife or trowel to smooth the sealant, making it level with the driveway surface.
- Cure Properly: Check the product directions. Some patchers require you to keep the area damp for a period to prevent it from drying too fast and shrinking.
For Deep or Uneven Cracks
If a crack is wider than 1/4 inch, runs the full depth of the slab, or if one side of the crack is higher than the other, you're looking at a structural issue. This usually means the soil underneath has shifted or settled, and the concrete slab is no longer properly supported.
DIY fillers can't fix this. You'll need to contact a professional concrete contractor. They may recommend solutions like "slab jacking" (injecting a grout mixture underneath to lift the slab back into place) or, in severe cases, replacing the entire section of concrete.
How to Fix a Paver Driveway
With paver driveways, the problem usually isn't with the pavers themselves but with the base or the joint sand between them.
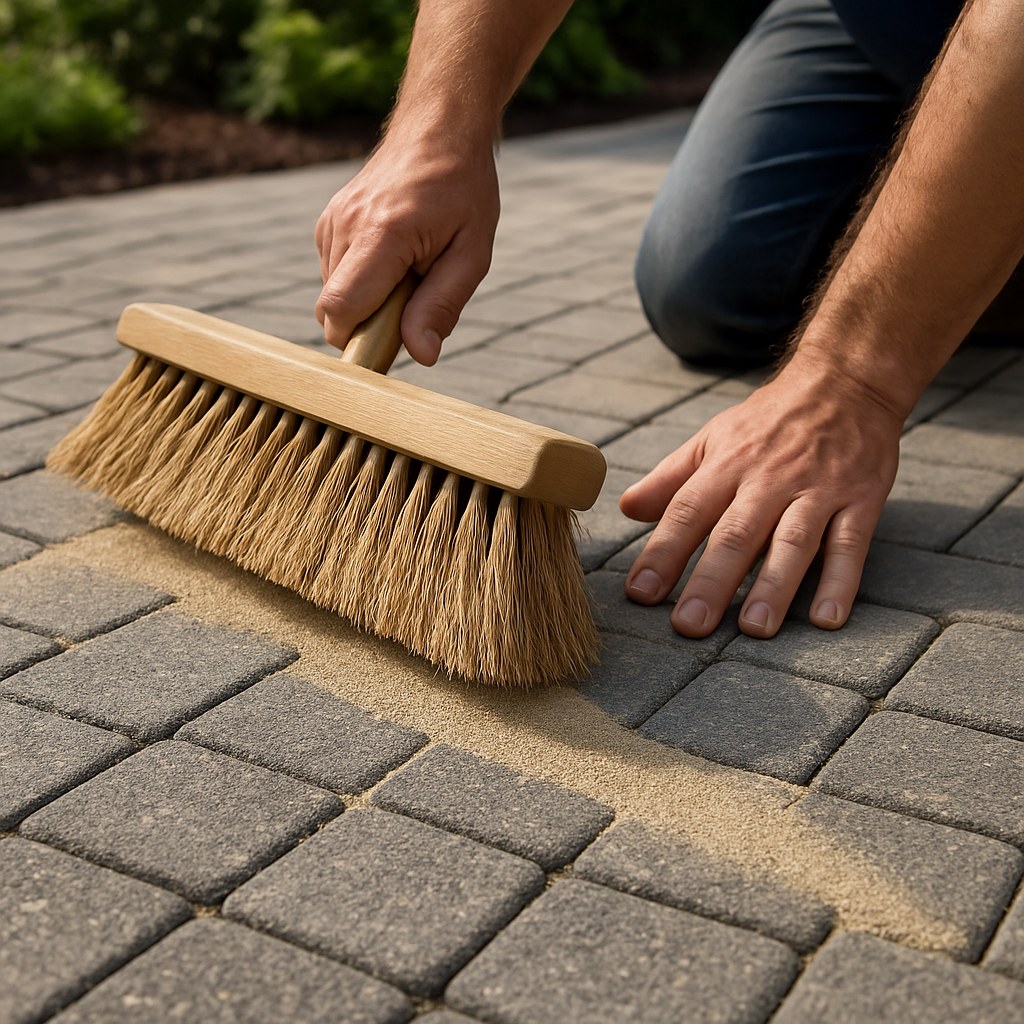
For Sunken Pavers or Empty Joints
If you have a few pavers that are loose, rocking, or sitting lower than the others, the fix involves resetting them and refilling the joints.
Tools You'll Need:
- Broom
- Flat pry bar or two flathead screwdrivers
- Paver base sand
- Steel trowel or level
- Rubber mallet
- Polymeric jointing sand
- Hose with a mist setting
Step-by-Step Guide:
- Remove the Problem Pavers: Use a pry bar to carefully lift out the uneven pavers and set them aside.
- Level the Base: Add a small amount of paver base sand to the empty spot. Use a trowel to spread it evenly and create a level surface. Check that it's the right height to make the paver flush with its neighbors.
- Replace the Pavers: Place the pavers back in position. Use a rubber mallet to gently tap them down until they are snug and level.
- Fill the Joints: Pour polymeric sand over the surface of the driveway. Polymeric sand contains a binder that hardens when wet, which helps lock the pavers in place and prevent weeds.
- Sweep it In: Use a broom to sweep the sand across the pavers until all the joints are completely filled.
- Activate the Sand: Use a leaf blower to blow any excess sand off the paver surfaces. Then, gently mist the entire driveway with a hose to activate the binder in the sand. Follow the product’s instructions carefully to avoid washing the sand out of the joints.
For Multiple Cracked Pavers
If you have several pavers that are physically broken or cracked, it could be a sign of a failing base layer. While you can replace individual pavers, if the problem is widespread, it’s best to consult a hardscape professional. They can diagnose if the base was improperly installed and recommend a long-term solution.
Take Control of Your Home Maintenance
Fixing small driveway cracks is a satisfying project that protects your home’s value and curb appeal. By taking action now, you’re preventing a small issue from becoming a massive headache.
Feeling empowered? There's a whole world of home maintenance you can conquer. For more simple DIY guides, expert advice, and a direct line to trusted professionals for those jobs that are just too big, download the Casa app today. Casa is your partner in homeownership, putting the power to manage, maintain, and repair your home right in the palm of your hand.