
Nov 25, 2025
How to Fix Foundation Cracks Caused by Tree Roots
Discovering cracks in your foundation can be alarming, especially when you suspect nearby trees are the culprits. This guide walks you through how to inspect foundation cracks, determine if tree roots are the cause, and decide on the right fix—from DIY repairs to calling in the pros.
Seeing a crack in your home’s foundation is a heart-sinking moment for any homeowner. Your mind immediately jumps to worst-case scenarios and costly repairs. While it’s a serious issue that should never be ignored, the cause might be rooted (quite literally) in your own backyard. Those beautiful, mature trees providing shade and curb appeal can sometimes be the source of foundation damage.
Looking for more guidance? Take a look at our Repairs overview.
The good news is that not every crack signals a catastrophe. Many foundation issues, especially those caught early, can be managed effectively. The key is to know what you’re looking at, understand the cause, and take the right steps to fix it.
Ignoring the problem can lead to significant structural damage, water intrusion, and pest infestations, with repair costs running into the thousands. According to Forbes Home, foundation repairs can cost anywhere from $2,000 to over $7,500 on average, with major issues climbing even higher.
In this guide, we'll walk you through how to play detective with your foundation. We’ll help you inspect the cracks, determine if tree roots are the likely culprit, and outline your action plan, whether it's a weekend DIY project or a call to a professional.

Why Do Tree Roots Damage Foundations?
It’s easy to imagine a big, strong root simply pushing its way through concrete, but the reality is a bit more complex. Tree roots typically damage foundations in two main ways:
-
Direct Pressure: As a tree grows, its root system expands in search of water and nutrients. If a root encounters your foundation, it will continue to grow and thicken, exerting immense, slow-motion pressure. Over years, this force can be powerful enough to crack concrete and shift the foundation.
-
Soil Dehydration (Indirect Damage): This is a more subtle but equally damaging process. Large trees are incredibly thirsty, drawing dozens or even hundreds of gallons of water from the soil each day. In regions with clay-heavy soil, this can cause the soil to shrink dramatically as it dries out. This shrinkage leads to soil settlement, creating voids under your foundation. The foundation, now unevenly supported, can sink and crack under its own weight. This is particularly common during periods of drought.
Now that you understand the "how," let's figure out what's happening at your house.
Step 1: Your Initial Foundation Inspection
Before you can fix the problem, you need to understand its severity. It’s time to get up close and personal with your foundation. Grab a good flashlight, a tape measure, and your smartphone for taking pictures.
Let’s walk through this together:
- Do a Full Walk-Around: Start outside and slowly inspect the entire perimeter of your foundation. Don't forget to check inside your basement or crawlspace, as cracks can often be more obvious there.
- Light it Up: Use your flashlight to get a clear view, especially in shaded areas or dark corners of a crawlspace.
- Clean the Cracks: Wipe away any dirt, cobwebs, or debris from the cracks so you can see their true size and shape.
- Measure and Document: Use your tape measure to find the width of each crack at its widest point. Take clear photos of every crack for your records. It’s also a great idea to use a permanent marker to make a small mark at the end of each crack—this will help you see if it's growing over time.
- Note the Pattern: Pay close attention to the direction of the cracks. Are they vertical (straight up and down), horizontal (side to side), diagonal, or do they form a stair-step pattern in concrete blocks or brick?
The Critical Question: When Should You Worry?
This inspection will help you categorize the cracks. Here’s the general rule:
- Minor Cracks: Thin, vertical hairline cracks (less than 1/4 inch wide) are often due to normal concrete curing and minor settling. They are less concerning but should still be sealed and monitored.
- Serious (Structural) Cracks: Be on high alert if you see cracks wider than 1/4 inch, horizontal cracks, diagonal cracks, or stair-step cracks. These are red flags that indicate significant foundation movement and potential structural damage.
Step 2: Is a Nearby Tree the Culprit?
Once you’ve assessed the cracks, it’s time to see if a tree is the likely cause.
- Identify Nearby Trees: Stand at the part of your foundation with the most significant cracking and identify the closest trees.
- Measure the Distance: Use your tape measure to find the distance from the base of each tree’s trunk to your foundation.
- Identify the Tree Species: If you don’t know what kind of tree it is, use a plant identification app on your phone.
- Find its Mature Height: Do a quick online search for the tree species plus "mature height." This will tell you how tall the tree is expected to grow.
A good rule of thumb is that a tree's root system can spread out two to three times its height. However, for foundation safety, a more conservative rule applies: If a tree is closer to your foundation than its expected mature height, its roots are close enough to be a potential threat.

Step 3: Your Action Plan Based on Your Findings
Your next steps depend entirely on what you discovered during your inspection.
Scenario A: You Found Serious Structural Cracks
If your inspection revealed wide, horizontal, or stair-step cracks, this is not a DIY job. Your home’s structural integrity could be at risk.
- Take Safety Precautions: Mark off the area around the cracked foundation with brightly colored tape. Move any heavy items, like grills, large planters, or stacked firewood, at least 10 feet away from the area to reduce pressure on the foundation.
- Call the Professionals Immediately: You need to contact two experts:
- A Licensed Structural Engineer: They will assess the extent of the damage to your foundation, determine the cause, and design a certified repair plan.
- A Certified Arborist: They will evaluate the tree and its root system and recommend the best course of action, which could include root pruning, installing a deep root barrier, or, in severe cases, tree removal.
When you call, explain what you found: the size and pattern of the cracks and the proximity of the suspected tree.
Scenario B: You Found Minor Cracks and a Nearby Tree
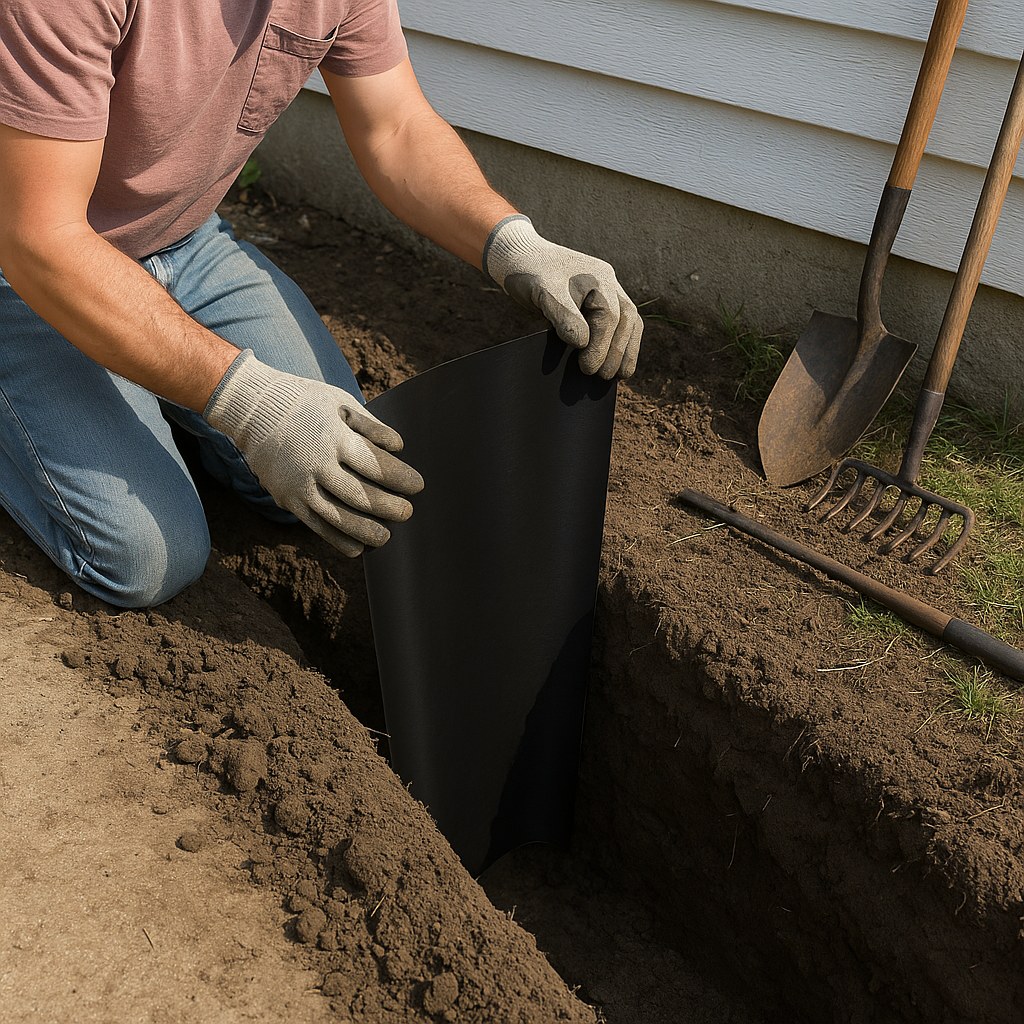
If you have hairline cracks and a tree that’s too close for comfort, you can take proactive DIY steps to prevent the problem from getting worse. The best solution is installing a root barrier.
A root barrier is a wall of high-density plastic installed underground to deflect roots down and away from your foundation.
How to Install a Surface Root Barrier:
- Get Your Materials: Purchase a roll of high-density polyethylene root barrier that is at least 24 inches tall. You’ll also need a shovel and root-barrier tape.
- Dig the Trench: Mark a line on the ground parallel to your foundation, about 2 feet away from it. Using a square-point shovel, dig a narrow trench along this line that is 24 inches deep.
- Install the Barrier: Place the root barrier vertically in the trench. If it has a textured side, that side should face the tree roots.
- Seal the Seams: If you use multiple pieces, overlap them by at least 6 inches and seal the seam with root-barrier tape to ensure there are no gaps for roots to sneak through.
- Backfill the Trench: Fill the trench with the soil you removed, tamping it down every 6 inches to eliminate air pockets. The soil level should slope slightly away from your foundation to help with drainage.
Scenario C: You Found Minor Cracks, and No Trees Are Close
If your cracks are minor and trees aren’t the likely cause, the issue is probably normal settling. Your job is to seal the cracks to prevent water from getting in, which can freeze, expand, and make the cracks worse.
How to Seal Cosmetic Foundation Cracks:
- Clean the Crack: Use a stiff wire brush to remove any loose debris, then use a shop vacuum to get rid of all the dust.
- Prepare the Filler: Mix an epoxy or polyurethane crack repair kit according to the manufacturer's instructions.
- Inject the Epoxy: Use a caulk gun to inject the filler deep into the crack, starting from the bottom and working your way up.
- Smooth the Surface: Use a putty knife to smooth the excess epoxy so it sits flush with the foundation wall.
- Let it Cure: Allow the patch to cure completely (usually 24 hours).
After taking these steps, be sure to monitor the foundation every six months to make sure no new cracks appear.
Protecting Your Foundation for the Future
Whether you've fixed a crack or want to prevent one, here are some final tips:
- Plant Smart: When adding new trees to your landscape, plant them a safe distance from your home. Choose smaller, less invasive species for areas closer to the house.
- Water Wisely: During dry spells, use a soaker hose to provide slow, deep watering to the soil around your foundation. This helps maintain consistent moisture levels and prevents the soil shrinkage that leads to settling.
- Manage Rainwater: Keep your gutters clean and ensure downspouts extend at least 6 feet away from your foundation.
Don't Go It Alone
Dealing with foundation issues can feel overwhelming, but you don’t have to tackle it by yourself. Whether you’re attempting a DIY repair or trying to find a trustworthy professional, having a reliable partner makes all the difference.
Download the Casa app today! Our app provides easy-to-follow, step-by-step guides for hundreds of home maintenance tasks. For bigger jobs, we can connect you with our network of vetted, high-quality professionals in your area, from certified arborists to structural engineers. Take the guesswork out of homeownership and protect your biggest investment with Casa.