
Feb 27, 2026
How to Install a Chandelier Safely and Securely
Updating your lighting doesn't have to be intimidating. Learn how to safely remove an old fixture, check your electrical box rating, and install a new chandelier securely.
Changing a light fixture is one of those home improvements that looks intimidating but is actually quite straightforward. A new chandelier can completely transform a dining room or entryway, adding instant value and character to your space.
Looking for more guidance? Take a look at our Repairs overview.
However, many homeowners worry about two things: working with electricity and ensuring the heavy fixture doesn't fall down. These are valid concerns! But with the right preparation and a clear understanding of what’s happening in your ceiling, you can tackle this project safely.
This guide will walk you through the process, from ensuring the power is off to checking if your current electrical box can actually support that beautiful new light.
Before You Start: Is This a DIY Job?
Most chandelier installations are safe for a homeowner to do on a Saturday morning. However, there are a few scenarios where you should pause and call a professional:
- No existing box: If there is no light fixture in the ceiling currently, running new wiring through joists is a job for a licensed electrician.
- Extremely heavy fixtures: If your chandelier weighs more than 50 pounds, it requires special heavy-duty bracing that is often best handled by a pro.
- Old wiring: If the wires in your ceiling are cloth-covered or crumbling, stop immediately. This indicates older electrical work that needs professional attention.
Symptoms of a Poor Installation
If you have an existing chandelier that is giving you trouble, look out for these signs that it may have been installed incorrectly:
- Flickering lights: Often caused by loose wire connections.
- Swaying: The electrical box isn't secured to a joist or brace properly.
- Visible gaps: The canopy isn't flush with the ceiling, suggesting a loose mounting bracket.
Step-by-Step Guide to Installing a Chandelier
We have broken this down into two main phases: inspection and installation. The inspection phase is crucial because it tells you which installation method you need to use.
Phase 1: Power Off and Inspect
Difficulty: Easy Time: 10–25 minutes
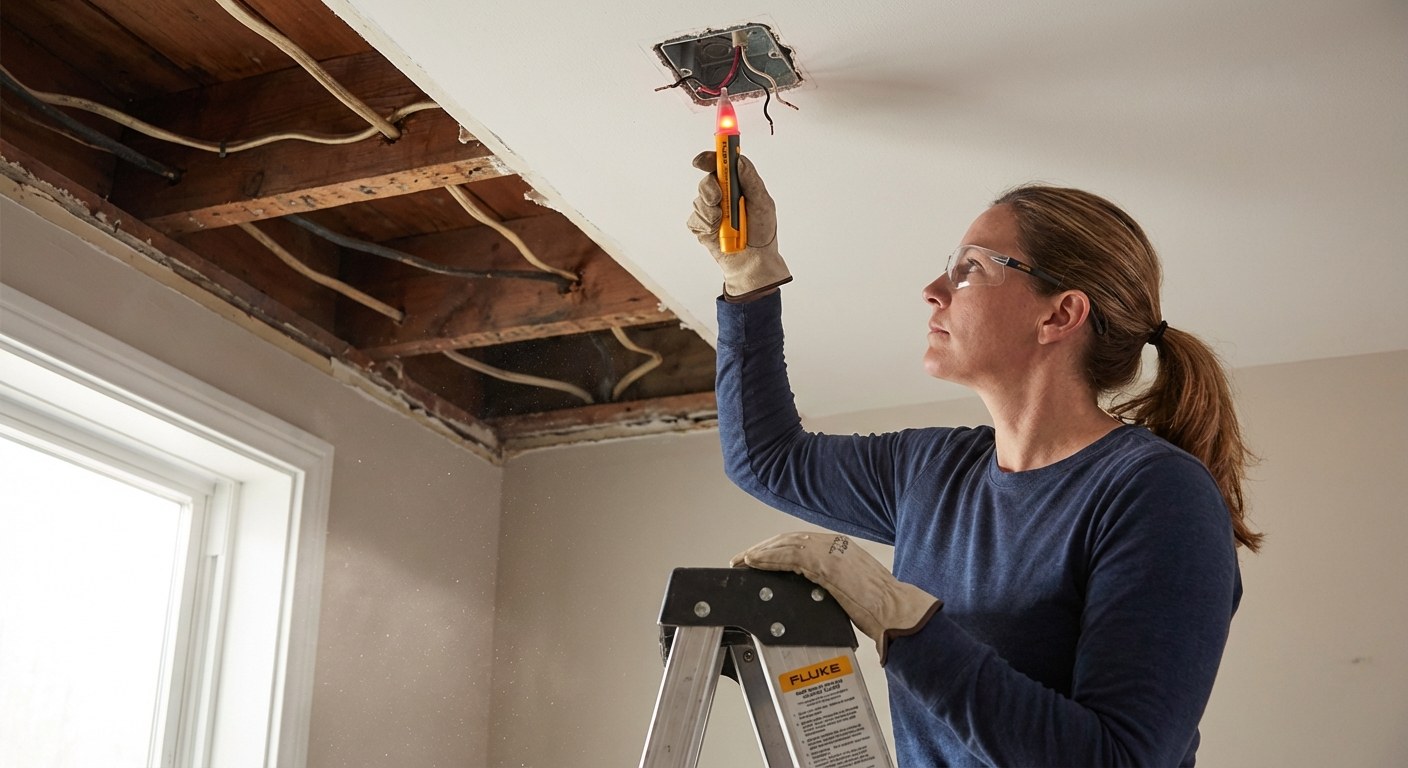
Safety is the absolute priority here. Never guess if the power is off—verify it.
- Turn off the power: Go to your electrical panel and flip the circuit breaker for the room you are working in to "OFF."
- Verify at the switch: Flip the light switch in the room. The light should not turn on.
- Set up your ladder: Ensure your stepladder is sturdy and level.
- Remove the old fixture:
- Unscrew the canopy (the bowl-shaped part against the ceiling) to expose the wiring.
- Crucial Step: Use a non-contact voltage tester on the wires. It should not beep or light up. If it does, the power is still on.
- Untwist the plastic wire connectors.
- Support the fixture with one hand while unscrewing the mounting bracket. Lower the old fixture safely.
Phase 2: Check the Electrical Box Rating
Difficulty: Moderate Time: 5 minutes
Now that the old light is down, look up into the hole in your ceiling. You see a box (usually plastic or metal). This box holds the weight of your fixture.
- Look for text inside the box: You are looking for words like "FAN," "50 LB," or "SUPPORT."
- If the box is rated for the weight: You can proceed to the standard installation below.
- If the box is standard/unrated: Standard plastic boxes are meant for light flush-mount fixtures, not heavy hanging chandeliers. If your new light is heavy, you must replace this box with a "fan-rated" brace and box (instructions below).
Option A: Standard Installation (Box is Rated Correctly)
If your existing box is sturdy and rated for the weight of your new chandelier, this is a quick swap.
Steps:
- Prep the new fixture: Thread the chandelier's chain or downrod through the canopy. Adjust the chain length now—it's much harder to do once it's hanging!
- Install the bracket: Screw the new mounting bracket (included with your chandelier) into the ceiling box.
- Wire the fixture:
- Strip about ½ inch of insulation off the chandelier wires.
- Connect black to black (Hot) using a wire nut.
- Connect white to white (Neutral) using a wire nut.
- Connect the ground wire (bare copper or green) to the green ground screw in the box.
- Secure the canopy: Tuck the wires neatly into the box (don't cram them). Slide the canopy up the chain and tighten the nut to hold it flush against the ceiling.
- Finish up: Install your light bulbs, turn the breaker back on, and test the light.
Option B: Heavy-Duty Installation (Replacing the Box)
Difficulty: Hard Time: 40–60 minutes
If your existing box is flimsy, loose, or just a standard plastic square, you need to upgrade it to hold the weight of a chandelier. The best solution is a fan-rated brace, which expands between two ceiling joists to create a rock-solid mounting point.
Steps:
- Remove the old box: You may need to pry it off the joist or unscrew it. Push it up into the ceiling or pull it down to remove it.
- Insert the brace: Slide the metal brace bar through the hole in the ceiling. Rotate it so it is perpendicular to the joists.
- Tighten the brace: Use a wrench or your hand to rotate the brace bar. It will expand outward, digging its metal teeth into the wooden joists on either side. Make sure it is extremely tight.
- Attach the new box: The brace kit comes with a metal box that slides onto the bar. bolt it securely in place.
- Proceed with installation: Now that you have a heavy-duty box, follow the wiring and mounting steps listed in "Option A" above.

Typical Costs and Time
Doing this yourself saves a significant amount on labor, but heavy fixtures require the right hardware.
- DIY Cost: $0 if you have tools and a rated box. $20–$50 if you need to buy a fan-rated brace kit.
- Professional Cost: A handyman or electrician typically charges $150–$400 for a standard installation. If new wiring or bracing is needed, costs can rise to $500+.
- Time: 1–2 hours.
When to Call a Pro
If you encounter any of the following, stop and call a licensed electrician:
- You can't identify which wire is hot or neutral (common in very old homes).
- The ceiling drywall is crumbling and won't support the canopy.
- You find aluminum wiring (silver-colored) instead of copper.
- The chandelier is exceptionally heavy (over 50 lbs) or complex (thousands of crystals).
Final Thoughts
Installing a chandelier is a rewarding project because the visual payoff is immediate. It changes the mood of the room instantly. The most critical part is patience—take your time ensuring the electrical box is strong enough. A secure box means peace of mind knowing your fixture is safe.
As you plan your home updates, it helps to keep track of which rooms have upgraded electrical boxes and which ones might still need work. Download the Casa app to keep a digital log of your home's maintenance history, store photos of your wiring for future reference, and get reminders for other seasonal tasks.
Good luck with the installation—let there be light!