

Oct 20, 2026
How to Clean and Maintain Faucet Aerators and Showerheads
Keep your faucets and showerheads flowing smoothly by clearing mineral buildup before it damages fixtures and drives up your replacement costs.
When the water stream from your kitchen faucet starts spraying sideways or your showerhead feels weaker than it used to, it is easy to assume the fixture is wearing out or that your home has a sudden water pressure problem.
Looking for more guidance? Take a look at our Maintenance overview.
In most cases, the fixture is perfectly fine. It simply has mineral buildup.
Taking twenty minutes to clean your faucet aerators and showerheads is not mere surface cleaning or busywork. It is low-effort preventive maintenance that protects the internal seals of your fixtures, preserves steady water flow, and prevents premature fixture replacements.
What Typically Goes Wrong If Ignored
Every gallon of municipal or well water contains dissolved minerals such as calcium and magnesium. As water evaporates around the tiny openings of aerators and shower spray nozzles, these minerals crystallize into hard deposits known as limescale.
When ignored over months or years, several things happen:
- Uneven or restricted water flow: Mineral deposits clog the fine mesh screens inside aerators, leading to sputtering, spraying at odd angles, or weak pressure.
- Backpressure on internal valves: As outlets clog, water pressure backs up against the cartridge inside the faucet or shower valve, accelerating wear on rubber gaskets and O-rings.
- Corrosion and seized threads: Hard water minerals can chemically bond with brass and chrome threads. Once components seize together, removing the aerator or showerhead without stripping threads or cracking the finish becomes nearly impossible.
What This Task Protects
Routine descaling delivers three clear benefits:
- Fixture Lifespan: Keeping pathways clear ensures water flows without building unnecessary backpressure inside your valve cartridges, helping faucets and shower fixtures last their full intended lifespan—often 10 to 15 years or more.
- Finish and Appearance: Mineral deposits eventually etch into metal finishes like matte black, brushed nickel, or polished chrome. Regular cleaning prevents permanent discoloration.
- Water Efficiency: Aerators mix air with water to maintain a full stream while limiting flow to standard conservation rates (typically 1.5 to 2.2 gallons per minute). When screens clog, people often leave taps running longer to rinse dishes or wash hands, increasing overall utility usage.
Step-by-Step Maintenance Checklist
You do not need special plumbing chemicals for this job. Plain distilled white vinegar gently breaks down calcium deposits without harming your plumbing lines.
Tools and Supplies Needed
- Distilled white vinegar
- A small bowl or plastic baggie with a rubber band
- An adjustable wrench or channel-lock pliers
- A microfiber cloth or rag (to protect metal finishes)
- An old toothbrush
- Plumber's tape (PTFE thread seal tape)
Cleaning Faucet Aerators
- Cover the drain: Place a washcloth over the sink drain so small parts cannot fall down the pipe if dropped.
- Unscrew the aerator: Turn the aerator counterclockwise with your fingers. If it is stuck, wrap a cloth around the aerator casing and gently grip it with your wrench to turn it loose.
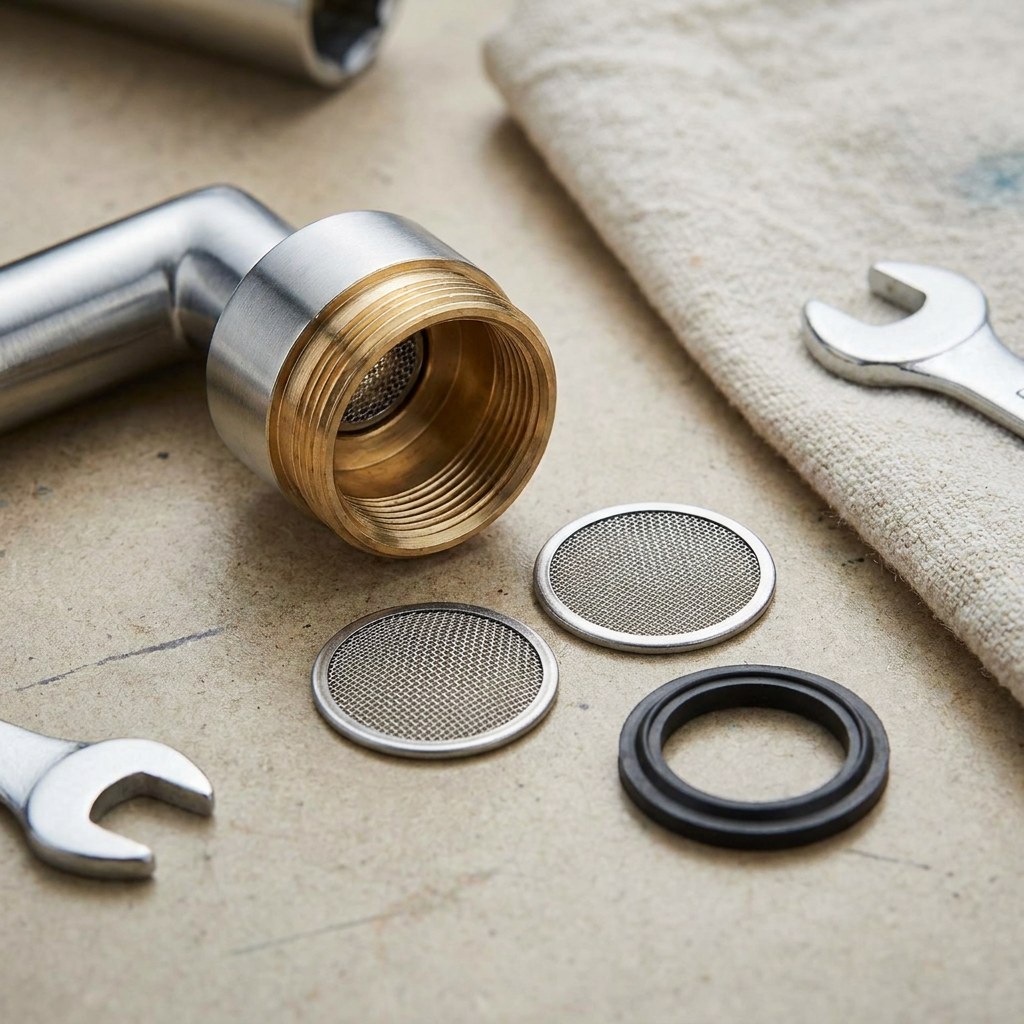
- Disassemble the parts: Note the order of the pieces as you take them apart. You will typically find an outer housing, a rubber washer, a small plastic flow restrictor, and one or two metal or plastic mesh screens.
- Soak in vinegar: Place the screens and housing in a small bowl filled with warm white vinegar. Let them sit for 30 to 60 minutes.
- Scrub and rinse: Use an old toothbrush to brush away softened mineral flakes. Rinse thoroughly under running water.
- Reassemble and test: Put the parts back in their original order, screw the aerator back on hand-tight, and run the water to check for smooth flow and no side leaks.
Cleaning Showerheads
You can clean a showerhead without removing it from the wall, or remove it for a deeper soak.
Method A: The Bag Soak (In Place)
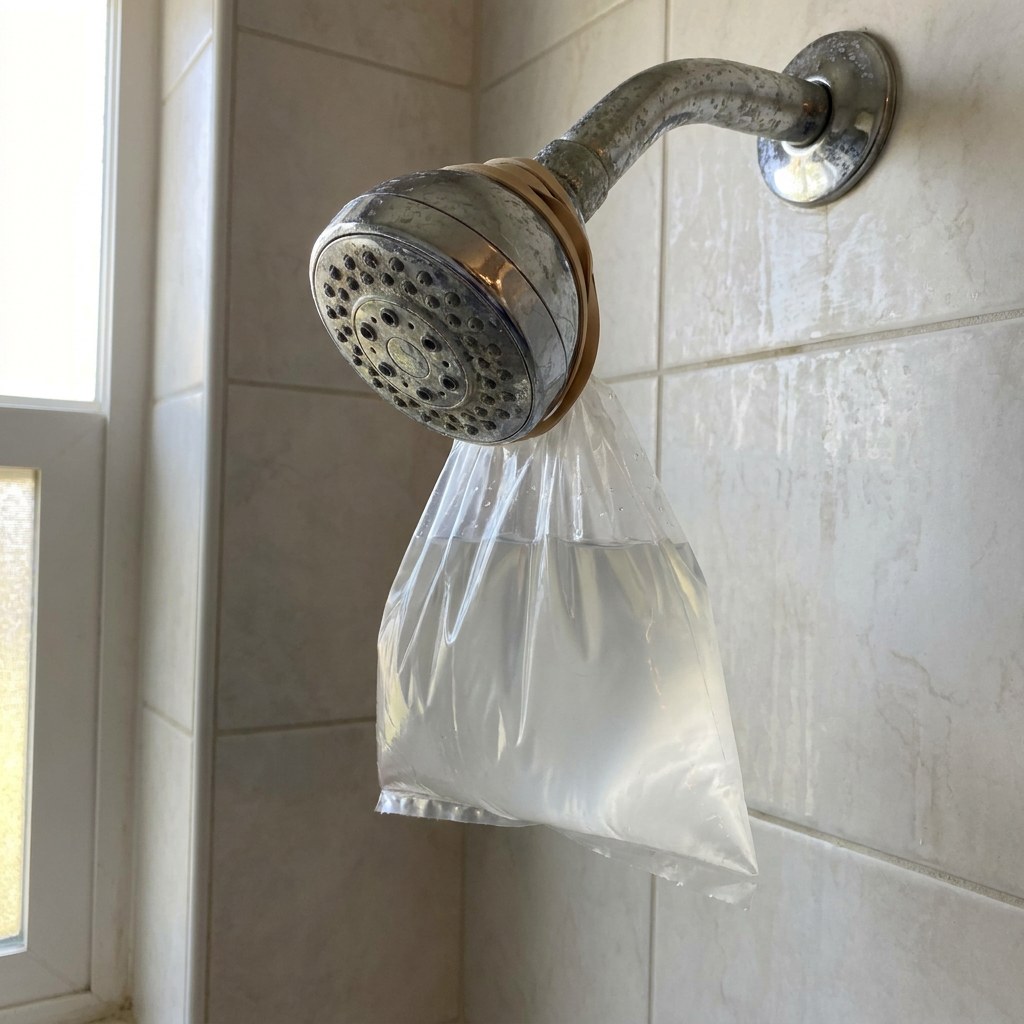
- Fill a sturdy plastic bag halfway with white vinegar.
- Slip the bag over the showerhead until the nozzles are submerged.
- Secure the bag tightly around the shower neck with a rubber band or zip tie.
- Leave it in place for 1 to 2 hours (limit to 30 minutes for brass or gold finishes).
- Remove the bag, wipe the faceplate with a cloth, and run hot water for 60 seconds to flush loose debris.
Method B: Removal and Deep Soak
- Wrap a cloth around the showerhead nut and loosen it counterclockwise with an adjustable wrench.
- Submerge the showerhead in a bucket or bowl of vinegar for 1 to 2 hours.
- Scrub the rubber nozzles with a toothbrush to dislodge stubborn buildup.
- Clean old plumber's tape off the shower arm threads.
- Wrap fresh plumber's tape clockwise around the threads two to three times.
- Thread the showerhead back on hand-tight, then tighten a quarter-turn with your wrench. Run water to confirm there are no leaks at the connection.
How Often It Should Be Done
For most homes, cleaning aerators and showerheads once every 6 to 12 months keeps water flowing evenly.
If your home has hard water (more than 7 grains per gallon) and you do not have a whole-home water softener, plan on doing this every 3 to 4 months. Keeping track of these recurring seasonal checks in an advisor tool like Casa helps ensure small tasks do not slip through the cracks while you manage everyday life.
Signs You Have Waited Too Long
It is worth checking your fixtures right away if you notice any of these warnings:
- The aerator casing will not budge, even with moderate wrench pressure.
- White, crusty buildup has formed on the outside of the spout or around the base of the handle.
- The stream separates into multiple wild sprays rather than a unified aerated column.
- Water drips continuously from the faucet neck or shower arm connection while the water is turned on, indicating internal backpressure or degraded seals.
Cost of Neglect vs. Cost of Maintenance
The economics of fixture maintenance are straightforward:
- Routine maintenance: A gallon of white vinegar costs roughly $3 to $5, and a roll of plumber's tape costs under $2. The actual maintenance cost is practically zero.
- Neglect and replacement: If mineral buildup seizes the threads or ruins the internal cartridge, replacement costs add up quickly. A quality bathroom or kitchen faucet costs between $80 and $300 for materials alone. If you hire a licensed plumber to install a replacement, professional labor typically adds another $150 to $350 depending on local rates.
Investing thirty minutes a year across your home prevents hundreds of dollars in unnecessary fixture replacements.
Safety Boundaries: When to Call a Professional
Most aerator and showerhead cleanings are safe and simple DIY tasks, but there are times when it is wise to stop:
- Frozen or corroded pipe joints: If the shower arm moves or bends inside the wall while you try to unscrew the showerhead, stop immediately. Turning too hard can snap the pipe behind your drywall, leading to water damage.
- Stripped threads: If an aerator cross-threads upon reinstallation and leaks continuously around the casing, it may require a thread repair tool or spout replacement.
- Persistent low pressure across all fixtures: If cleaning the aerators does not restore pressure, or if low pressure affects every faucet in the house simultaneously, the issue is not mineral buildup at the fixture. It may point to a failing pressure-reducing valve (PRV), a main line issue, or an undiagnosed leak requiring a licensed plumber.
How to Build This Into Your Home Maintenance Schedule
Rather than treating fixture cleaning as an isolated project, pair it with existing household routines:
- Tie it to seasonal clocks: Clean showerheads and aerators each spring and fall when you check smoke detector batteries.
- Group room by room: When deep cleaning a bathroom or kitchen, set the aerators to soak while you wipe down counters and cabinets. By the time you finish the surfaces, the aerator parts are ready to brush and rinse.
- Log it in your home profile: Adding your home's water profile and fixture schedules to Casa gives you timely reminders tailored to your local water hardness, so you can address buildup before flow ever slows down.
Ready to Move Forward
Restricted water flow and mineral crust are common, manageable parts of owning a home. With a bottle of vinegar, an adjustable wrench, and a few minutes of patience, you can protect your fixtures, preserve steady water pressure, and avoid premature replacement costs.
Managing a home is simpler when you have the right guidance at the right time. Download the Casa app to track routine maintenance, log fixture details, and keep your home operating smoothly year-round.