
Dec 26, 2025
How to Fix Misaligned Cabinets A Step by Step Guide
Misaligned cabinets can make your kitchen look messy and prevent doors from closing properly. Learn how to diagnose the issue, adjust wall and base cabinets, and perfectly align your cabinet doors with our easy-to-follow DIY guide.
It’s one of those little things that can drive you crazy. You walk into your kitchen and notice it right away—the gaps between your cabinet doors are uneven, one door hangs slightly lower than the other, or maybe a drawer scrapes against the frame every time you open it. Misaligned cabinets don't just look off; they can also be a functional nuisance, preventing doors and drawers from closing smoothly.
Looking for more guidance? Take a look at our Repairs overview.
The good news is that you don't have to live with it. In most cases, fixing misaligned cabinets is a straightforward DIY project that you can tackle in an afternoon with just a few common tools. It’s one of those fixes that provides a huge amount of satisfaction for a relatively small amount of effort.
Whether your house has settled over time, your floors are a bit uneven, or the original installation wasn't quite perfect, we’re here to walk you through it. Think of us as your friendly expert on the other end of the line, guiding you step-by-step. Let’s get those cabinets looking sharp and working perfectly again.
Why Do Cabinets Become Misaligned?
Before we grab our tools, it helps to understand what causes this common household headache. Cabinets can shift out of alignment for several reasons:
- House Settling: All homes settle over time. This gradual movement can cause walls and floors to shift slightly, pulling your perfectly installed cabinets out of alignment.
- Uneven Walls or Floors: If the wall or floor wasn't perfectly level when the cabinets were installed, they may have been forced into position. Over time, gravity and use can cause them to settle into their natural, un-level state.
- Heavy Loads: Overloading your cabinets, especially wall-mounted ones, can cause strain on the mounting screws and the cabinet box itself, leading to sagging.
- Humidity and Temperature Changes: Wood expands and contracts with changes in humidity. These subtle shifts can affect the fit of doors, drawers, and the cabinet boxes themselves.
- Loose Screws or Hinges: Sometimes, the fix is as simple as tightening a few loose screws that have worked their way out over years of opening and closing doors.
Getting Started: Tools You'll Need
You won't need a full workshop for this job. Here’s a short list of tools and materials that will cover most cabinet alignment issues:
- 4-foot Level: This is your most important tool. A shorter level can work, but a 4-foot level gives you a much more accurate reading across the span of the cabinet.
- Phillips Screwdriver: Most cabinet mounting and hinge screws are Phillips head.
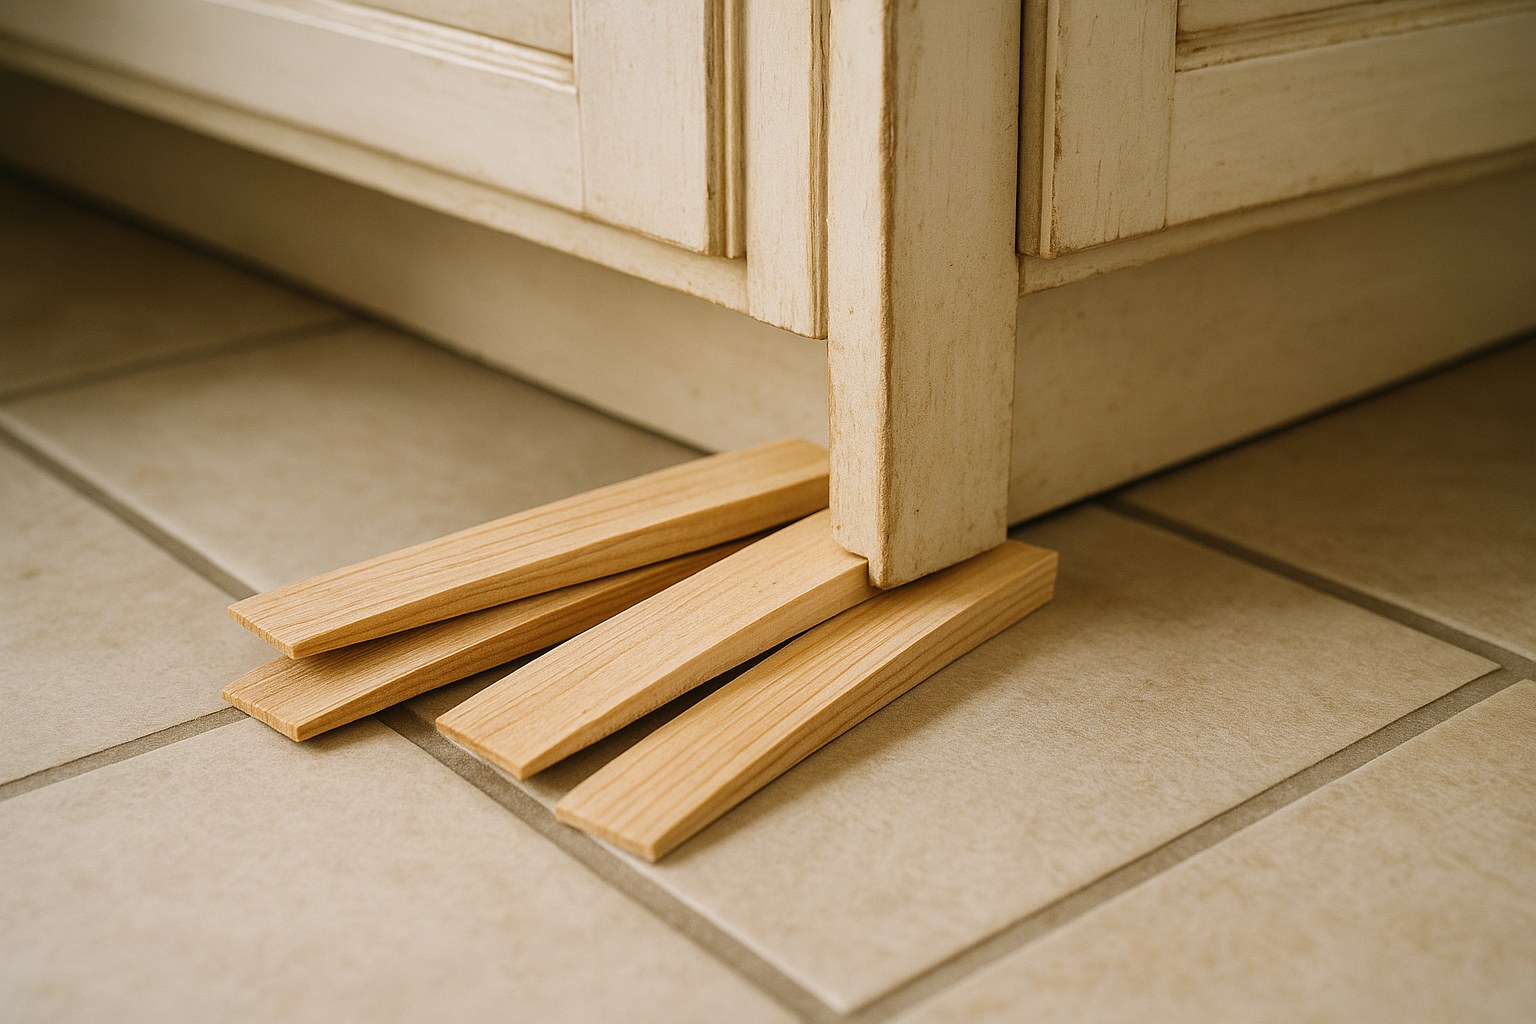
- Wood Shims: These thin, wedge-shaped pieces of wood are essential for filling gaps between the cabinet and an uneven wall or floor.
- Utility Knife: To score and snap off the excess length of the shims for a clean finish.
- A Helper (Recommended): Especially when working with wall cabinets, having an extra set of hands to hold the cabinet steady makes the job much safer and easier.
Step 1: Diagnose the Problem - Wall Cabinets vs. Base Cabinets
First things first, let's figure out what we're working with. Take a step back and look at your cabinets. Are the misaligned ones mounted high up on the wall, or are they the ones sitting on the floor, likely with a countertop on top?
- Wall-Mounted Cabinets: These are the upper cabinets, attached directly to the wall studs.
- Base Cabinets: These are the lower cabinets that rest on the floor.
The method for leveling them is slightly different, so it's important to identify which type you're dealing with before you begin. If both are misaligned, it's generally best to start with the wall cabinets first.
How to Level and Align Wall-Mounted Cabinets
If your upper cabinets are the culprits, let's get them back in line.
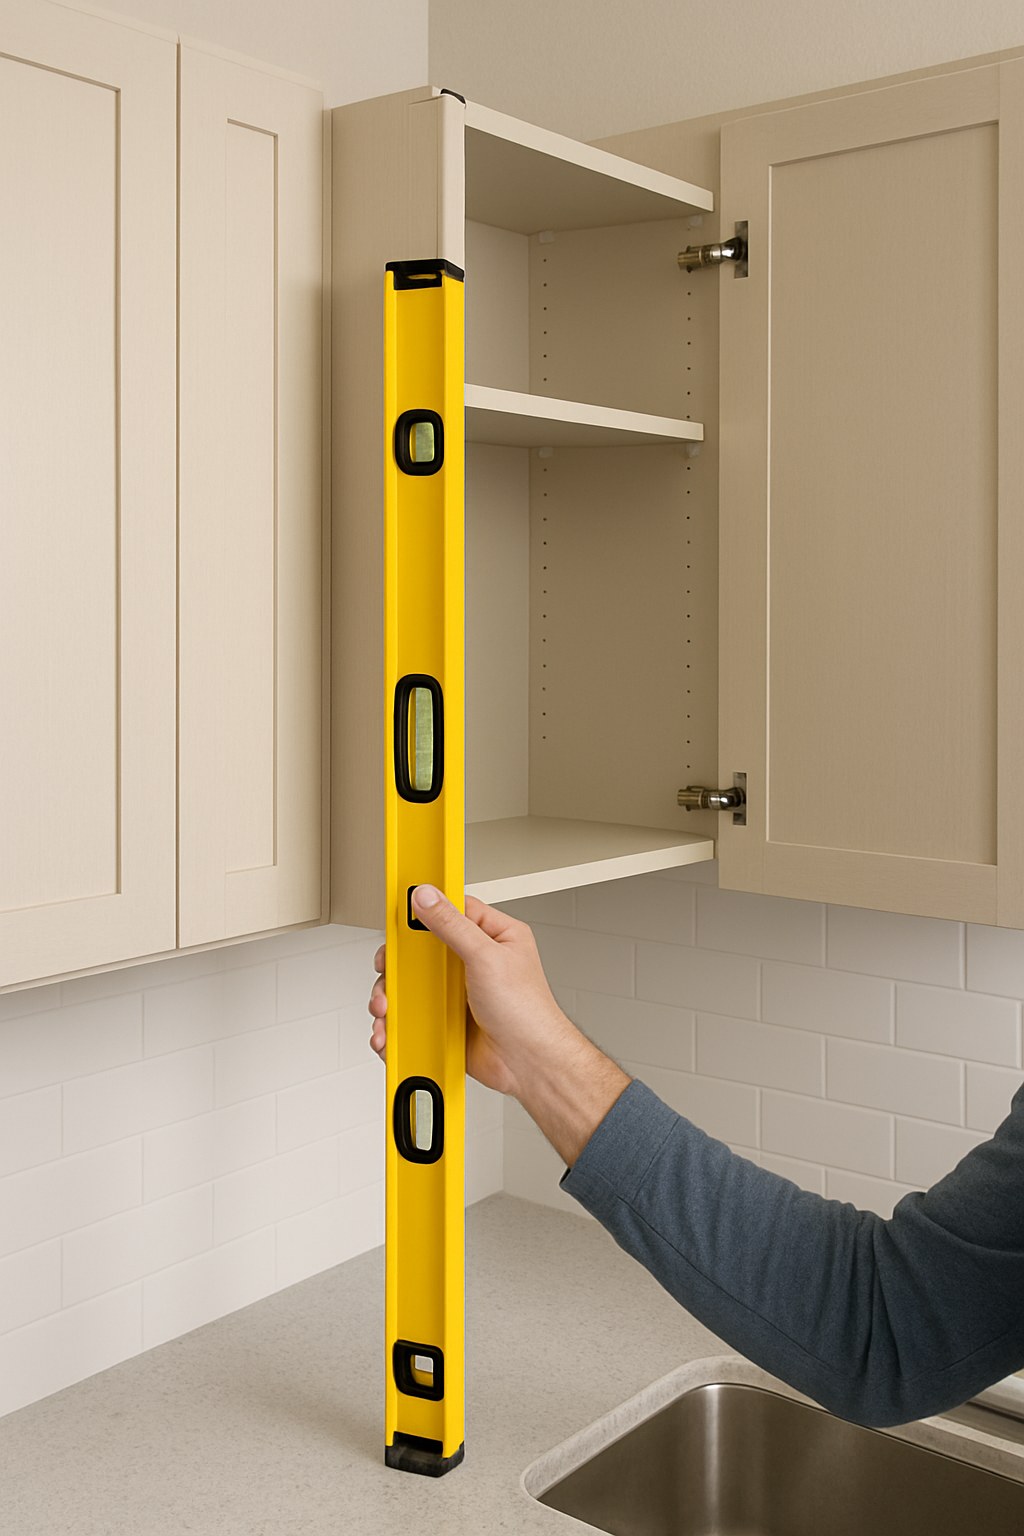
1. Prepare and Check for Level
Before you make any adjustments, you need to get an accurate reading.
- Empty the Cabinet: Remove everything from the shelves. The weight of dishes, food, and other items can cause the cabinet to sag, which will throw off your level reading.
- Check the Side: Place your 4-foot level vertically against the side of the cabinet box (not the door). Look at the bubble in the vial. Is it perfectly centered? If not, the cabinet is leaning forward or backward.
If the bubble is not centered, it often means the wall behind it isn't perfectly flat. Don't worry, this is very common, and we can fix it with shims.
If the bubble is centered, the cabinet box itself is plumb (perfectly vertical), but it might be tilted left or right or sagging. The problem likely lies with the mounting screws.
2. The Fix: Using Shims for an Uneven Wall
This is for when your level shows the cabinet is leaning forward or backward.
- Get Your Helper: Ask your helper to press firmly against the bottom of the cabinet to hold it securely against the wall.
- Loosen the Top Screw: Inside the cabinet, find one of the top mounting screws. Using your Phillips screwdriver, loosen it about half a turn. You just want it loose enough to slide a thin shim behind it.
- Insert Shims: Slide one or two wood shims into the gap created between the back of the cabinet and the wall, right near the screw you just loosened.
- Tighten and Check: Snug the screw back up (don't overtighten it yet). Place your level against the side again. Is the bubble closer to the center?
- Repeat as Needed: Repeat this process for the other mounting screws, adding shims where needed, until your level shows the bubble is perfectly centered. You may need to add shims at the top or bottom, depending on which way the cabinet is leaning.
- Trim the Shims: Once the cabinet is perfectly plumb, use your utility knife to carefully score the shims where they stick out. You should be able to snap them off cleanly for a hidden repair.
3. The Fix: Adjusting Mounting Screws
This is for when the side of the cabinet is plumb, but it's tilted or sagging.
- Support the Cabinet: Have your helper brace the bottom of the cabinet, ready to take its weight.
- Loosen All Screws: Slightly loosen all the mounting screws inside the cabinet.
- Reposition the Cabinet: Gently push or lift the cabinet box into the correct position. Use your level placed horizontally along the top or bottom inside edge to check when it's level.
- Tighten Everything Up: While your helper holds the cabinet perfectly in its new, level position, tighten all the mounting screws securely.
How to Level and Align Base Cabinets
Now, let's tackle those lower cabinets. The process is similar, but instead of fighting gravity, we're dealing with uneven floors.
1. Prepare and Check for Level
- Clear the Countertop: Remove everything from the countertop above the cabinet you're working on.
- Check the Top: Place your 4-foot level across the top front edge of the cabinet (or on the countertop directly above it). Is the bubble centered? If not, note which side is lower.
If the bubble is not centered, the floor underneath is likely uneven, and you’ll need to use shims to level the cabinet.
If the bubble is centered, the issue may be with how the cabinet is secured to the wall.
2. The Fix: Shimming for an Uneven Floor
This is the most common fix for base cabinets.
- Empty the Cabinet: Just to be safe and reduce weight, take everything out of the cabinet.
- Identify the Low Spot: Your level already showed you which side is low. This is where you'll be inserting the shims.
- Lift and Shim: You may need to gently pry up the front edge of the cabinet's base. Slide shims under the low corner. Often, you can just tap them into place without much lifting.
- Check and Adjust: Place the level back on top. Keep adding or adjusting the shims until the bubble is perfectly centered.
- Secure the Cabinet: Once level, it's a good idea to drive a screw through the back panel of the cabinet into a wall stud to ensure it doesn't shift over time.
- Trim the Shims: Score and snap off the excess shim material so it's hidden from view. You can often hide the shim behind the cabinet's toe-kick.
3. The Fix: Adjusting Mounting Screws
If the cabinet is level front-to-back and side-to-side but seems tilted away from the wall:
- Locate the Screws: Find the mounting screws securing the cabinet to the wall, usually along a rail at the top of the cabinet box.
- Loosen and Adjust: Loosen each screw about one full turn. Push the top of the cabinet box firmly against the wall until it's plumb (use your level on the side to check).
- Tighten and Secure: While holding it steady, tighten all the screws.
The Final Touch: Adjusting the Cabinet Doors
After you’ve leveled the cabinet boxes, the doors themselves may still look crooked. This is where the final, fine-tuning happens. Most modern cabinets use European-style hinges that are highly adjustable.
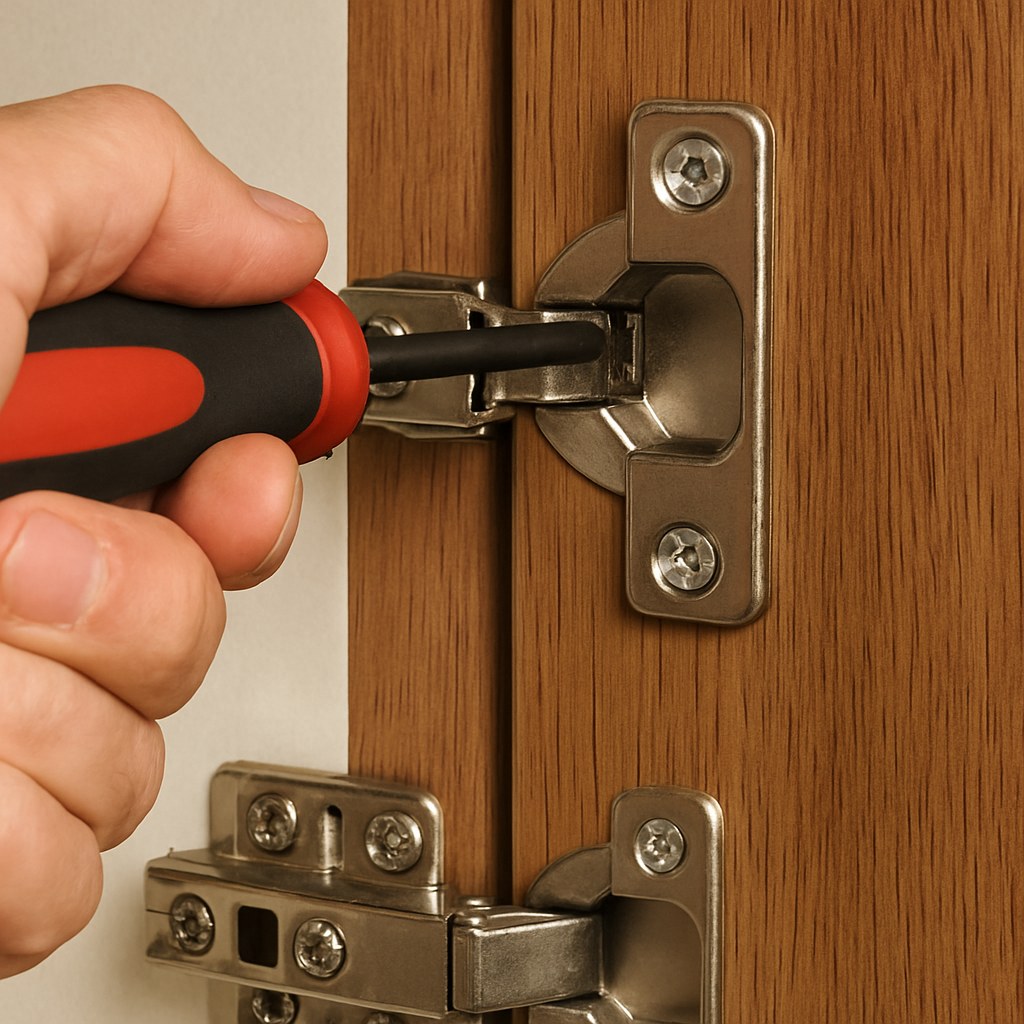
Look at the hinge inside the door. You’ll usually see two or three screws:
- Side-to-Side Screw: This screw moves the door left or right, closing or widening the gap between doors.
- Depth Screw: This screw, usually at the back, moves the door closer to or further from the cabinet frame.
- Height Screw: Some hinges have a screw that allows for small up-and-down adjustments. On others, you may need to loosen the two screws holding the hinge plate to the cabinet frame and manually slide the door up or down.
Make small, incremental adjustments—a quarter-turn at a time—and close the door after each adjustment to check your progress. It takes a little patience, but you can achieve perfect, even gaps with this method.
When Is It Time to Call a Professional?
While most alignment issues are DIY-friendly, there are times when you should call for backup. If you've tried these steps and things still aren't right, or if you notice any of the following, it's best to contact a professional handyman or carpenter:
- The cabinet feels loose or unstable even after tightening the screws.
- The wall or floor is severely uneven.
- You see signs of water damage or rot on the cabinet or wall.
- The cabinet box itself is cracked or falling apart.
Hiring a professional handyman can cost anywhere from $60 to $140 per hour, according to Thumbtack. It's a worthwhile investment if you're dealing with a larger structural issue.
Your Cabinets Are Aligned—Now What?
Congratulations! Step back and admire your handiwork. Those perfectly straight lines and even gaps make a huge difference in the overall look and feel of your room. You’ve not only improved your home's appearance but also its function.
For more easy-to-follow guides on common home repairs, from plumbing puzzles to electrical enigmas, download the Casa app today. Casa puts expert advice in your pocket, helping you tackle DIY projects with confidence and connecting you with trusted local pros when you need one. Take control of your home maintenance with Casa