The good news is that catching it early can save you from a complete tear-down. Whether you've noticed a few soft spots on the surface or you're worried about something more serious, we're here to walk you through it. Think of us as your expert on the line, ready to help you diagnose the problem and figure out the best course of action.
This guide will show you how to inspect your deck like a pro, determine the extent of the damage, and confidently tackle the repairs yourself.
What Causes Deck Rot in the First Place?
Before we grab our tools, it helps to understand the enemy. Wood rot is caused by a combination of two things: moisture and fungus. When wood stays damp for extended periods, it becomes a breeding ground for fungi that feed on the wood fibers, breaking them down and causing them to become soft, spongy, and weak.
Common culprits for a rotting deck include:
- Poor Drainage: Water pooling on the surface or around support posts.
- Trapped Debris: Leaves, dirt, and pine needles stuck between deck boards hold moisture against the wood.
- Lack of Sealing: Unprotected wood is like a sponge, soaking up rain and humidity.
- Inadequate Ventilation: Poor airflow underneath the deck can trap dampness, leading to rot from the bottom up.
Understanding these causes will not only help you fix the current problem but also prevent it from happening again.
Step 1 Your In-Depth Deck Inspection
First things first, we need to play detective. We have to figure out exactly where the rot is and how deep it goes. This initial inspection is the most crucial step, as it will determine whether you're facing a simple DIY fix or a job for a professional.
Grab a few tools and let's get started. You'll need:
- Safety glasses and work gloves
- A powerful flashlight
- A flathead screwdriver
Now, follow these steps to perform a thorough inspection:
- Examine the Surface Boards: Start by walking across the entire deck. Look closely at the deck boards for any suspicious areas. Telltale signs of rot include dark, discolored stains, splintering or cracking, and wood that looks waterlogged or feels spongy underfoot.
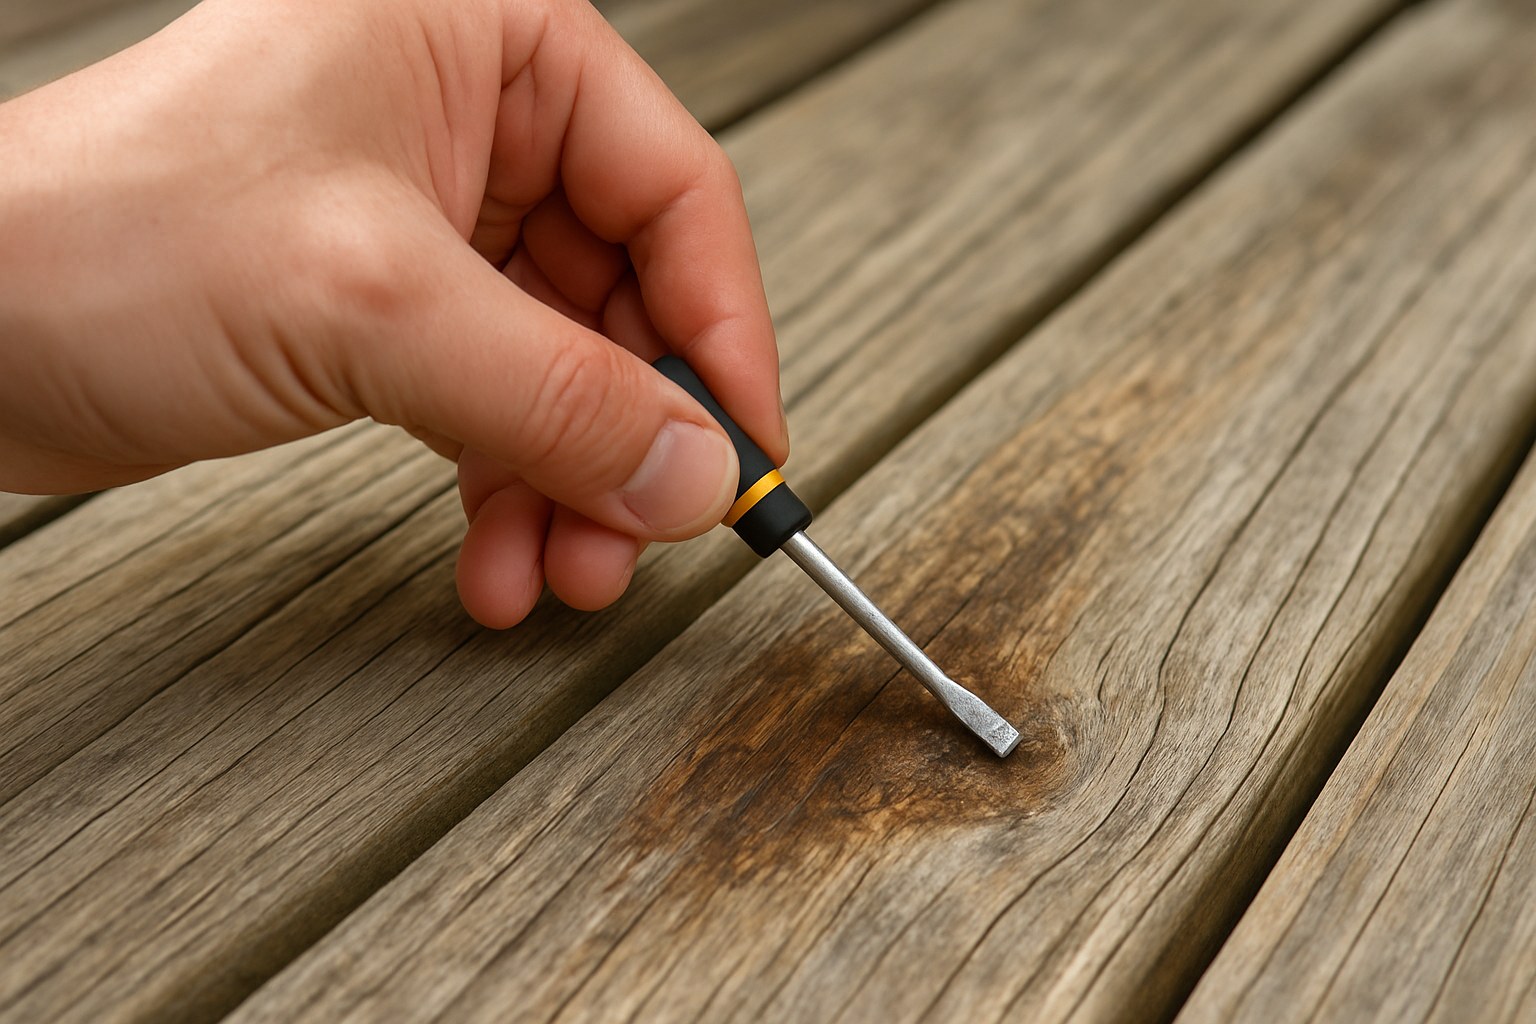
- The Screwdriver Test: This is the best way to confirm rot. Find a spot that looks questionable and press the tip of your flathead screwdriver into the wood. Healthy wood is firm and will resist the pressure. If the screwdriver sinks in easily, or if the wood flakes away without much effort, you've found rot. Test several spots, especially around screw heads and board ends where water tends to collect.
- Check the Gaps: Look in the gaps between the deck boards. Are they filled with old leaves or dirt? This trapped debris is a major cause of rot, so pay close attention to the board edges in these areas.
- Inspect the Underside (The Substructure): Now for the most important part. Get down on your hands and knees and use your flashlight to look underneath the deck. You need to carefully examine the support structure: the joists (the horizontal supports that the deck boards are attached to), the beams (the thicker boards that support the joists), and the posts (the vertical supports holding everything up).
- Probe the Structure: Just like you did with the surface boards, use your screwdriver to probe the joists, beams, and posts. Pay special attention to areas where wood connects with wood or with concrete footings, as these joints can trap moisture.
Assessing the Damage Is it a DIY Fix or Time to Call a Pro?
Once your inspection is complete, you'll know exactly what you're dealing with. The results will fall into one of three categories.
Scenario 1 The Rot is in the Structure (Joists, Beams, or Posts)
If your screwdriver test revealed soft, rotting wood in any of the structural components, stop right there. This is no longer a DIY project. The frame is the backbone of your deck, and any compromise to its integrity can lead to a catastrophic collapse.
Our Recommendation: Call a licensed deck contractor immediately. Repairing the substructure is a complex job that requires specialized knowledge to ensure the deck is safe and up to code. A professional can assess the damage and safely replace the rotten structural members.
Scenario 2 The Entire Surface of the Deck is Rotting
If the structure underneath is solid, but most of the surface boards are rotten, you're looking at a deck resurfacing project. This is a bigger job than replacing a few boards, but it's still manageable for a homeowner with solid DIY skills. Resurfacing involves removing all the old deck boards and replacing them with new ones.
Scenario 3 The Rot is Limited to a Few Deck Boards
This is the best-case scenario! If the substructure is sound and the rot is confined to just a few isolated boards, you have a straightforward and satisfying DIY project ahead of you. Replacing individual deck boards is the most common type of deck rot repair.
How to Replace Rotten Deck Boards
Ready to get your hands dirty? Let's replace those bad boards. The process is the same whether you have spare matching boards lying around or need to buy new ones.
Tools & Materials:
- Safety glasses and work gloves
- Pry bar
- Drill or impact driver
- Tape measure
- Circular saw (if you need to cut new boards)
- Replacement wood deck boards
- New coated wood screws designed for outdoor use
Step-by-Step Guide:
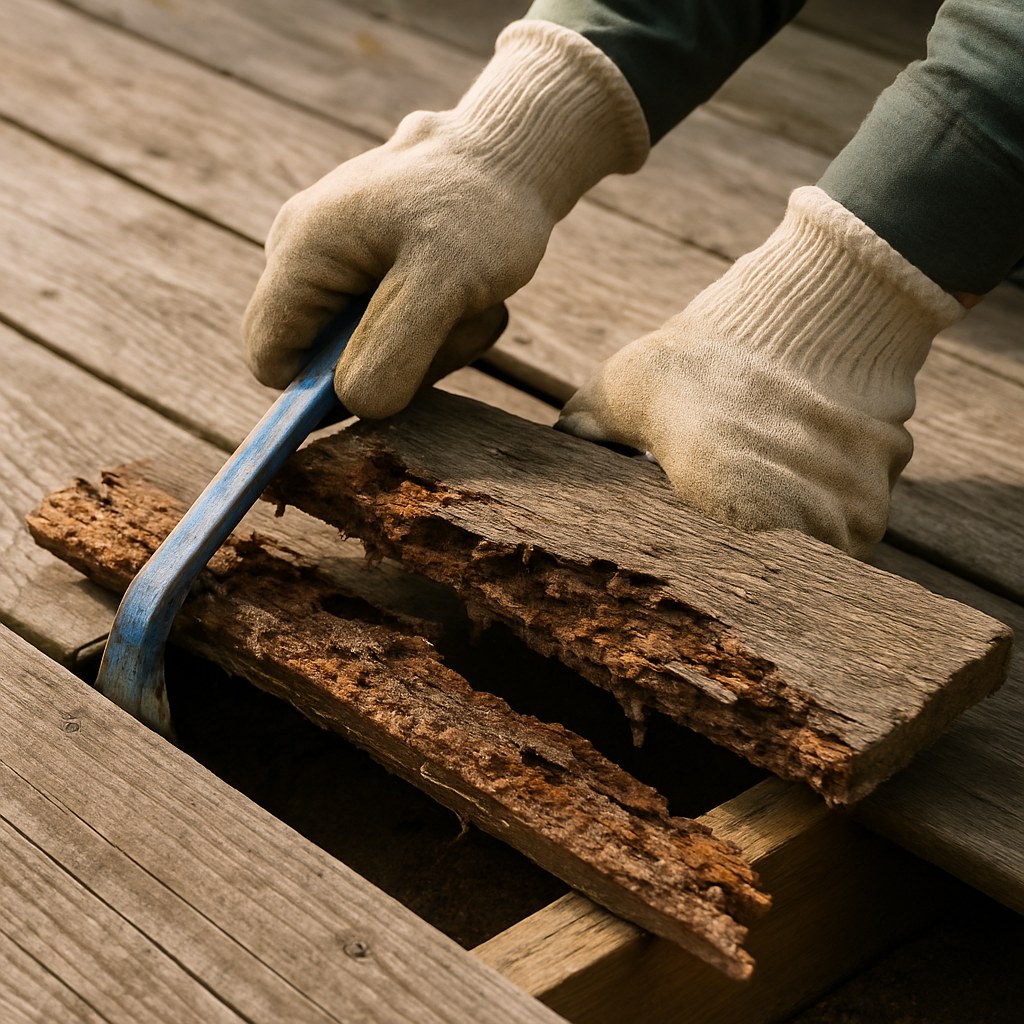
- Pry Up the Damaged Board: Carefully work your pry bar under the rotten board near a joist. Gently lift it up just enough to get some space. Work your way down the length of the board, prying it up from each joist.
- Remove the Old Screws: Once the board is loosened, use your drill to back out all the screws holding it to the joists. If the screws are rusted and stripped, you may need to use locking pliers to twist them out.
- Remove the Board: Lift the old, rotten board out and set it aside for disposal.
- Source Your Replacement Board:
- If you have spares: Great! Find a matching board.
- If you need to buy new: Take a piece of the old board (or at least its measurements and a clear photo) to a building supply store. Match the material (e.g., pressure-treated pine, cedar), thickness, and width as closely as possible.
- Cut to Length: Measure the opening and use your circular saw to cut the new board to the perfect length.
- Install the New Board: Place the new wood deck board onto the joists. Be sure to leave a small gap (about 1/8-inch, or the width of a nail) between it and the neighboring boards. This gap is crucial for water drainage. A good tip for durability is to install the board with the growth rings (the "smile" in the grain) facing down to prevent cupping.
- Fasten it Down: Drive two new wood screws through the board into each joist it crosses.
- Test for Firmness: Walk over the new board. It should feel completely solid and level with the rest of the deck.
If the board feels firm, congratulations—you've successfully repaired your deck!
What Does Deck Repair Cost?
The cost can vary wildly depending on the extent of the damage and whether you DIY or hire a pro.
- DIY Board Replacement: This is incredibly cost-effective. You're only paying for the materials. A single pressure-treated deck board might cost between $15 and $40, depending on length and location.
- Professional Repair: According to HomeAdvisor, hiring a professional to replace a few boards can cost between $200 and $500.
- Deck Resurfacing: A full resurfacing project can range from $5 to $15 per square foot for labor and materials.
- Structural Repair: This is the most expensive scenario, often running into thousands of dollars, as it requires significant labor and expertise.
The Best Offense is a Good Defense How to Prevent Deck Rot
Once your deck is repaired, you'll want to keep it that way. Prevention is key:
- Clean Regularly: Sweep your deck often to remove leaves, dirt, and other debris that can trap moisture.
- Seal or Stain Annually: Apply a high-quality water-repellent sealer or stain every 1-3 years. This is the single most important thing you can do to protect the wood.
- Ensure Good Ventilation: Make sure there's clear airflow under your deck. Don't let plants or storage block ventilation.
- Promote Drainage: Ensure gutters and downspouts direct water away from the deck and its foundation.
Take Control of Your Home Maintenance
Fixing a rotting deck board is a powerful way to protect your investment and ensure your family's safety. By following these steps, you can confidently assess the damage and handle the repairs yourself.
But we know home maintenance doesn't stop here. From a leaky faucet to a flickering light, there's always something new to tackle. That's why we created Casa.
Download the Casa app today for step-by-step guidance on hundreds of home repair projects. Our easy-to-follow instructions, tool lists, and expert tips empower you to manage your home with confidence. And if you ever run into a job that's too big, Casa can connect you with trusted, local professionals to get it done right. Don't wait for the next problem to arise—be prepared with Casa.
Related Reading


